1. Introduction
This manual provides detailed instructions for the installation, operation, and maintenance of your Nilight 31-Inch 150W LED Light Bar. Please read this manual thoroughly before installation and use to ensure proper function and safety.
2. Safety Information
- Always disconnect the vehicle's battery before performing any electrical work.
- Ensure all wiring connections are secure and properly insulated to prevent short circuits.
- Do not look directly into the light bar when it is illuminated, as it can cause eye damage.
- Mount the light bar securely to prevent it from dislodging during vehicle operation.
- Check local regulations regarding auxiliary lighting before use on public roads.
3. Package Contents
Verify that all components are present before beginning installation:
- 1 x 150W LED Light Bar
- 1 x Wiring Harness
- Mounting Brackets (2 styles: High and Low)
- Hardware (screws, nuts, washers, Allen key)
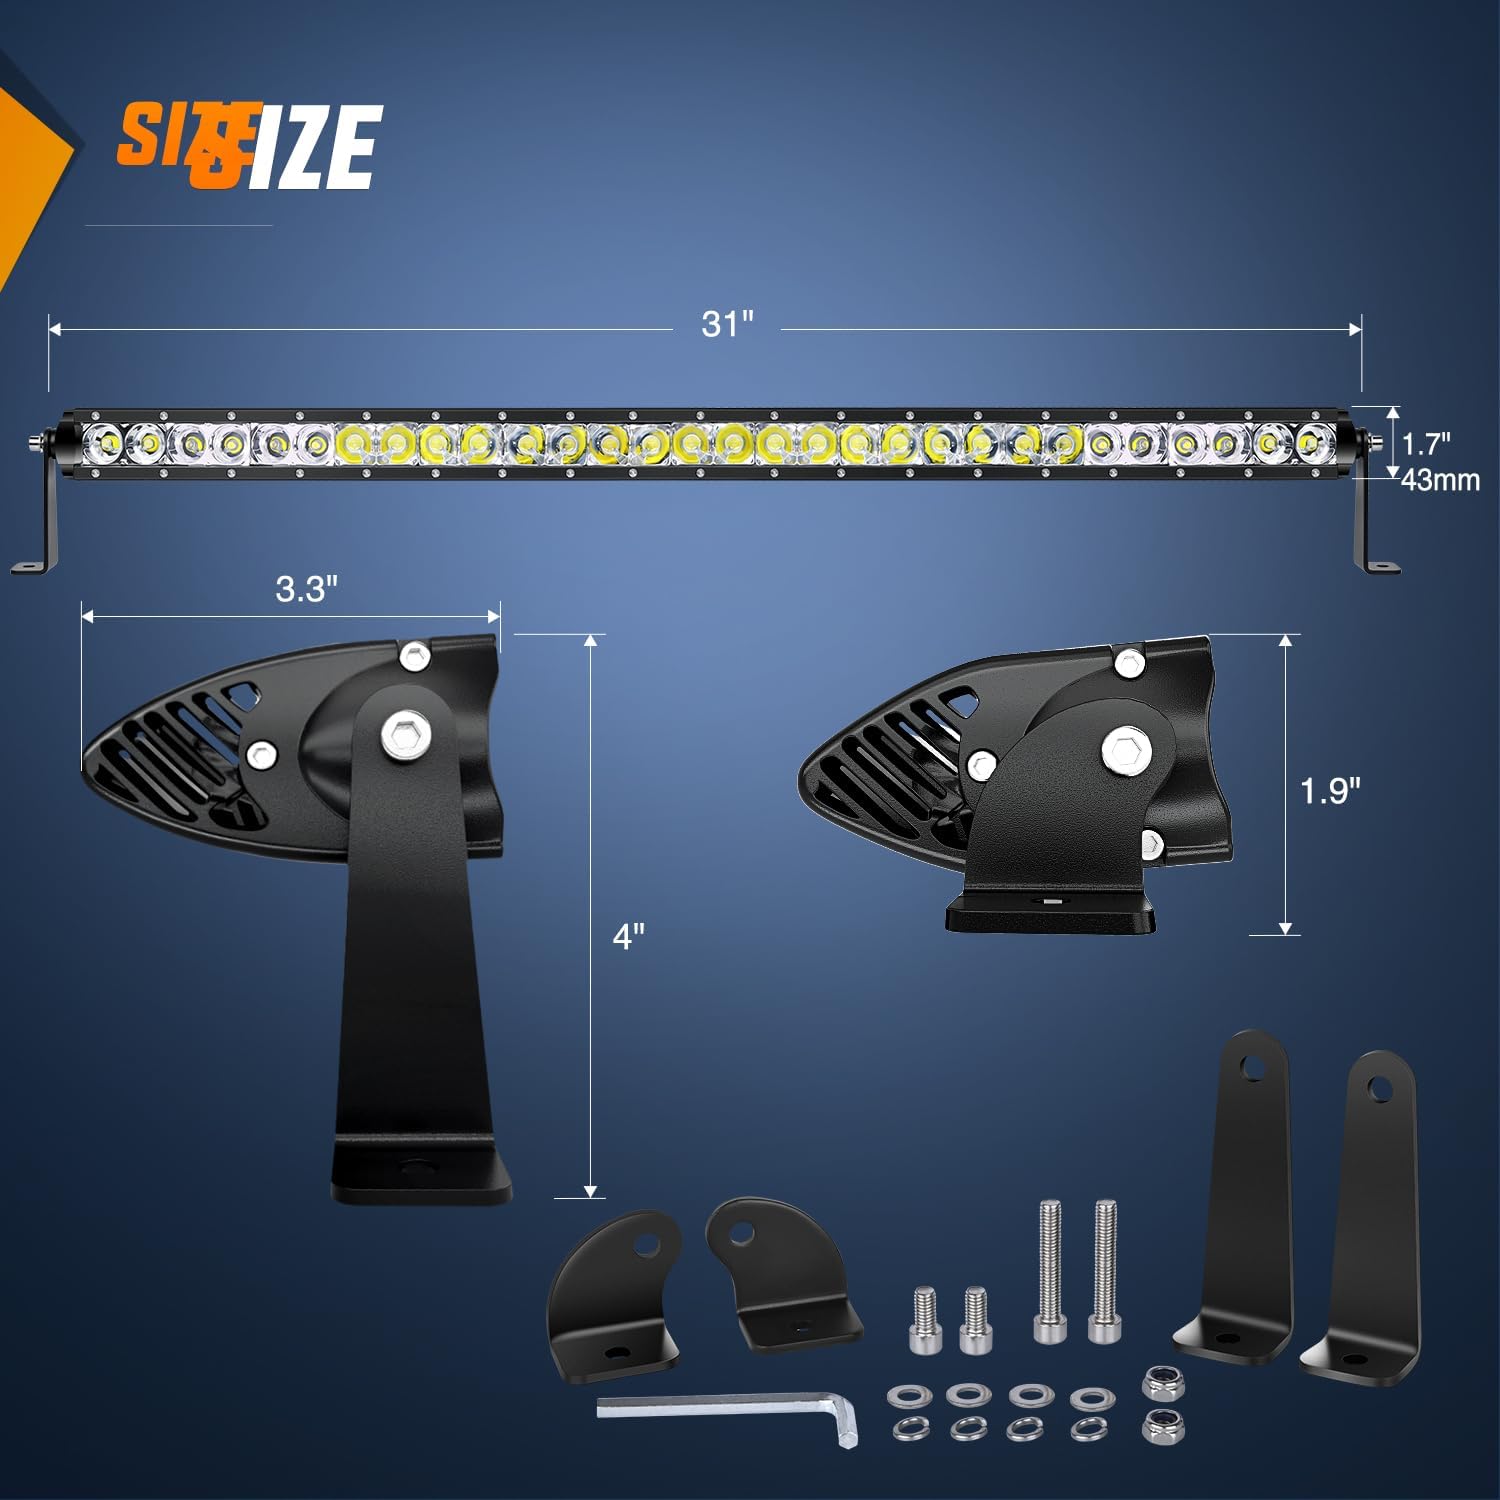
Image: The Nilight 31-inch LED Light Bar is shown with its dimensions (31 inches long, 1.7 inches high, 3.3 inches deep for the bracket, 4 inches total height with bracket). Various mounting hardware components, including two styles of brackets (low and high), screws, nuts, and an Allen key, are laid out below the light bar.
4. Specifications
| Feature | Specification |
|---|---|
| Model Number | ZH029 |
| Dimensions | 31"L x 3"W x 4"H |
| Wattage | 150 Watts |
| Brightness | 14500 Lumens |
| Color Temperature | 6000 Kelvin |
| Voltage | 12 Volts (DC) |
| Amperage | 12.5 Amps |
| Light Source Type | Light Emitting Diode (3D projectors, advanced LED chips) |
| Beam Pattern | Spot & Flood Combo Beam |
| Material | Aluminum Housing, Shatterproof PC Lenses |
| Finish Type | Painted |
| Mounting Type | Adjustable/Variable Mount (High/Low adjustable stainless steel bracket) |
| Waterproof Rate | IP67 |
| Lifespan | Over 30,000 hours |
5. Setup and Installation
Follow these steps for proper installation of your LED light bar:
5.1 Mounting the Light Bar
The light bar comes with two styles of adjustable mounting brackets to suit various installation needs. Choose the bracket style that best fits your vehicle and desired light bar position.

Image: This image illustrates two different mounting bracket styles for the Nilight LED Light Bar: 'Low Mounting Brackets' and 'High Mounting Brackets'. Each style shows a three-step process for attaching the bracket to the light bar and then to the vehicle, along with all necessary hardware.

Image: A close-up view of the adjustable mounting bracket, demonstrating its ability to pivot and adjust the angle of the light bar. This allows for precise aiming of the light beam.
5.2 Wiring the Light Bar
The included wiring harness simplifies the connection process. Connect the light bar to your vehicle's 12V DC power source using the provided harness. It includes a relay and fuse for protection.

Image: A detailed wiring diagram showing the connections for the Nilight LED Light Bar. It illustrates the power connection to the switch (6.56 ft), the relay to the battery (2.76 ft), and the extension to the light bar (10 ft). A 5-pin on/off rocker switch with SPST design is highlighted as a recommended option.
Video: This video provides a comprehensive installation and demonstration of the Nilight LED Light Bar. It covers the mounting process, wiring connections, and showcases the light bar's brightness in various conditions. The video highlights the ease of installation and the significant light output.
Video: This video demonstrates a super easy installation process for the Nilight LED Light Bar, emphasizing its bright output. It walks through the steps required to mount and connect the light bar, showcasing its functionality and performance.
6. Operating Instructions
The Nilight 31-Inch 150W LED Light Bar features a spot and flood combo beam pattern, providing both focused long-distance illumination and wide-area coverage.
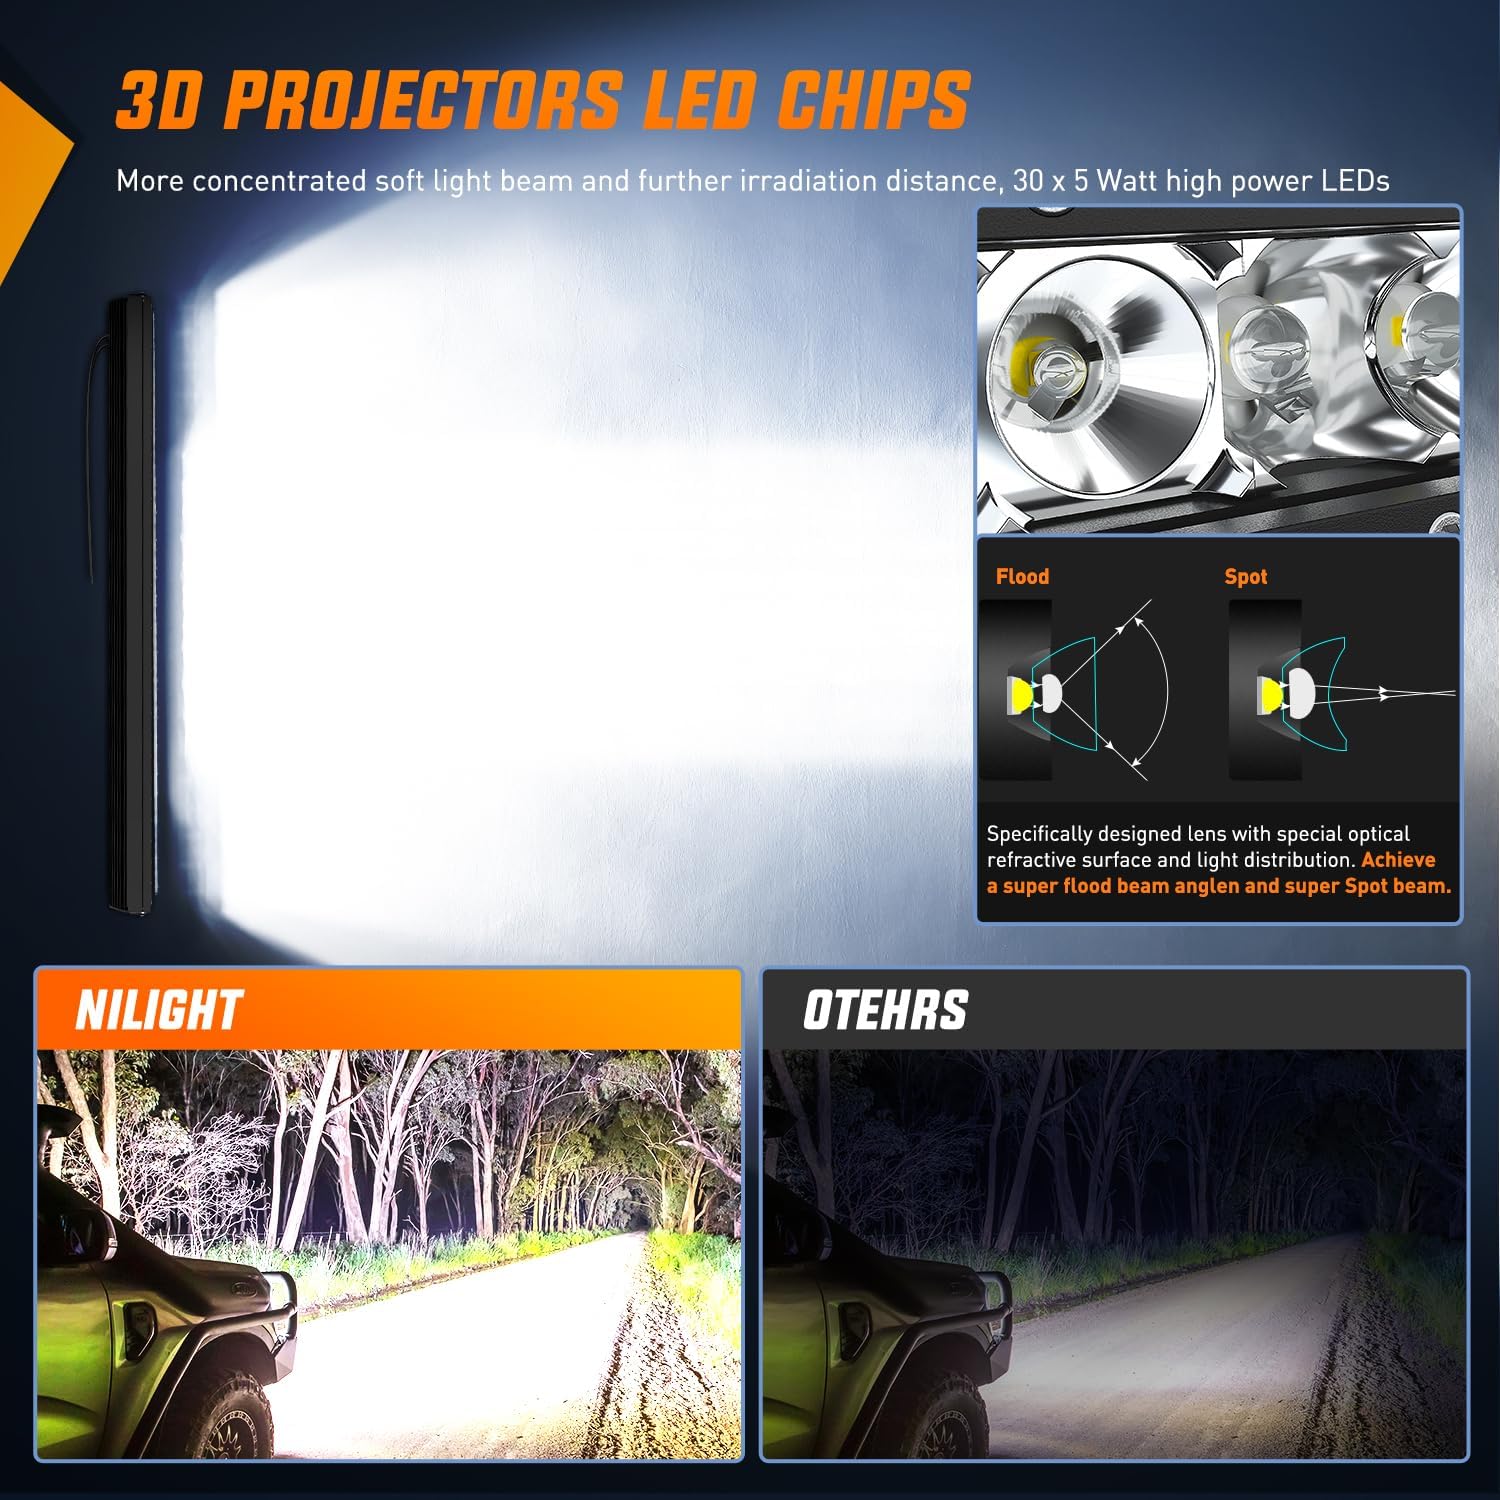
Image: This diagram illustrates the light distribution from the 3D projectors and advanced LED chips, showing both the concentrated spot beam for distance and the wider flood beam for area illumination. A comparison is shown between Nilight's superior light output and that of other brands.

Image: A close-up view of the LED light bar's reflectors, highlighting the distinct designs for spot and flood beams. The image also includes diagrams illustrating how light is refracted to achieve these specific beam patterns.
Activate the light bar using the installed toggle switch. For optimal visibility, use the light bar in off-road conditions or when additional illumination is needed beyond standard headlights.
7. Maintenance
To ensure the longevity and performance of your Nilight LED Light Bar, follow these maintenance guidelines:
- Cleaning: Regularly clean the lens with a soft cloth and mild soap to remove dirt and debris that may obstruct light output. Avoid abrasive cleaners.
- Inspection: Periodically check all mounting hardware and wiring connections for tightness and signs of wear or corrosion. Tighten as necessary.
- Waterproofing: The light bar features an IP67 waterproof rating, meaning it is protected against dust and can withstand immersion in up to 1 meter of water for 30 minutes. Ensure the seals remain intact.

Image: This diagram highlights the IP67 waterproof features of the LED light bar, including a waterproof silica gel strip, rubber pad, potting glue sealed wire, and a fully sealed screw and wire outlet. It visually explains how these components contribute to the light bar's water resistance, including a depiction of the light bar submerged in water.

Image: This image illustrates the 'Better Heat Dissipation' design of the light bar, featuring special designed aluminum alloy cooling fins. Arrows indicate airflow through the fins, demonstrating how heat is effectively dissipated to extend the lifespan of the LEDs to over 30,000 hours. A cross-section of the heat sink is also shown.
8. Troubleshooting
If you encounter issues with your Nilight LED Light Bar, refer to the following common troubleshooting steps:
- Light Bar Not Turning On:
- Check the wiring connections to ensure they are secure and properly connected to the battery and switch.
- Inspect the fuse in the wiring harness. Replace if blown.
- Verify the vehicle's battery has sufficient charge.
- Dim or Flickering Light:
- Ensure all electrical connections are clean and tight. Loose connections can cause voltage drops.
- Check for any damage to the wiring harness.
- Condensation Inside Lens:
- While the light bar is IP67 rated, extreme temperature changes can sometimes cause minor condensation. This usually dissipates on its own.
- If persistent or excessive, inspect the seals around the lens and wire entry points for any damage or gaps. Re-sealing with appropriate automotive-grade sealant may be necessary.
9. Warranty
The Nilight 31-Inch 150W LED Light Bar comes with a 2-year warranty. This warranty covers manufacturing defects and ensures the product meets specified quality standards. Please retain your proof of purchase for warranty claims.
10. Support
For further assistance, technical support, or warranty inquiries, please visit the official Nilight website or contact their customer service department. Contact information can typically be found on the product packaging or the brand's official online store.
Nilight Official Store: Visit the Nilight Store on Amazon


