1. Introduction
The AWithZ H2 Spot Welder is a compact, portable, and versatile tool designed for precise spot welding of various battery types and thin metal sheets. Featuring an integrated design, an intuitive OLED display, and 99 adjustable power levels, it is suitable for both professional battery maintenance and DIY projects. This manual provides essential information on the product's features, setup, operation, and maintenance to ensure safe and effective use.
Safety Information
- Always wear appropriate personal protective equipment, including safety glasses, when operating the spot welder.
- Ensure the work area is well-ventilated and free from flammable materials.
- Do not operate the device with wet hands or in damp conditions.
- Keep the device away from children and pets.
- Avoid direct contact with the welding tips during operation, as they can become hot.
- Do not attempt to weld materials thicker than specified (0.1-0.15mm, up to 0.2mm for nickel sheets).
- If the device overheats (reaches 60°C), it will automatically shut down. Allow it to cool before resuming operation.
2. Package Contents
Upon opening the package, please verify that all items listed below are present and in good condition:
- AWithZ H2 Spot Welder Unit
- Nickel-Plate Sheet (for practice and use)
- Replacement Welding Needles
- Sandpaper (for cleaning welding tips)
- USB Charging Cable
- Multi-language Instruction Manual

Image: Contents of the AWithZ H2 Spot Welder package.
3. Product Features and Overview
The AWithZ H2 Spot Welder is designed for efficiency and ease of use, integrating the power supply and welding pen into a single unit. This allows for convenient one-handed operation, making it ideal for various applications.
- Integrated Design: Power supply and welding pen are combined, eliminating the need for external connections and simplifying operation.
- OLED Display: A minimalist color LCD screen provides real-time information on temperature, mode selection (Auto/Manual), preheating time, activation time, power level, and allows for language and brightness adjustments.
- Adjustable Power Levels: Offers 99 adjustable power levels (Gear 1.0-9.9) to customize welding intensity for different materials and thicknesses.
- Dual Mode Operation: Supports both automatic and manual welding modes with double pulse output for precise welds.
- Compact and Lightweight: Weighing approximately 140g and measuring 202mm in length, it is highly portable for use at home or on the go.
- Wide Application: Suitable for cylindrical lithium batteries (18650, 21700, 26650, 32650), mobile phone batteries, button batteries, nickel-metal hydride batteries, nickel-cadmium batteries, and welding thin nickel-plated sheets, stainless steel sheets, and other materials.

Image: The AWithZ H2 Spot Welder in use, highlighting its integrated design and display.
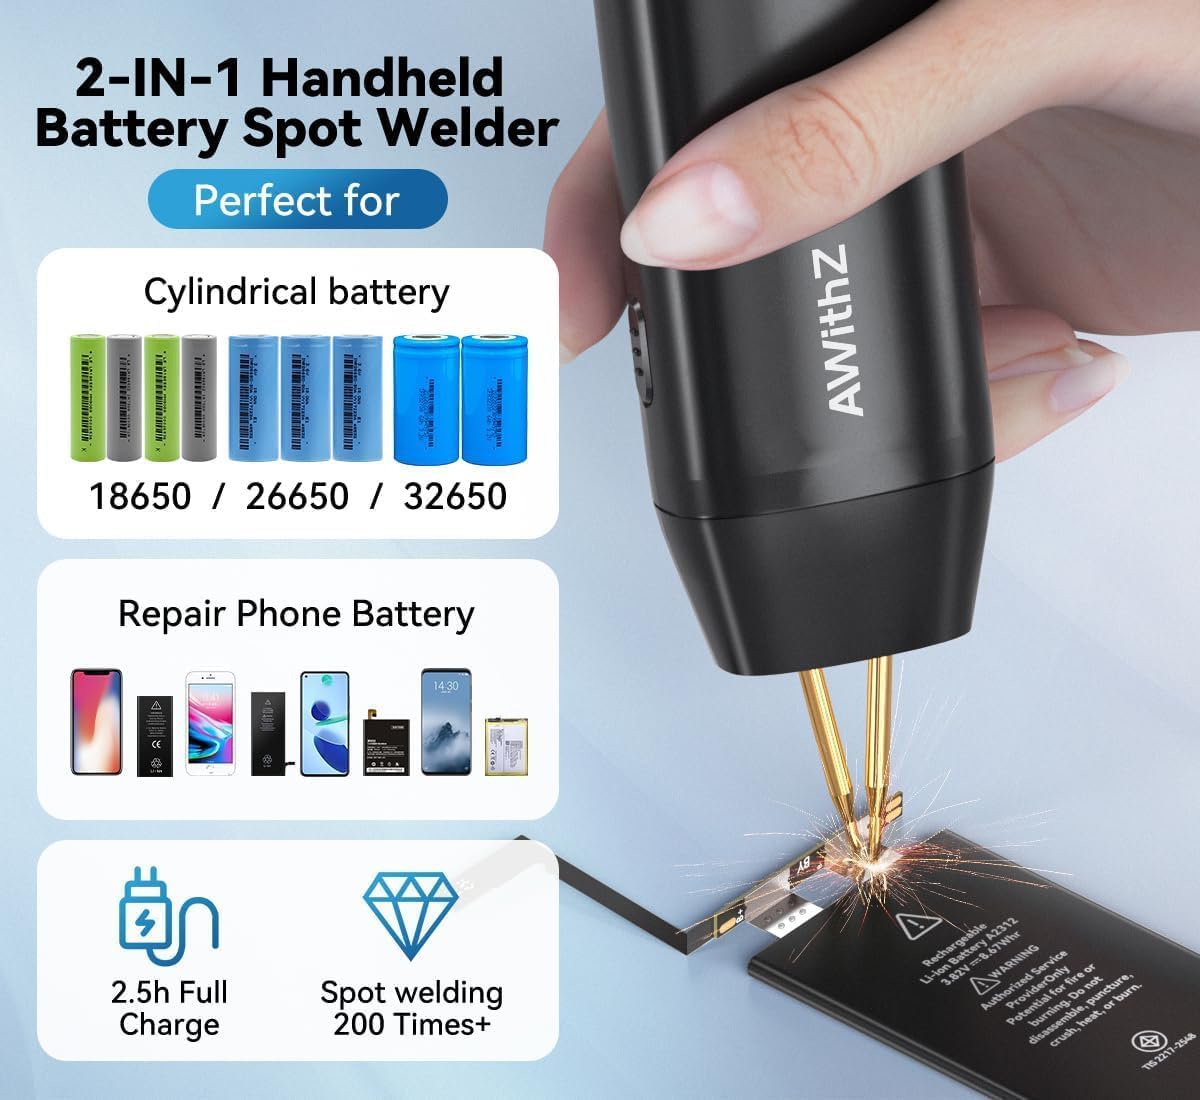
Image: Detailed view of the OLED display interface.

Image: The integrated design allows for easy one-handed operation.

Image: Versatile applications for various battery types.
4. Setup
Before first use, ensure the device is fully charged and properly configured.
Charging the Device
- Connect the provided USB charging cable to the welder's charging port.
- Plug the other end of the USB cable into a compatible USB power adapter (not included) or a computer USB port.
- The OLED display will indicate the charging status. Charge until the battery indicator shows full. A full charge typically takes approximately 2.5 hours.
Initial Power-On and Settings
- Press and hold the ON/OFF/Option Toggle button to power on the device.
- Upon first power-on, you may be prompted to select a language. Use the adjustment keys to navigate and confirm your selection.
- Familiarize yourself with the OLED display. It shows current temperature, welding mode (Auto/Manual), preheat time, trigger time, and power level (Gear).
- Use the adjustment keys to set desired parameters. The device offers 99 levels of power adjustment (Gear 1.0-9.9).
Image: Key components and controls of the AWithZ H2 Spot Welder.
5. Operating Instructions
Follow these steps for effective and safe spot welding.
Preparation for Welding
- Ensure the surfaces to be welded (e.g., battery terminals, nickel strip) are clean and free of oxidation, dirt, or grease. Use sandpaper (included) to lightly abrade the nickel strip if necessary.
- Clean the welding tips with sandpaper to ensure good conductivity.
- Select the appropriate nickel strip thickness. The welder supports 0.1-0.15mm, and up to 0.2mm for pure nickel.
Setting Welding Parameters
The AWithZ H2 offers 99 adjustable power levels (Gear 1.0-9.9) and two welding modes: Automatic and Manual.
- Power Level (Gear): Adjust the power level using the adjustment keys. Start with a lower setting (e.g., 3.0-5.0) and perform test welds on the provided nickel sheet to find the optimal setting for your material. Higher numbers indicate higher power.
- Mode Selection:
- Automatic Mode: The welder automatically detects contact with the welding surface and triggers the weld. This is generally recommended for ease of use.
- Manual Mode: You must press the trigger button (located on the side of the device) for 1 second to initiate the weld after positioning the tips.
- Preheat Time (0-5ms): This setting controls a brief pre-pulse to help burn off surface impurities. Adjust as needed for cleaner welds.
- Trigger Time (0.5-5s): This setting determines the duration of the welding pulse.

Image: Intelligent precision welding settings on the display.
Performing a Weld
- Place the nickel strip firmly onto the battery terminal or desired welding point.
- Position the two welding tips of the AWithZ H2 Spot Welder onto the nickel strip, ensuring both tips make firm and simultaneous contact with the strip and the underlying material. The optimal welding distance is 0.8mm between the tips.
- In Automatic Mode: The weld will trigger automatically once proper contact is detected.
- In Manual Mode: Press and hold the trigger button for 1 second to initiate the weld.
- After the weld, lift the welder straight up. Inspect the weld for strength and appearance. A good weld will be strong and clean.
- If the weld is too weak, increase the power level. If it burns through the nickel strip, decrease the power level.
6. Maintenance
Proper maintenance ensures the longevity and optimal performance of your spot welder.
- Cleaning Welding Tips: Regularly clean the welding tips with the provided sandpaper to remove any residue or oxidation. This ensures good electrical contact and consistent welds. Replace tips when they become excessively worn.
- Device Cleaning: Wipe the body of the welder with a soft, dry cloth. Do not use abrasive cleaners or solvents.
- Storage: Store the spot welder in a cool, dry place, away from direct sunlight and moisture. Ensure it is fully charged before long-term storage to preserve battery health.
7. Troubleshooting
If you encounter issues with your AWithZ H2 Spot Welder, refer to the following common problems and solutions:
| Problem | Possible Cause | Solution |
|---|---|---|
| No weld or weak weld | Low power setting; Dirty welding tips/material; Insufficient pressure; Battery low. | Increase power level; Clean tips and material surfaces; Apply firm, even pressure; Recharge the device. |
| Nickel strip burns through | Power setting too high; Nickel strip too thin. | Decrease power level; Use appropriate thickness nickel strip (0.1-0.15mm recommended). |
| Device automatically shuts off | Overheating (temperature reached 60°C); Battery protection. | Allow the device to cool down completely; Recharge the device if battery is low. |
| Display not working or frozen | Software glitch; Low battery. | Try restarting the device; Recharge the device. |
8. Specifications
Technical specifications for the AWithZ H2 Spot Welder:
| Feature | Detail |
|---|---|
| Model Number | H2 |
| Manufacturer | AWithZ |
| Dimensions (L x W x H) | 10 x 3 x 10 cm (Product); 45 x 28 x 202 mm (Unit) |
| Weight | 300 grams (Product); 137 grams (Unit) |
| Battery Type | Lithium-polymer (included) |
| Power Levels | 99 adjustable levels (Gear 1.0-9.9) |
| Welding Thickness | 0.1-0.15 mm (nickel sheets), up to 0.2 mm (pure nickel) |
| Display | OLED Color Screen |
| Power Source | Battery Powered |
9. Warranty and Support
Specific warranty details and direct support contact information are not available in the provided product data. For warranty claims, technical assistance, or replacement parts, please refer to the contact information provided with your purchase or visit the official AWithZ website.


