
1. Overview
The Wonrabai MPPT Solar Power Manager Module (D) is designed for efficient power management from 6V to 24V solar panels. It facilitates charging 3.7V rechargeable Lithium batteries via either a solar panel or a Type-C power adapter. The module provides a regulated 5V/3A output, supporting multiple fast-charging protocols such as PD, QC, FCP, PE, and SFCP.
Equipped with Maximum Power Point Tracking (MPPT) functionality and multiple protection circuits, this module ensures high efficiency, stability, and safety during operation. It is suitable for various solar-powered applications, including low-power IoT devices, mini solar road lamps, intelligent agriculture systems, and other environmental protection projects.

Image 1.1: Wonrabai Solar Power Management Module (D) highlighting its input and output capabilities.
2. Key Features

Image 2.1: Key features of the Solar Power Management Module (D).
- MPPT Functionality: Supports Maximum Power Point Tracking to maximize the efficiency of the connected solar panel.
- Dual Charging Inputs: Allows battery charging from either a 6V-24V solar panel or a Type-C power adapter.
- Self-Adaptive Input Voltage: For solar panels, it supports self-adaptive input voltage via the DC-002 jack or screw terminals, including input anti-reverse protection.
- Multi-LED Indicators: Provides visual feedback on the status of the solar panel and connected batteries.
- Comprehensive Protection Circuits: Integrates protection against over-charge, over-discharge, overheating, and over-current, ensuring stable and safe operation.
- Regulated 5V/3A Output: Delivers a stable 5V/3A output, compatible with various fast-charging protocols.
3. Package Contents
Verify that all items listed below are included in your package:
- Solar Power Manager (D) Module x1
- Battery holder x1 (for 3x 18650 batteries, batteries not included)
- Screws pack x1
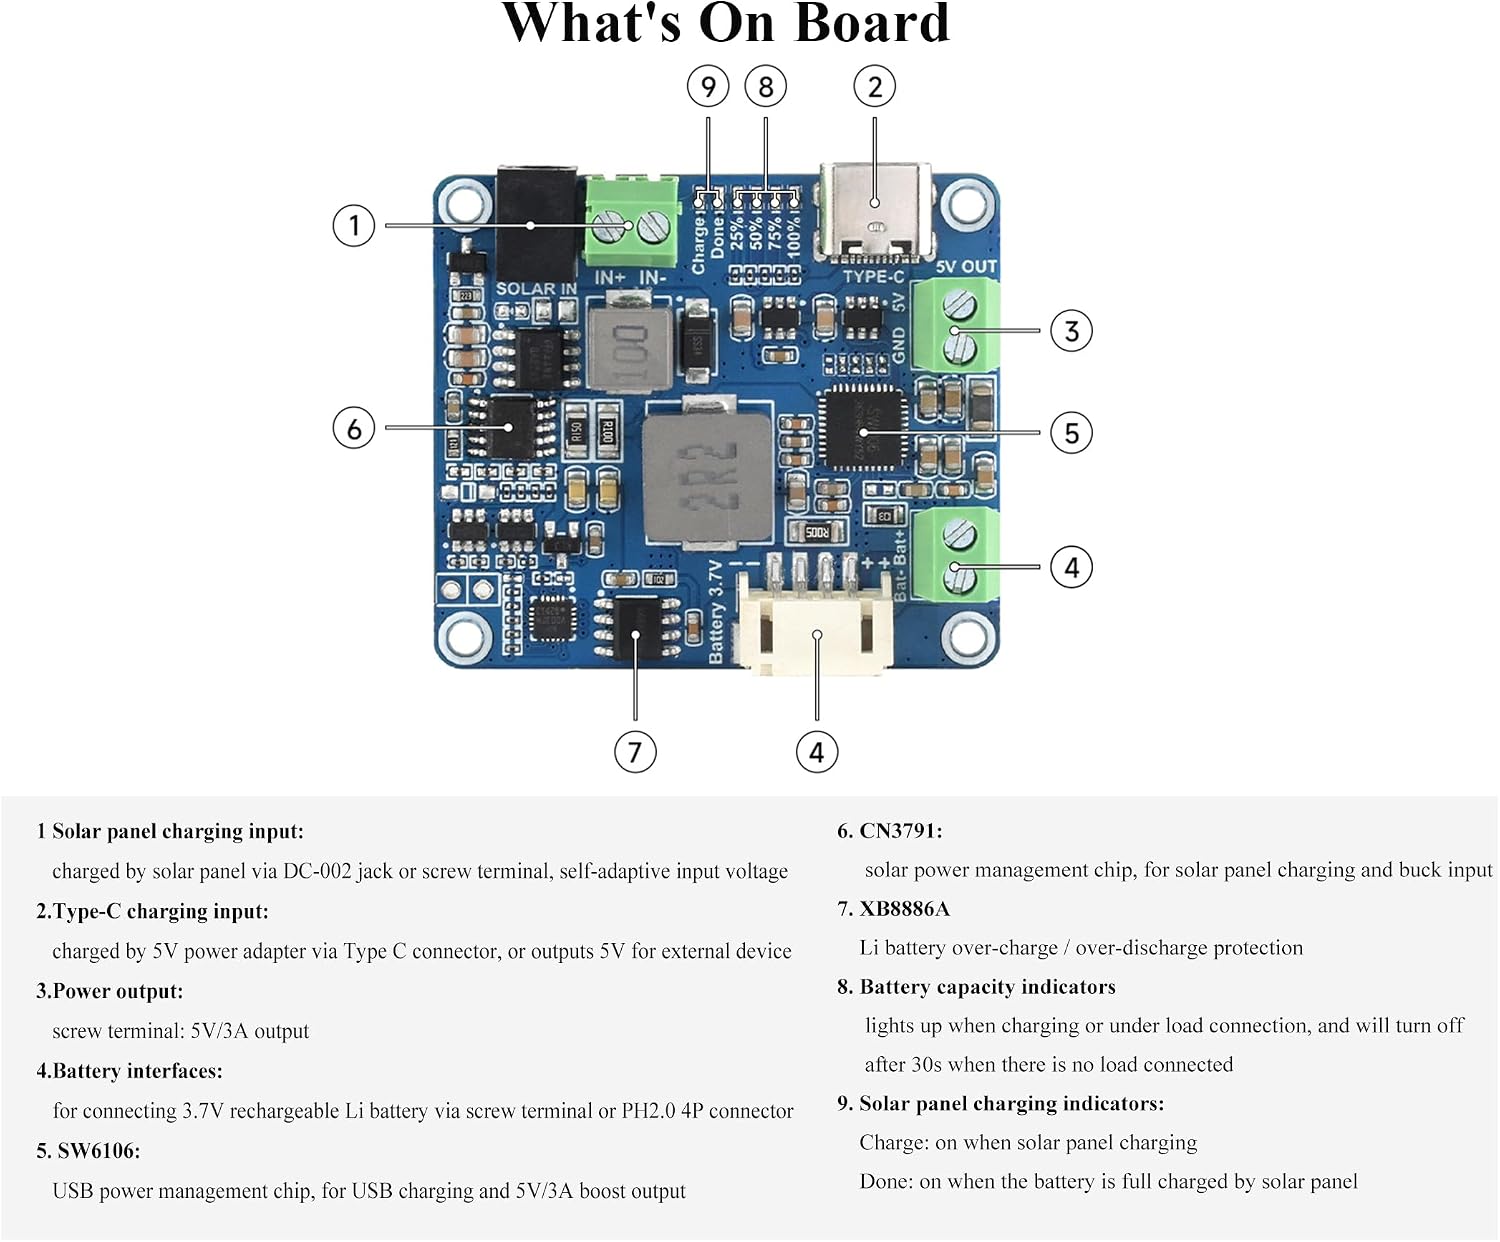
Image 3.1: Included components in the package.
4. Setup and Connections
This section details the physical connections required to set up your Solar Power Manager Module (D).
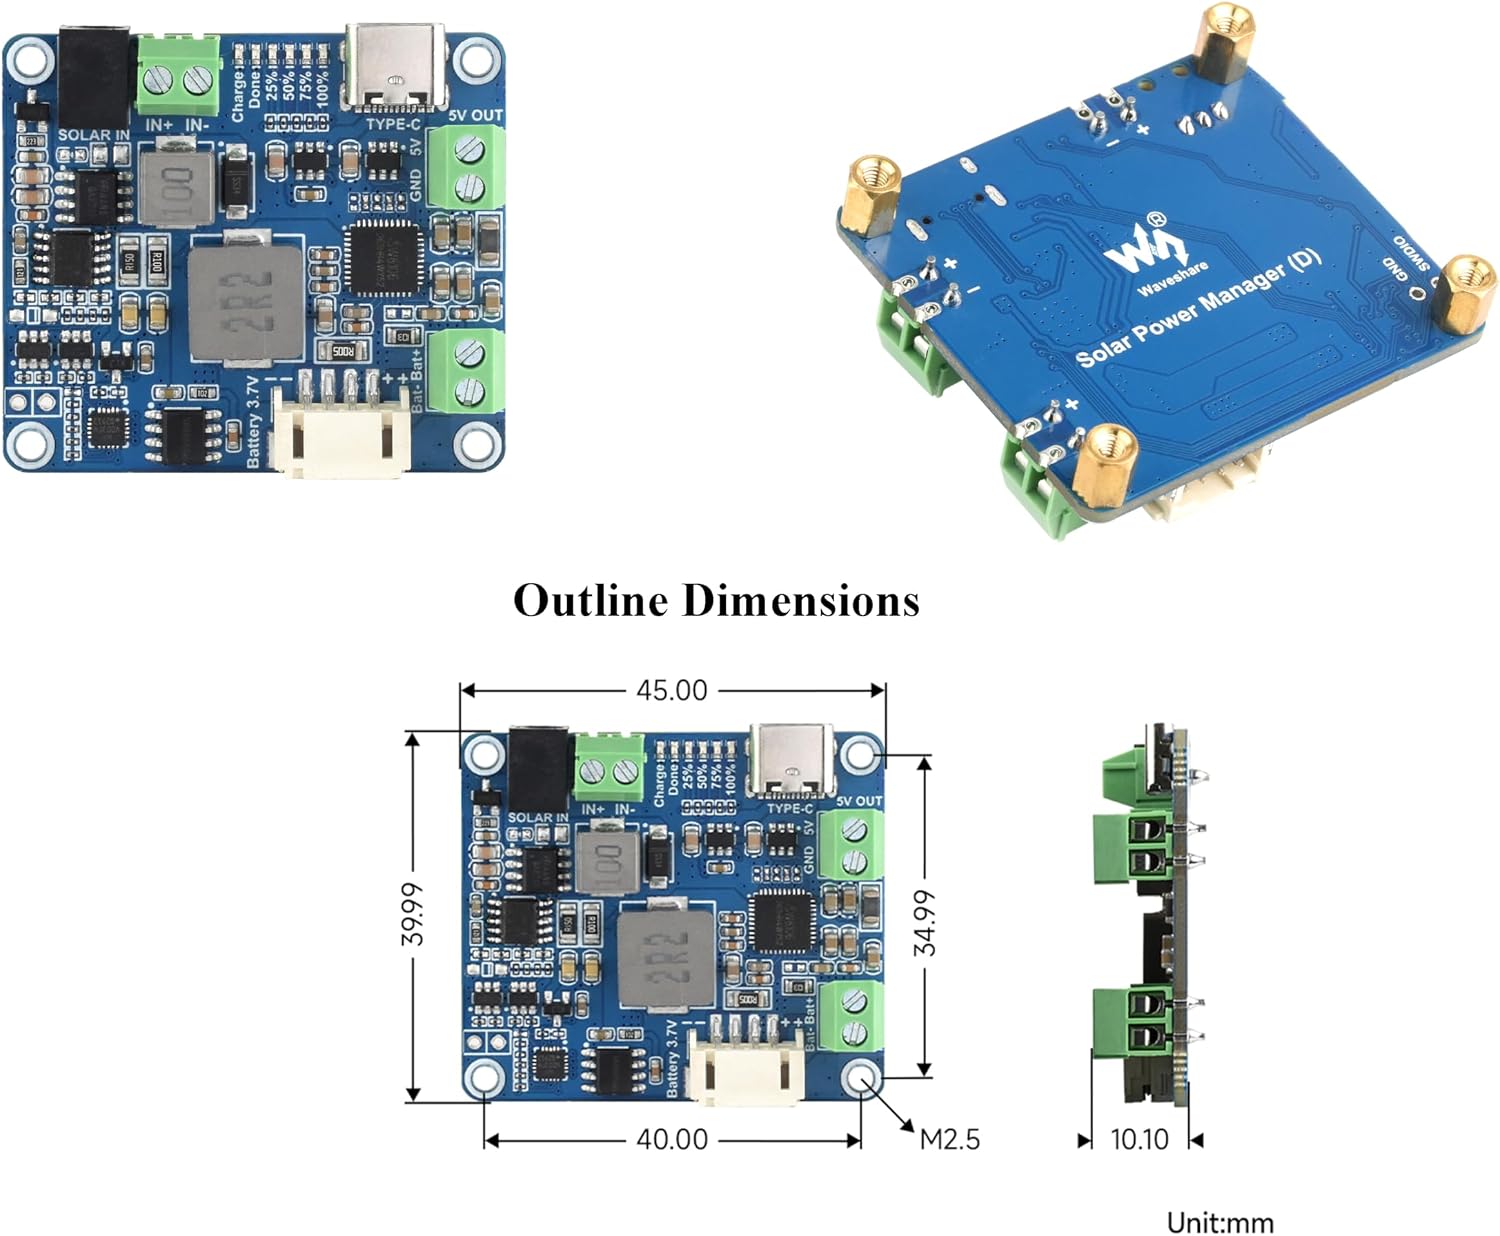
Image 4.1: Detailed view of the Solar Power Manager (D) board with labeled components.
4.1. Component Identification
- Solar Panel Charging Input: Connect your 6V-24V solar panel here via the DC-002 jack or screw terminal.
- Type-C Charging Input: Connect a 5V power adapter via the Type-C port for external device charging or module power.
- 5V Output: Provides 5V/3A regulated output via screw terminal.
- Battery Interfaces: For connecting 3.7V rechargeable Li-ion batteries via screw terminal or PH2.0 4P connector.
- SW6106: USB power management chip, for USB charging and 5V/3A boost output.
- CN3791: Solar power management chip, for solar panel charging and buck input.
- XB8886A: Li battery over-charge / over-discharge protection.
- Battery Capacity Indicators: Four LEDs (25%, 50%, 75%, 100%) light up when charging or under load connection. They turn off after 30 seconds when there is no load.
- Solar Panel Charging Indicators: "Charge" LED indicates active charging from the solar panel. "Done" LED indicates the battery is fully charged by the solar panel.
4.2. Connection Steps
- Connect Battery: Insert 3.7V 18650 Li-ion batteries into the provided battery holder. Connect the battery holder's PH2.0 connector to the corresponding port (4) on the module, or connect a 3.7V Li-ion battery directly to the battery screw terminals (4). Ensure correct polarity (+ to + and - to -).
- Connect Solar Panel: Connect your 6V-24V solar panel to the "SOLAR IN" screw terminals (1) or the DC-002 jack (1). Observe correct polarity. The module features anti-reverse protection.
- Connect Output Device: Connect your 5V device (e.g., Raspberry Pi, Jetson Nano) to the "5V OUT" screw terminals (3). Ensure correct polarity.
- Alternative Charging (Type-C): If solar power is unavailable, you can charge the battery by connecting a 5V Type-C power adapter to the Type-C port (2).

Image 4.2: Example setup connecting a solar panel, batteries, and a Raspberry Pi to the module.
5. Operating Instructions
Once connections are established, the module operates largely automatically. Monitor the LED indicators for status information.
- Solar Charging: When a solar panel is connected and receiving sufficient light, the "Charge" LED (9) will illuminate, indicating active charging. The "Done" LED (9) will light up when the battery is fully charged by the solar panel.
- Type-C Charging: If a Type-C power adapter is connected, it will charge the battery. The battery capacity indicators (8) will show the charging progress.
- Battery Capacity Indication: The four battery capacity LEDs (8) will light up sequentially to indicate the current charge level (25%, 50%, 75%, 100%). These LEDs will turn off after 30 seconds if no load is connected to conserve power.
- Power Output: The module provides a continuous 5V/3A output to connected devices. The MPPT function ensures optimal power extraction from the solar panel to maintain this output and charge the battery.
6. Maintenance
To ensure the longevity and optimal performance of your Solar Power Manager Module (D), consider the following maintenance guidelines:
- Environmental Conditions: Operate the module within its specified temperature range. Avoid exposure to extreme temperatures, high humidity, or direct water contact.
- Cleanliness: Keep the module free from dust and debris. Use a soft, dry cloth for cleaning. Do not use liquid cleaners or solvents.
- Connection Integrity: Periodically check all screw terminal connections to ensure they are secure. Loose connections can lead to poor performance or damage.
- Battery Health: If using rechargeable batteries, ensure they are in good condition and within their recommended lifespan. Replace old or damaged batteries as needed.
- Ventilation: Ensure adequate airflow around the module, especially if it is enclosed, to prevent overheating.
7. Troubleshooting
If you encounter issues with your Solar Power Manager Module (D), refer to the following troubleshooting steps:
- No Power Output:
- Check battery connections and ensure the battery is charged.
- Verify solar panel connection and ensure it is receiving sufficient sunlight.
- Confirm Type-C power adapter is functional if used for charging.
- Check output device connections and ensure the device is not drawing excessive current, which might trigger over-current protection.
- Battery Not Charging:
- Ensure solar panel is connected correctly and exposed to direct sunlight.
- Verify the solar panel voltage is within the 6V-24V range.
- Check Type-C power adapter and cable if charging via Type-C.
- Confirm battery polarity is correct.
- LED Indicators Not Functioning:
- Ensure the module is receiving power from either the solar panel or Type-C input, and a battery is connected.
- Note that battery capacity indicators turn off after 30 seconds without a load. Connect a load to check their status.
- Module Overheating:
- Reduce the load on the 5V output.
- Ensure adequate ventilation around the module.
- Verify input voltage from the solar panel is within the specified range.
If issues persist after following these steps, refer to the online resources mentioned in the Support section.
8. Specifications
The following table outlines the technical specifications of the Wonrabai MPPT Solar Power Manager Module (D).

Image 8.1: Outline dimensions of the module.
| Feature | Specification |
|---|---|
| Solar Input Voltage | 6V ~ 24V |
| Recharging Method | Solar panel / Type-C power adapter |
| Battery Type | 3.7V Li-ion battery (18650 recommended, not included) |
| USB Input | 5V (Type-C, with PD quick charge support) |
| 5V Output | 5V / 3A (Type-C, screw terminal) |
| Recharging Cutoff Voltage | 4.2V ± 1% |
| Over Discharging Protection Voltage | 3.0V ± 1% |
| Quiescent Current (Max) | <30mA |
| Operating Temperature | -40°C ~ 85°C |
| Dimensions (mm) | 45.0 x 40.0 x 10.1 |
| Compatible Devices | Raspberry Pi, Jetson Nano, Arduino |
Table 8.1: Technical Specifications.

Image 8.2: Specification comparison with other models.
9. Application Scenarios
The versatility of the Solar Power Manager Module (D) makes it suitable for a wide range of applications:
- Solar-Powered Control Systems for MCUs / Development Boards (e.g., Raspberry Pi, Jetson Nano, Arduino).
- Low-power IoT devices.
- Mini Solar Road Lamps.
- Intelligent Agriculture systems.
- Other environmental protection projects requiring reliable solar power management.

Image 9.1: Examples of practical applications.
10. Support and Resources
For additional information, detailed usage guides, and development resources, please refer to the official online documentation:
Online Usage Guide and Development Resources
This link provides comprehensive details that may assist with advanced configurations or specific project requirements.