1. Introduction
The eletechsup Schumann Resonance Ultra Low Frequency Generator, model SMJAC03_R, is designed to output Schumann waves and adjustable frequencies. This device utilizes a low-temperature drift crystal oscillator and a high-precision Digital-to-Analog Converter (DAC) chip to ensure accurate frequency output and a pure sine wave. It features an adjustable frequency range from 0.01Hz to 100KHz.
This manual provides essential information for the proper setup, operation, and maintenance of your frequency generator. Please read it thoroughly before use.
2. Product Overview and Components
The SMJAC03_R generator comes with an acrylic shell for protection and features a clear LCD display for easy monitoring of settings. Key components are identified below:
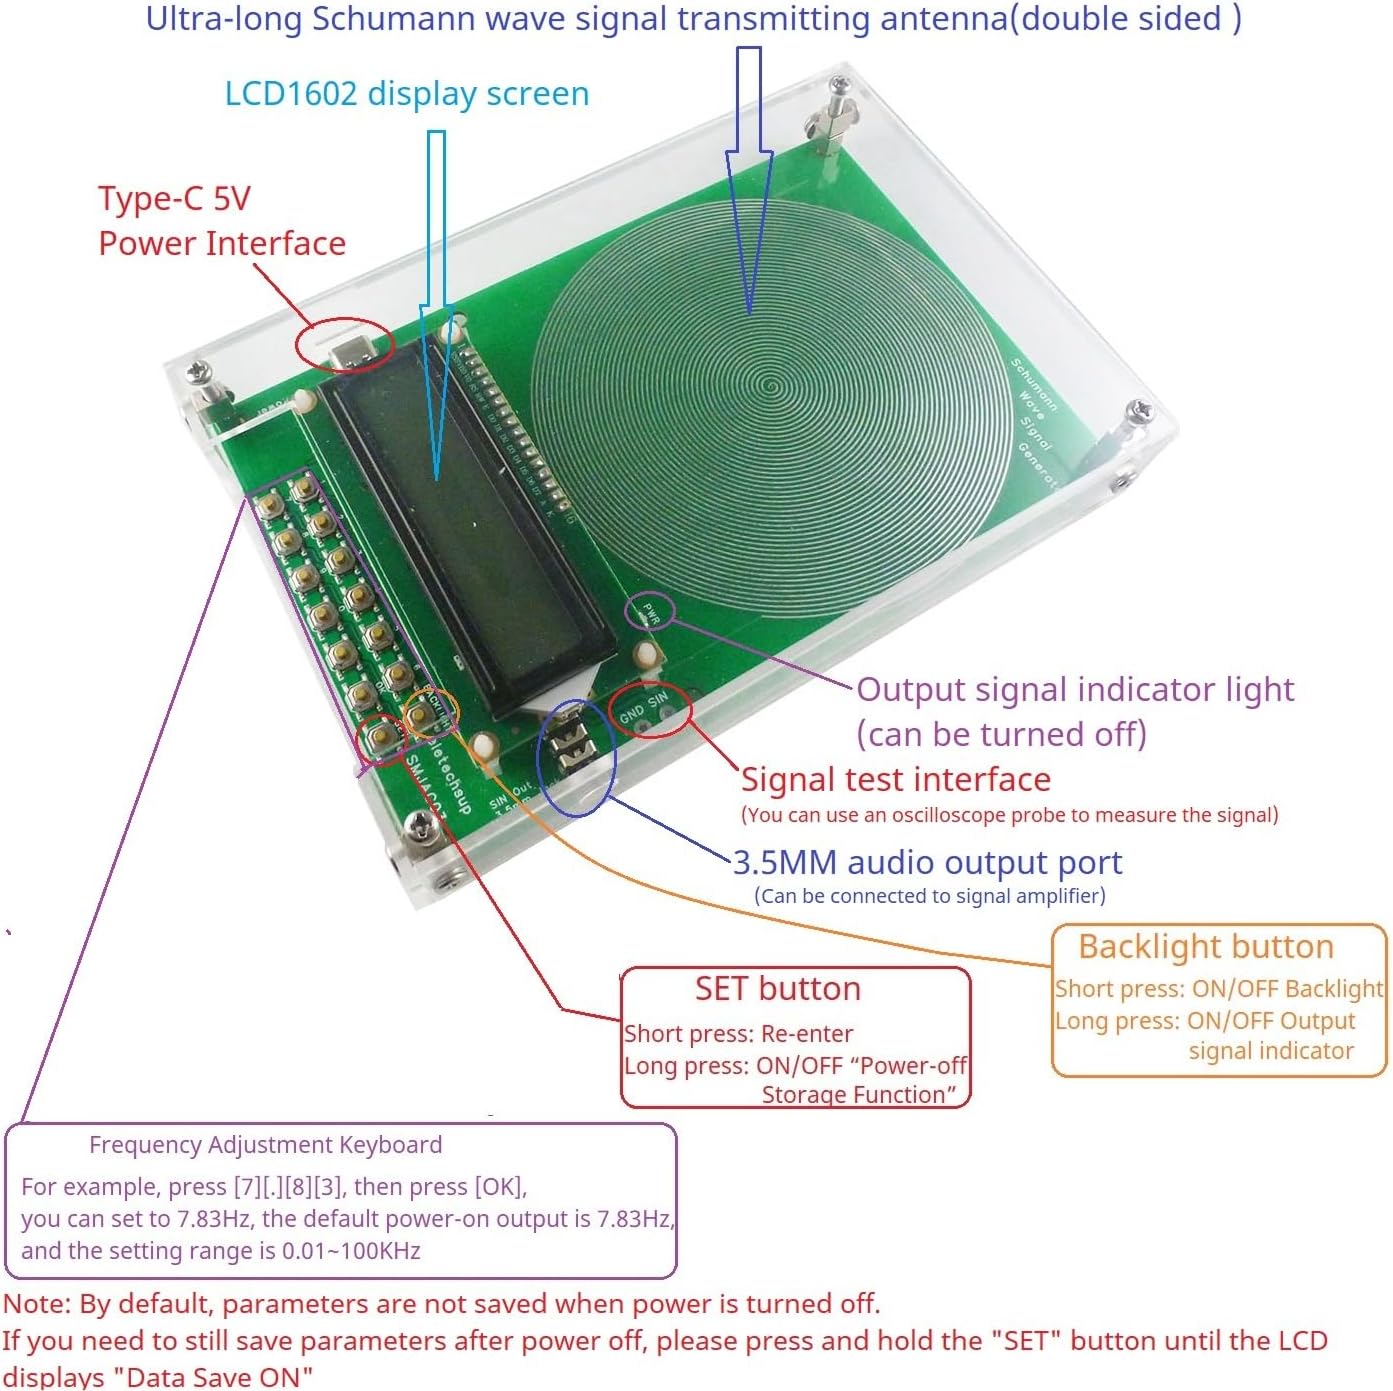
Figure 1: Component identification of the eletechsup Schumann Resonance Generator. Labels include the Ultra-long Schumann wave signal transmitting antenna, LCD1602 display screen, Type-C 5V Power Interface, Output signal indicator light, 3.5MM audio output port, SET button, Backlight button, and Frequency Adjustment Keyboard.
- Ultra-long Schumann wave signal transmitting antenna: Double-sided antenna for signal transmission.
- LCD1602 display screen: Displays current frequency and other operational information.
- Type-C 5V Power Interface: Connects to a 5V DC power source (4-15V supported). Note: A Type-C power cable is not included.
- Output signal indicator light (PWR LED): Indicates when the signal is active.
- 3.5MM audio output port: Allows connection to external audio devices for signal output.
- SET button: Used for re-entering frequency values and saving parameters.
- Backlight button: Controls the LCD backlight and the output signal indicator light.
- Frequency Adjustment Keyboard: Numeric buttons (0-9) and a decimal point (.) for entering frequency values, along with an OK button to confirm.
- Signal test interface (GND/SIN): For connecting an oscilloscope probe to measure the output signal.
3. Setup
- Power Connection: Connect a Type-C power cable (not included) to the Type-C 5V Power Interface. The device operates on DC 5V (range 4-15V).
- Initial Power-On: Once powered, the LCD screen will illuminate and display the default frequency, which is 7.83Hz.
- Audio Output (Optional): If desired, connect an audio cable to the 3.5MM audio output port to direct the signal to an external speaker or amplifier.
4. Operating Instructions
4.1. Adjusting the Output Frequency
To change the output frequency:
- Use the numeric buttons (0-9) and the decimal point (.) to enter your desired frequency value.
- Press the OK button to confirm the input.
- If an incorrect value is entered, press the SET button to clear and re-enter the frequency.
Example: To set the frequency to 9.71Hz, press [9][.][7][1], then press [OK]. The adjustable range is 0.01Hz to 100KHz. Note that not all frequency points within this range may be precisely settable due to internal resolution.
4.2. Saving Parameters
By default, frequency settings are not saved after power-off. To save your current frequency setting:
- Press and hold the SET button until the LCD displays "Data Save ON". This indicates that the current settings will be retained even after the device is powered off.
4.3. Verifying the Output Waveform
To visually confirm the pure sine wave output:
- Connect an oscilloscope probe to the GND/SIN port on the device. The oscilloscope will display the pure sine wave generated by the device.

Figure 2: The generator connected to an oscilloscope, demonstrating the pure sine wave output at 7.83Hz.
4.4. Controlling LCD Backlight
To manage the LCD backlight:
- Short press the BACKLIGHT button to turn off the LCD backlight.
- Short press the BACKLIGHT button again to turn on the LCD backlight.
4.5. Controlling Output Signal Indication (PWR LED)
To manage the PWR LED:
- Long press the BACKLIGHT button to turn off the output signal indication (PWR LED).
- Long press the BACKLIGHT button again to turn on the output signal indication.
5. Maintenance
To ensure the longevity and optimal performance of your eletechsup Schumann Resonance Generator:
- Cleaning: Use a soft, dry cloth to clean the acrylic shell and display screen. Avoid abrasive cleaners or solvents that could damage the surface.
- Storage: Store the device in a cool, dry place away from direct sunlight, extreme temperatures, and high humidity.
- Handling: Handle the device with care to prevent physical damage. The acrylic shell provides protection, but excessive force can cause cracks.
- Power Supply: Always use a stable 5V DC power supply within the specified 4-15V range. Using an incorrect voltage can damage the internal components.
6. Troubleshooting
- LCD does not display correctly after power on: Briefly press the RES button (reset button, if available, or power cycle the device) and then power on again. Ensure the Type-C power cable is securely connected and providing adequate power.
- No signal output: Verify that the device is powered on and the PWR LED is illuminated. Check all connections, especially to the 3.5MM audio output if used. Use an oscilloscope to verify signal presence at the GND/SIN port.
- Incorrect frequency output: Ensure the desired frequency has been correctly entered and confirmed with the OK button. If parameters were not saved, the device might revert to the default frequency after a power cycle.
7. Specifications
| Working Voltage | DC 5V (DC 4-15V) |
| Working Current | 9-14mA |
| Power Interface | Type-C (supports Type-C to Type-C power supply) |
| Default Frequency | 7.83Hz |
| Adjustment Range | 0.01Hz ~ 100,000Hz (Pure Sine Wave) |
| Signal Voltage Amplitude | 3V |
| Audio Output | 3.5MM audio output port |
| Dimensions (with shell) | 155 x 105 x 26MM (approximately 6.1 x 4.1 x 1.0 inches) |
| Weight (with shell) | 197g (approximately 6.9 ounces) |
| Manufacturer | eletechsup |
| Model Number | SMJAC03_R |
8. Product Video
Watch this video for a visual demonstration of the eletechsup Schumann Resonance Pulse Sine Wave Generator.
Video: A demonstration of the eletechsup Schumann Resonance Pulse Sine Wave Generator, showcasing its physical appearance and basic operation.
9. Warranty and Support
For warranty information, technical support, or service inquiries, please contact the seller or manufacturer directly. Refer to your purchase documentation for specific contact details. Keep your proof of purchase for any warranty claims.


