1. Introduction
Thank you for choosing the Hiicam Speed 10 Action Camera. This manual provides essential information for setting up, operating, and maintaining your camera to ensure optimal performance and longevity. The Speed 10 is designed to capture high-quality 5K 30FPS video and 30MP photos, featuring Electronic Image Stabilization (EIS), Wi-Fi connectivity, and waterproof capabilities up to 131 feet (40 meters) with its included housing. It is ideal for various activities including sports, travel, and underwater adventures.
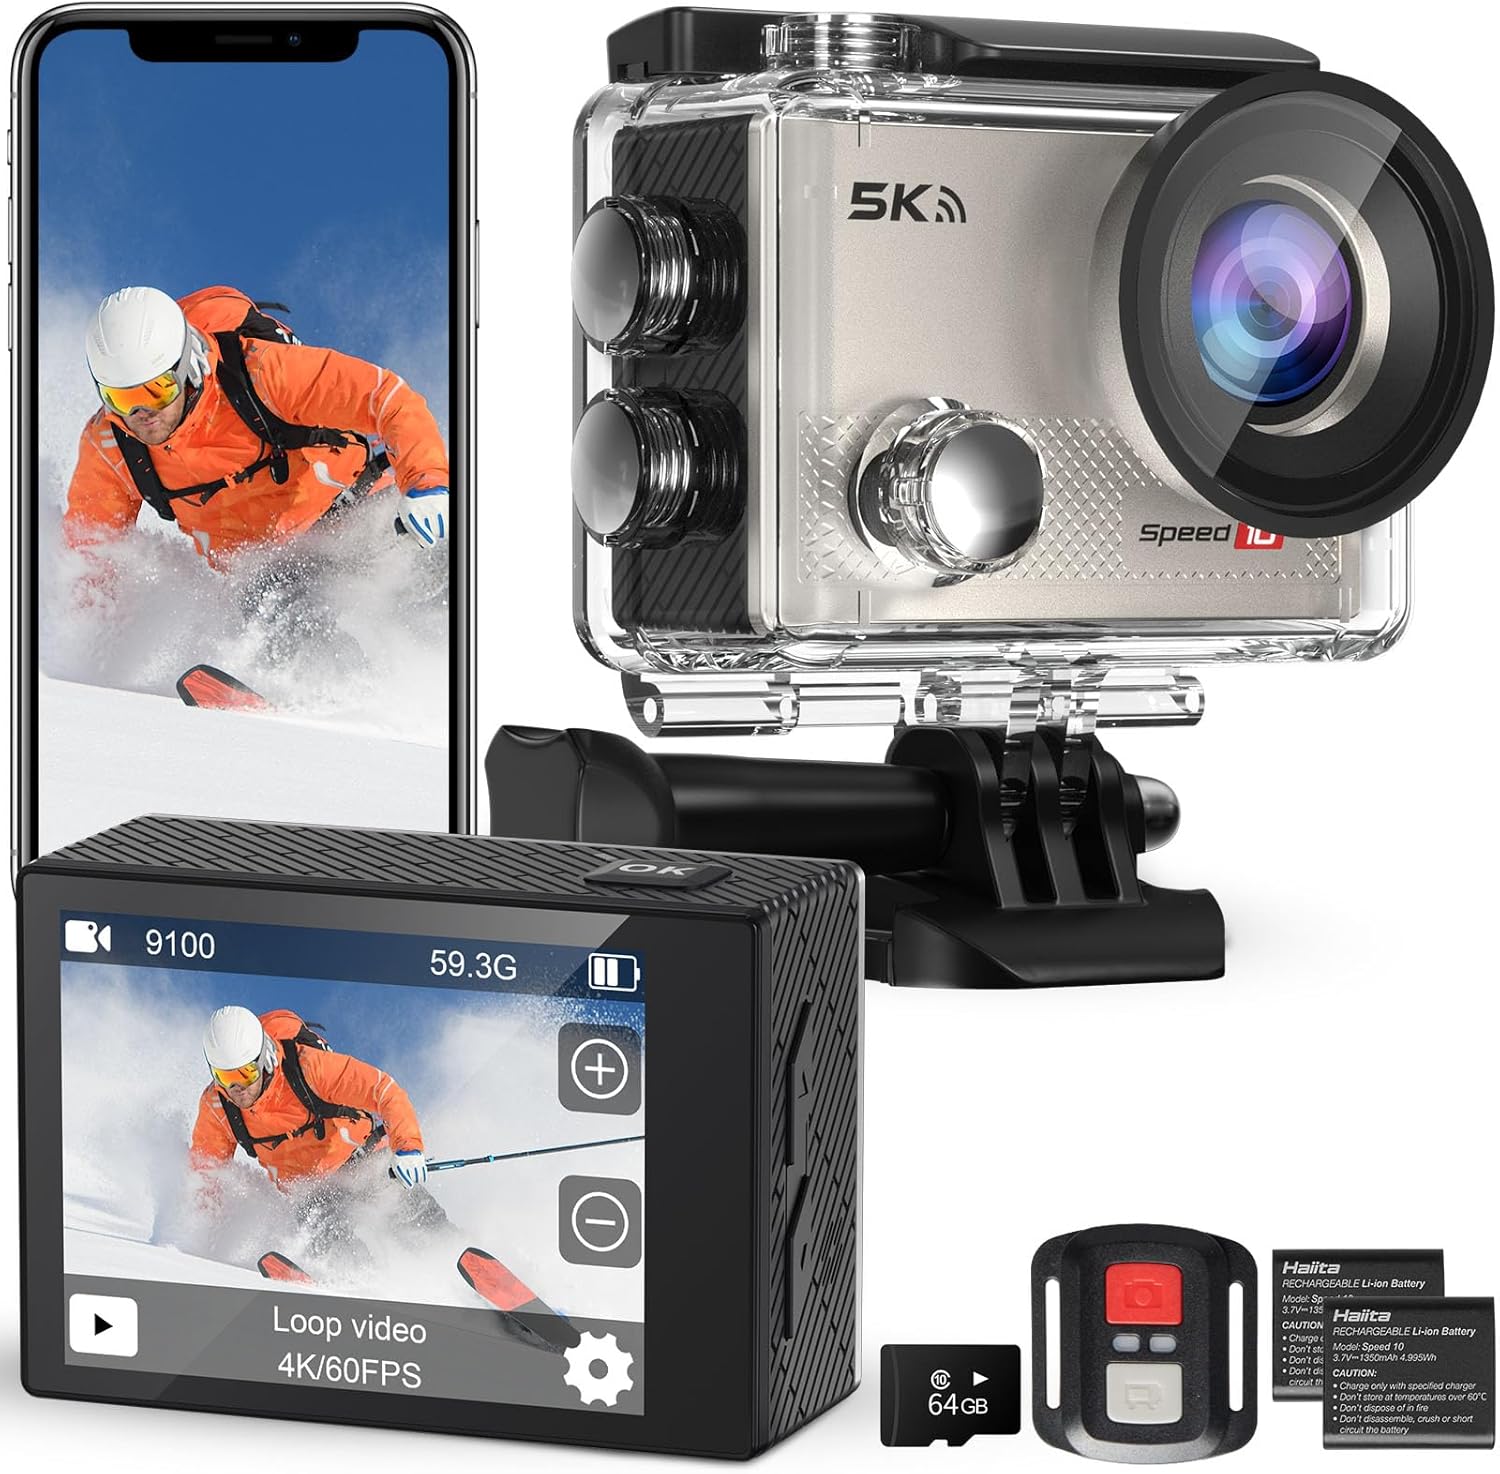
Figure 1.1: Hiicam Speed 10 Action Camera and included accessories.
2. Package Contents
Please check the package contents upon unboxing to ensure all items are present.
- Hiicam Speed 10 Action Camera
- Waterproof Housing
- Remote Control
- 2 x 1350mAh Rechargeable Lithium-Ion Batteries
- Battery Charger
- Mounting Accessories Kit (various mounts, straps, adhesives)
- USB Charging Cable
- User Manual (this document)
- (Note: Memory card may or may not be included depending on the specific product variant purchased.)
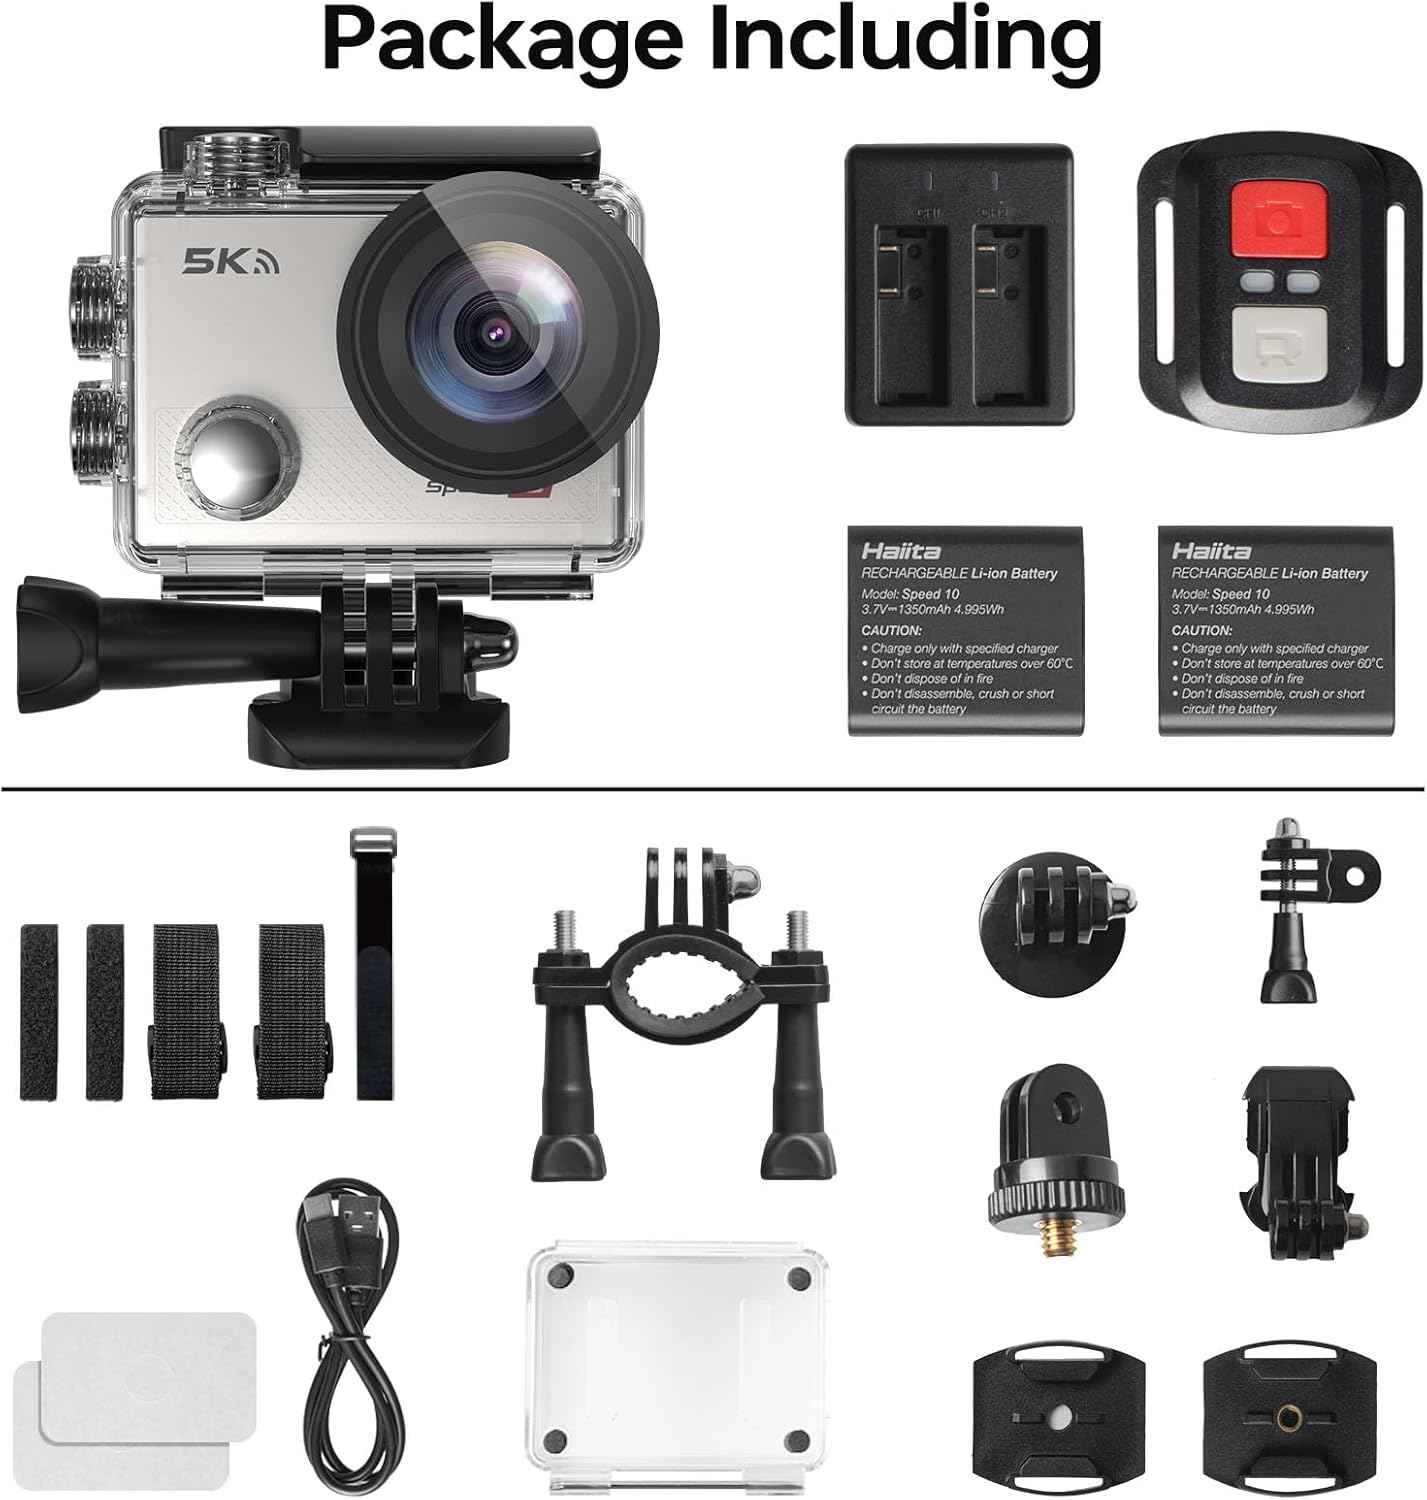
Figure 2.1: All components included in the standard package.
3. Camera Components
Familiarize yourself with the main parts of your Hiicam Speed 10 Action Camera.
| Component | Description |
|---|---|
| Lens | Captures images and videos. Features a 170° wide-angle view. |
| Front Screen | Displays camera status, mode, and can be used for selfies. |
| Rear Touch Screen | Main display for live view, playback, and menu navigation. |
| Power/Mode Button | Powers the camera on/off and switches between shooting modes. |
| Shutter/OK Button | Starts/stops recording, takes photos, confirms selections. |
| Up/Down Buttons | Navigation in menus, zoom control. |
| MicroSD Card Slot | For inserting a microSD card (up to 256GB, Class 10 or higher recommended). |
| Battery Compartment | Houses the rechargeable battery. |
| USB Port | For charging and data transfer. |
4. Setup
4.1. Battery Installation and Charging
- Open the battery compartment cover on the bottom of the camera.
- Insert a fully charged 1350mAh battery, ensuring the contacts align correctly.
- Close the battery compartment cover securely.
- To charge, insert the battery into the provided battery charger and connect the charger to a USB power source using the USB cable. The indicator light will show charging status.
- Alternatively, you can charge the battery inside the camera by connecting the camera directly to a USB power source.

Figure 4.1: Charging batteries with the external charger.

Figure 4.2: The camera supports extended recording time with two included batteries.
4.2. MicroSD Card Insertion
A microSD card (not always included) is required to store photos and videos.
- Ensure the camera is powered off.
- Locate the microSD card slot on the side of the camera.
- Insert a Class 10 or higher microSD card (up to 256GB) with the contacts facing the correct direction until it clicks into place.
- To remove, gently push the card until it springs out.
4.3. Waterproof Housing Usage
The waterproof housing allows the camera to be used underwater up to 131 feet (40 meters).
- Before each use, inspect the waterproof housing for any dirt, debris, or damage to the O-ring seal.
- Place the camera inside the housing, ensuring it fits snugly.
- Close the latch securely. Perform a dry test (without the camera) in water before first use to confirm no leaks.
- After underwater use, rinse the housing with fresh water and allow it to air dry.

Figure 4.3: The camera is waterproof up to 131 feet (40 meters) with the housing.
5. Operating the Camera
5.1. Power On/Off
- To power on: Press and hold the Power/Mode button for a few seconds.
- To power off: Press and hold the Power/Mode button again until the camera shuts down.
5.2. Switching Modes
Press the Power/Mode button repeatedly to cycle through different modes: Video, Photo, Playback, and Settings.
5.3. Recording Video / Taking Photos
- In Video mode: Press the Shutter/OK button to start recording. Press again to stop.
- In Photo mode: Press the Shutter/OK button to take a photo.

Figure 5.1: Capture ultra-sharp 5K 30FPS video and 30MP photos.
5.4. Menu Settings
Access the settings menu to customize camera parameters.
- From any mode, navigate to the Settings icon (gear icon) using the Mode button or touch screen.
- Use the Up/Down buttons or touch screen to navigate through options.
- Press the Shutter/OK button or tap to select an option.
- Key settings include:
- Video Resolution: Select from 5K/30FPS, 4K/60FPS, 4K/30FPS, 2.7K/30FPS, 1080P/120FPS, 1080P/60FPS, 720P/240FPS.
- Photo Resolution: Adjust photo size up to 30MP.
- Electronic Image Stabilization (EIS): Enable or disable for smoother footage.
- Wide Angle: Adjust the field of view (170° ultra-wide angle available).
- Loop Recording, Time-Lapse, Slow Motion, Burst Photo: Explore various shooting modes.

Figure 5.2: Electronic Image Stabilization (EIS) ensures steady and smooth footage.

Figure 5.3: The 170° wide-angle lens captures a broad field of view.
6. Advanced Features
6.1. Wi-Fi & Smart App Control
Connect your camera to a smartphone or tablet via Wi-Fi for remote control, live preview, and file transfer.
- Download the "iSmart DV" app (or specified app in camera manual) from your device's app store.
- On the camera, enable Wi-Fi from the settings menu. The camera's Wi-Fi name (SSID) and password will be displayed.
- On your smartphone, go to Wi-Fi settings and connect to the camera's Wi-Fi network.
- Open the app. You can now control the camera, view live footage, and download content to your device.

Figure 6.1: Share your moments instantly with Wi-Fi and app control.
6.2. Remote Control
The included remote control allows for convenient operation from a distance.
- Ensure the remote control has a working battery.
- Pair the remote with the camera (refer to the camera's settings menu for remote pairing instructions if needed).
- Use the dedicated buttons on the remote to start/stop video recording or take photos.

Figure 6.2: Wireless remote control for effortless capture.
7. Maintenance and Care
- Keep the camera and its accessories clean and dry.
- Use a soft, lint-free cloth to clean the lens and screens. Avoid abrasive materials.
- When not in use, store the camera in a cool, dry place away from direct sunlight and extreme temperatures.
- Remove batteries if the camera will not be used for an extended period.
- Regularly back up your footage and format the microSD card to maintain optimal performance.
8. Troubleshooting
| Problem | Possible Solution |
|---|---|
| Camera won't turn on. | Ensure the battery is fully charged and correctly inserted. Try a different charged battery. |
| Cannot record video/take photos. | Check if a microSD card is inserted and has sufficient free space. Ensure the card is Class 10 or higher. Format the card if necessary (this will erase all data). |
| Footage is blurry/shaky. | Ensure EIS (Electronic Image Stabilization) is enabled in settings. Check if the lens is clean. |
| Wi-Fi connection issues. | Ensure Wi-Fi is enabled on the camera and your smartphone. Re-enter the Wi-Fi password. Restart both devices. Ensure you are using the correct app. |
| Camera freezes. | Remove and reinsert the battery to reset the camera. Update firmware if available. |
| Water leakage in housing. | Immediately remove the camera. Inspect the O-ring seal for dirt, hair, or damage. Ensure the latch is fully secured. Do not use if the housing is damaged. |
9. Technical Specifications
| Feature | Specification |
|---|---|
| Model Name | Speed 10 |
| Video Resolution | Up to 5K 30FPS |
| Photo Resolution | Up to 30MP |
| Image Stabilization | Electronic Image Stabilization (EIS) |
| Waterproof Depth | 131FT / 40M (with waterproof housing) |
| Lens Angle | 170° Wide Angle |
| Display | 2-inch Rear Touch Screen, Front Screen |
| Battery | 2 x 1350mAh Lithium-Ion (included) |
| Storage | MicroSD card, up to 256GB (Class 10 or higher) |
| Connectivity | Wi-Fi, USB |
| Dimensions | 2.2 x 0.95 x 1.61 inches |
| Weight | 1.1 pounds |
10. Warranty and Customer Support
The Hiicam Speed 10 Action Camera typically comes with a manufacturer's warranty. Please refer to the warranty card included in your package or visit the official Hiicam website for detailed warranty terms and conditions.
For technical support, troubleshooting assistance, or warranty claims, please contact Hiicam customer service through their official channels.
- Hiicam Store on Amazon: Visit the Hiicam Store
- Refer to the contact information provided in your product packaging.


