1. Introduction
Thank you for choosing the LYNCAST Smart Vision Beam Projector. This manual provides essential information for setting up, operating, and maintaining your projector. Please read it thoroughly before use to ensure optimal performance and safety.
2. Safety Information
Always follow these basic safety precautions to reduce the risk of fire, electric shock, or injury:
- Do not block ventilation openings.
- Do not expose the projector to rain or moisture.
- Do not open the projector casing; refer all servicing to qualified personnel.
- Avoid looking directly into the projector lens when the lamp is on.
- Use only the power adapter provided with the projector.
- Place the projector on a stable, level surface.
3. Package Contents
Verify that all items are present in your package:
- LYNCAST Smart Vision Beam Projector
- Remote Control
- Power Adapter
- User Manual
4. Product Overview
Familiarize yourself with the projector's components and interfaces.
4.1 Front View

Image: Front view of the projector, highlighting the projection lens and front ventilation grille.
4.2 Rear View and Interfaces

Image: Rear view of the projector, detailing the HDMI interface, USB interface, and audio interface. The power input is also visible.
- HDMI Interface: Connects to devices like laptops, game consoles (e.g., PS4), or TV boxes.
- USB Interface: For connecting USB drives or other USB devices.
- Audio Interface: For connecting external speakers or headphones.
- Power Input: Connect the provided power adapter here.
4.3 Adjustable Stand

Image: The projector shown with its 180-degree adjustable stand, allowing for flexible projection angles including ceiling projection.
The integrated stand allows for 180-degree rotation, enabling projection onto walls, screens, or ceilings.
5. Setup
- Power Connection: Connect the power adapter to the projector's power input and then to a power outlet.
- Placement: Place the projector on a stable surface. Adjust the 180-degree stand to direct the projection onto your desired surface (wall, screen, or ceiling).
- Initial Power On: Press the power button on the projector or the remote control to turn it on.
- Network Connection:
- Navigate to "Settings" on the home screen.
- Select "Network & Internet" and connect to your Wi-Fi network.
- Bluetooth Pairing (for remote control):
Video: Instructions on how to pair the Bluetooth remote control with the projector. This video demonstrates opening Bluetooth settings, pressing and holding specific buttons on the remote to enter pairing mode, and confirming connection.
- Go to "Settings" -> "Bluetooth Setting".
- On the remote, press and hold the "OK" and "Volume Down" buttons simultaneously until the indicator light flashes, entering pairing mode.
- Select "Bluetooth remote" from the available devices on the projector screen to pair.
- Focus Adjustment: Use the manual focus wheel near the lens to achieve a clear image.
- Keystone Correction: The projector features automatic vertical keystone correction. For manual adjustments, navigate to "Settings" -> "Projection Setting" -> "Keystone".
6. Operating Instructions
6.1 Android 11 OS and Applications

Image: The projector's home screen displaying the Android 11 operating system with various pre-installed applications such as Netflix, YouTube, and Google Play Store.
The projector runs on Android 11, providing access to a wide range of applications. You can download additional apps from the integrated App Store or Google Play Store.
- Use the remote control to navigate the interface.
- Select an app to launch it.
6.2 Screen Mirroring (Wi-Fi & Bluetooth)

Image: The projector wirelessly connected to various devices (iOS, Android, Windows) via 2.4G/5G Wi-Fi and Bluetooth for screen mirroring, displaying a racing game.
The projector supports 2.4G/5G Wi-Fi and Bluetooth for seamless screen mirroring from your iOS, Android, or Windows devices. Ensure your device and the projector are connected to the same Wi-Fi network for optimal performance.
6.3 Connecting External Devices
Image: Rear view of the projector, detailing the HDMI interface, USB interface, and audio interface. The power input is also visible.
- HDMI: Connect gaming consoles (PS4), laptops, or TV boxes using an HDMI cable. Select the HDMI input from the projector's source menu.
- USB: Insert a USB drive to play media files directly. Navigate to the "Files" app to browse content.
- Audio Out: Connect external speakers or headphones to the 3.5mm audio jack for enhanced sound.
6.4 Adjusting Projection Size and Quality
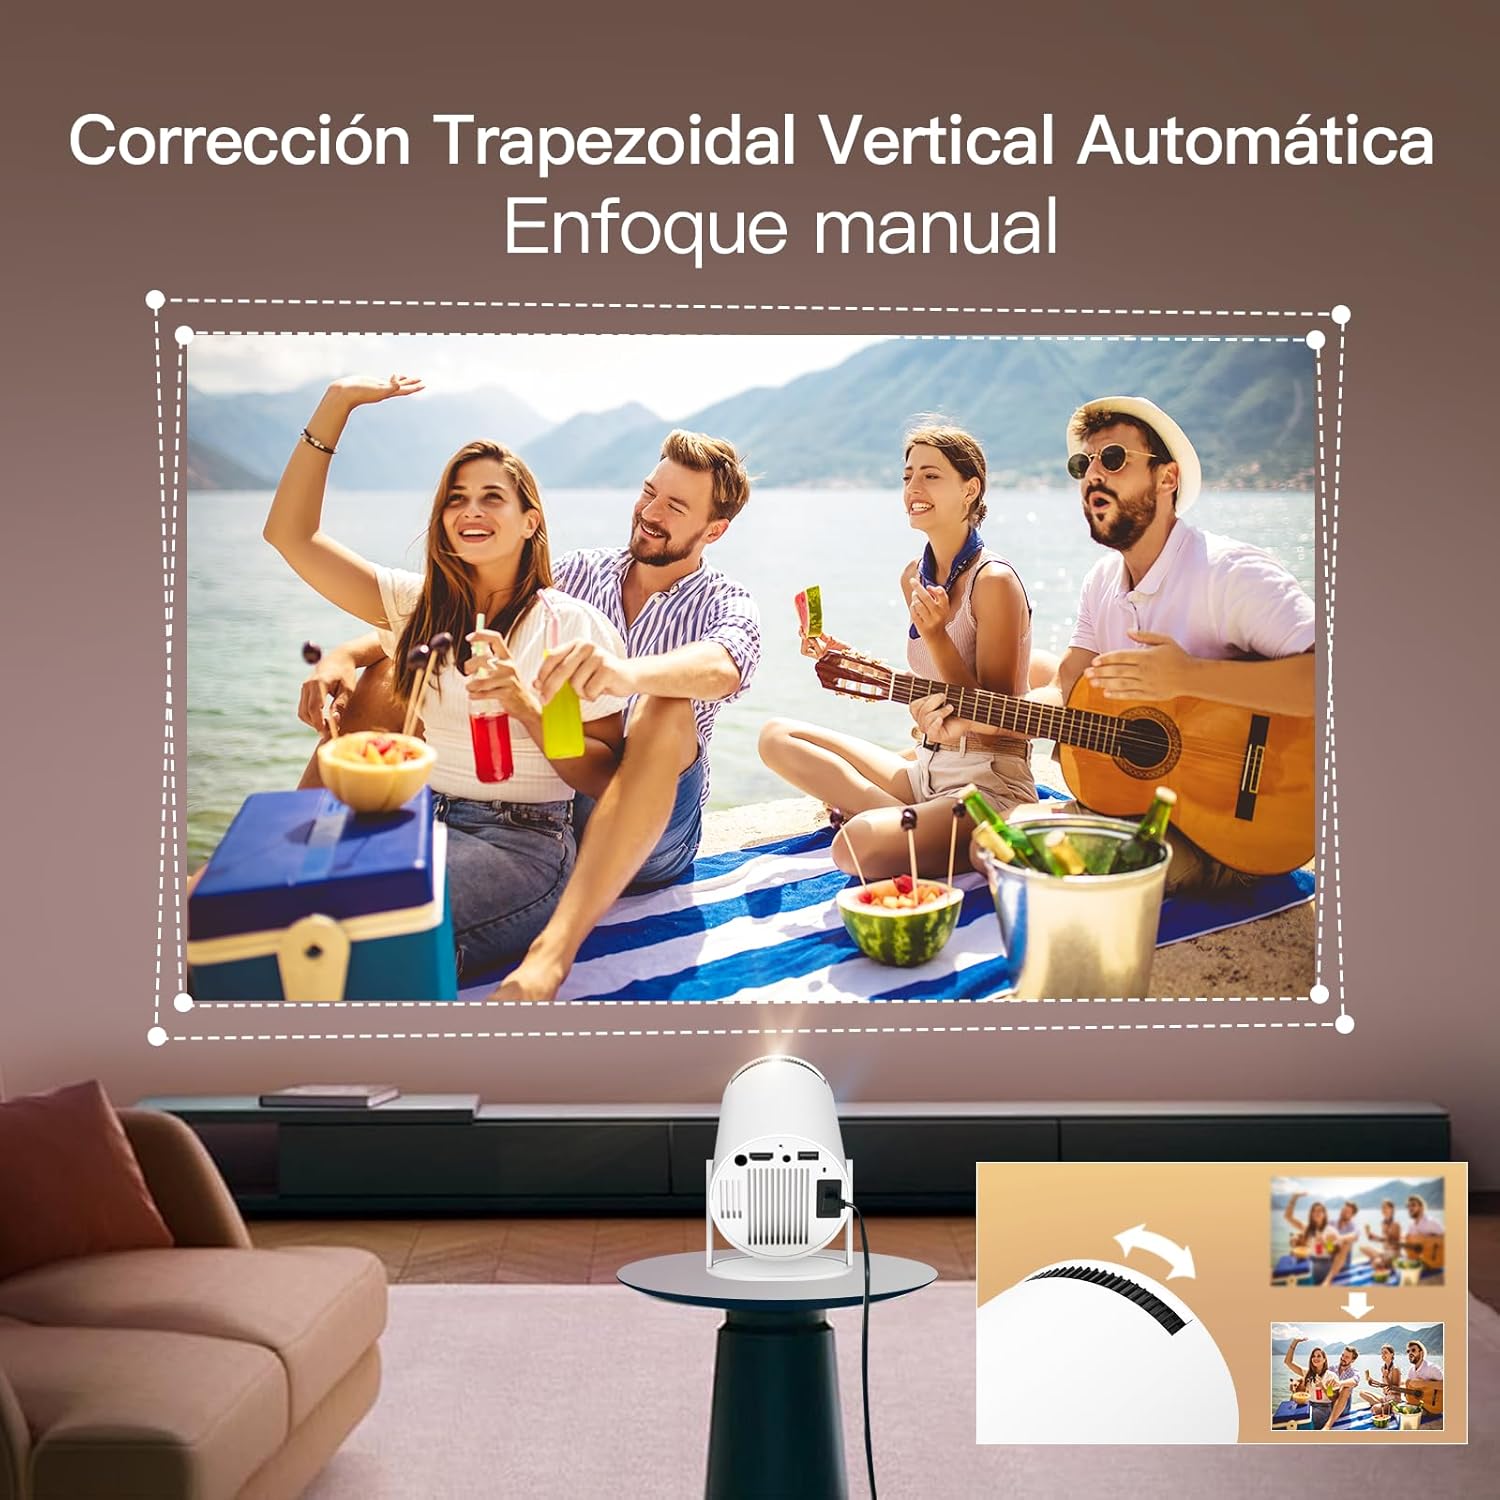
Image: The projector demonstrating flexible screen size options, from 80 inches at 1.6 meters to 130 inches at 2.6 meters, allowing users to choose their preferred viewing experience.
- Zoom Function: Use the remote control to adjust the projection size from 80% to 100% without moving the projector.
- Distance: The projection size varies with distance. For example, 1.6m for 80 inches, 2m for 100 inches, and 2.6m for 130 inches.
- Image Settings: Access "Settings" -> "Picture" to adjust brightness, contrast, color, sharpness, and color temperature.
7. Maintenance
Proper maintenance ensures the longevity and performance of your projector:
- Cleaning the Lens: Use a soft, lint-free cloth specifically designed for optical lenses. Do not use abrasive cleaners or solvents.
- Cleaning the Casing: Wipe the projector's exterior with a soft, dry cloth. For stubborn marks, use a slightly damp cloth and then dry thoroughly.
- Ventilation: Ensure the ventilation openings are clear of dust and obstructions to prevent overheating.
- Storage: When not in use for extended periods, store the projector in a cool, dry place, away from direct sunlight and extreme temperatures.
8. Troubleshooting
| Problem | Possible Cause | Solution |
|---|---|---|
| No image projected | Power cable disconnected, projector off, input source incorrect. | Check power connection, turn on projector, select correct input source (HDMI/USB). |
| Blurred image | Incorrect focus, projector too close/far, keystone not adjusted. | Adjust focus wheel, reposition projector, use auto or manual keystone correction. |
| No sound | Volume too low, external speakers not connected properly, audio settings incorrect. | Increase volume, check external speaker connection, verify audio output settings. |
| Wi-Fi/Bluetooth connection issues | Incorrect password, out of range, interference. | Re-enter password, move closer to router/device, reduce interference. |
| Remote control not working | Batteries low/dead, not paired, obstruction. | Replace batteries, re-pair remote via Bluetooth settings, ensure no obstructions. |
9. Specifications
| Feature | Detail |
|---|---|
| Brand | LYNCAST |
| Model Name | Smart Vision Beam Projector |
| Product Dimensions | 10 x 10 x 17 cm |
| Item Weight | 820 grams |
| Hardware Interface | Bluetooth, HDMI, USB |
| Display Technology | LCD |
| Image Contrast Ratio | 10000:1 to 50000:1 |
| Native Resolution | 1920 x 1080 (Full HD) |
| Max Display Resolution | 1920 x 1080 (Supports 4K input) |
| Connectivity Technology | Bluetooth, Wi-Fi |
| Form Factor | Portable |
| Mounting Type | Tabletop |
| Brightness | 3000 lumens (Note: ANSI lumens are typically lower than marketing lumens) |
| Controller Type | Remote Control |
| Operating System | Android 11 |
10. Warranty and Support
LYNCAST offers comprehensive support for its products. For specific warranty details, please refer to the warranty card included in your package or contact LYNCAST customer service.
- Customer Service: For technical assistance, troubleshooting, or warranty claims, please contact LYNCAST support through their official website or the contact information provided in your product documentation.
- Online Resources: Visit the LYNCAST website for FAQs, updated manuals, and software downloads.

Image: LYNCAST's commitment to customer satisfaction, including a 2-year warranty, 30-day no-reason return policy, 24-hour response time, and lifetime technical support.


