
1. Introduction
Thank you for choosing the ONKRON MS75-B Monitor Desk Mount. This manual provides detailed instructions for the safe and efficient installation, operation, and maintenance of your new monitor mount. Please read this manual thoroughly before installation and keep it for future reference.
The ONKRON MS75-B is a versatile desk mount designed for flat and curved monitors ranging from 17 to 38 inches and weighing between 3 to 11 kg. It features VESA compatibility (75x75mm and 100x100mm) and a high-quality mechanical spring for smooth adjustments and long-term durability. This mount offers extensive flexibility with tilt, swivel, and rotation capabilities, enhancing ergonomic comfort in any workspace.

Image 1.1: ONKRON MS75-B Monitor Desk Mount
This image displays the ONKRON MS75-B monitor desk mount in its assembled form, ready for installation. It highlights the sleek black design and the robust construction of the arm and VESA plate.
2. Safety Information
- Ensure the mounting surface can support the combined weight of the mount and your monitor.
- Do not exceed the maximum weight capacity of 11 kg (24.2 lbs).
- Always follow the installation instructions carefully. Improper installation can result in equipment damage or personal injury.
- Keep small parts away from children.
- Do not overtighten screws.
- If you have any doubts about the installation, consult a qualified professional.
3. Package Contents
Before proceeding with installation, please verify that all components listed below are present in your package:
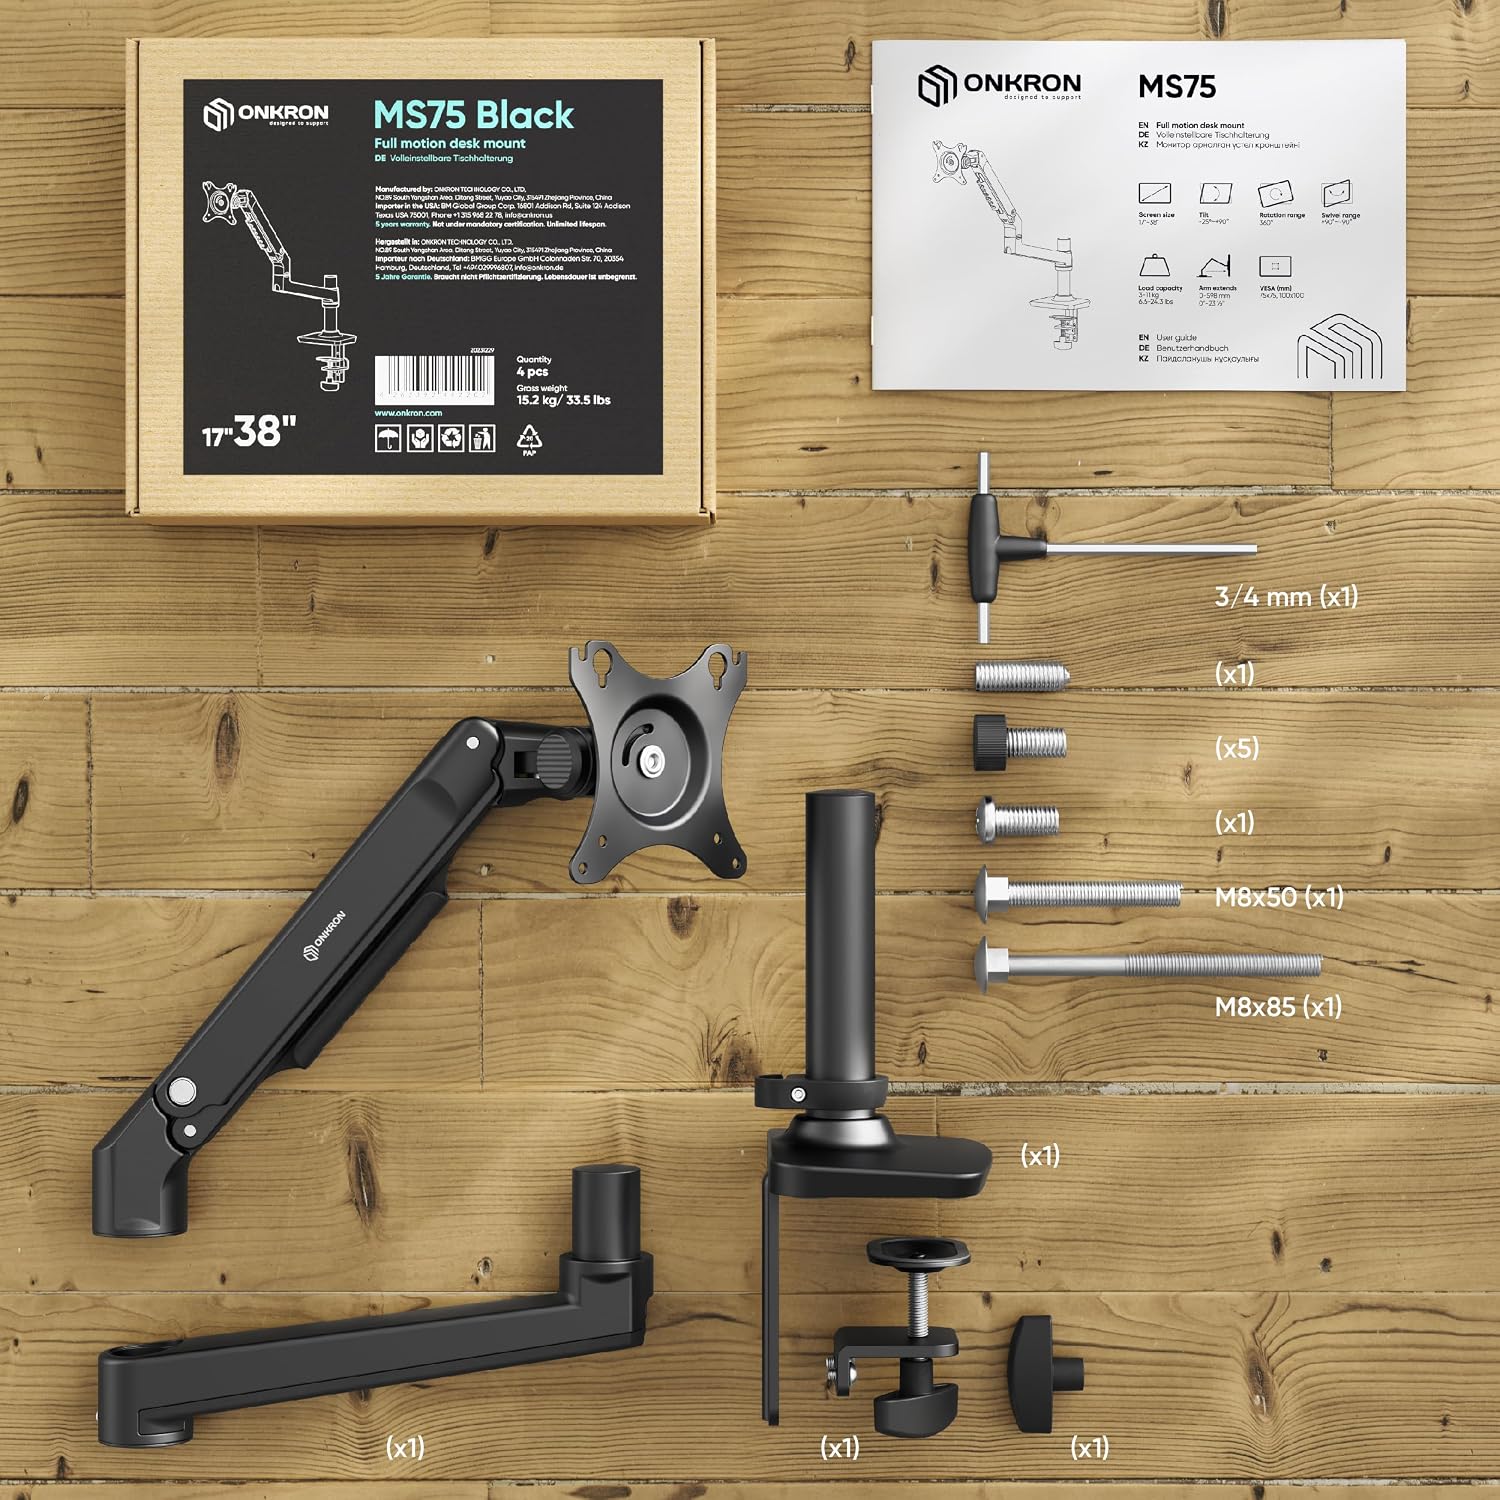
Image 3.1: ONKRON MS75-B Package Contents
This image shows an exploded view of all components included in the ONKRON MS75-B package, including the monitor arm, desk clamp, grommet base, VESA plate, and various screws and tools for assembly.
- Monitor Arm Assembly (x1)
- Desk Clamp Base (x1)
- Grommet Base (x1)
- VESA Plate (x1)
- Mounting Hardware Kit (various screws, washers, spacers)
- Hex Keys (x1)
- Instruction Manual (x1)
4. Specifications
| Feature | Specification |
|---|---|
| Screen Size Compatibility | 17" - 38" (flat or curved) |
| Weight Capacity | 3 kg - 11 kg (6.6 lbs - 24.2 lbs) |
| VESA Compatibility | 75x75mm, 100x100mm |
| Tilt Range | +90° to -25° |
| Swivel Range | 180° |
| Rotation Range | 360° |
| Arm Extension | Up to 598 mm (23.5 inches) |
| Mounting Options | Desk Clamp, Grommet |
| Material | Aluminum |
| Color | Black |
5. Setup and Installation
The ONKRON MS75-B offers two installation methods: desk clamp or grommet mount. Choose the method that best suits your desk and preferences.
5.1. Desk Clamp Installation
- Attach the desk clamp base to the main pole using the provided screws.
- Position the clamp on the edge of your desk. Ensure the desk thickness is within the clamp's adjustable range.
- Tighten the clamp screw until the mount is securely fastened to the desk. Do not overtighten.

Image 5.1: Desk Clamp Mounting
This image illustrates the desk clamp mounting option, showing the clamp securely attached to the edge of a desk. The detail highlights the tightening mechanism for stable installation.
5.2. Grommet Mount Installation
- If your desk has a grommet hole, or if you plan to drill one, ensure the hole diameter is appropriate for the grommet base.
- Insert the grommet base through the hole.
- Secure the grommet base from underneath the desk using the provided plate and screw.
5.3. Attaching the Monitor Arm and Monitor

Image 5.2: Easy and Quick Assembly
This image provides a visual guide to the assembly process, showing the monitor arm being attached to the desk mount base and the VESA plate being prepared for monitor attachment. It emphasizes the straightforward nature of the installation.
- Slide the monitor arm assembly onto the pole. Adjust the height and tighten the collar screw to secure it.
- Attach the VESA plate to the back of your monitor using the appropriate screws from the hardware kit. Ensure the screws are tightened securely but do not overtighten.
- Carefully slide the monitor (with the attached VESA plate) onto the monitor arm's VESA head. Ensure it clicks into place or is secured with the locking mechanism.
- Adjust the tension of the mechanical spring if necessary to counterbalance your monitor's weight. Use the included hex key to turn the adjustment screw until the monitor stays in position when moved.
6. Operation and Adjustments
The ONKRON MS75-B monitor mount offers a wide range of adjustments to achieve an ergonomic viewing experience.

Image 6.1: Monitor Arm Adjustment Capabilities
This diagram illustrates the full range of motion for the ONKRON MS75-B, including 360° rotation, 180° swivel, and tilt from +90° to -25°. It also shows the arm's extension capability up to 59.8 cm (598 mm).
6.1. Tilt Adjustment
Gently push or pull the top or bottom edge of your monitor to adjust the tilt angle from +90° (upwards) to -25° (downwards). This allows you to reduce glare and find the optimal viewing angle.
6.2. Swivel Adjustment
Rotate the monitor arm horizontally to swivel your monitor up to 180° (90° left or 90° right). This is useful for sharing your screen with colleagues or adjusting your viewing position.
6.3. Rotation Adjustment
The VESA plate allows for a full 360° rotation, enabling you to switch your monitor between landscape and portrait orientations without removing it.

Image 6.2: Rotation Limitation Option
This image highlights a feature that allows users to limit the rotation of the monitor arm, preventing it from hitting walls or other objects behind the desk. This can be adjusted using a screw on the arm joint.
6.4. Height and Extension Adjustment
The mechanical spring arm allows for fluid vertical height adjustments. Simply push or pull the monitor to the desired height. The arm can also extend up to 598 mm (23.5 inches) to bring the screen closer or further away.

Image 6.3: Monitor in Flexible Use
This image demonstrates the practical flexibility of the monitor mount, showing a user interacting with a monitor that is positioned at a low, angled height, ideal for tasks like drawing or design work.
6.5. Cable Management
Utilize the integrated cable management clips along the arm to route your monitor cables. This helps maintain a tidy and organized workspace.

Image 6.4: Integrated Cable Management
This image shows a close-up of the monitor arm with cables neatly routed through the integrated cable management channels, contributing to a clean and organized desk setup.
7. Maintenance
To ensure the longevity and optimal performance of your ONKRON MS75-B monitor mount, follow these simple maintenance guidelines:
- Cleaning: Wipe the mount with a soft, damp cloth. Avoid using abrasive cleaners or solvents that could damage the finish.
- Periodic Inspection: Regularly check all screws and connections to ensure they remain tight. Retighten if necessary.
- Spring Tension: If the monitor does not hold its position or drifts, readjust the spring tension using the hex key as described in the installation section.

Image 7.1: Durable Mechanical Spring Components
This close-up image highlights the robust mechanical spring mechanism within the monitor arm, emphasizing its durable components designed for a long lifespan and reliable performance.
8. Troubleshooting
If you encounter any issues with your ONKRON MS75-B monitor mount, refer to the following common problems and solutions:
- Monitor Sags or Does Not Stay in Position:
Solution: The spring tension needs adjustment. Use the provided hex key to turn the tension screw (usually located on the arm joint) clockwise to increase tension for heavier monitors, or counter-clockwise to decrease tension for lighter monitors. Adjust until the monitor holds its position. - Monitor is Difficult to Move:
Solution: The spring tension might be too high, or the pivot points are too tight. Try decreasing the spring tension slightly. Check if any pivot screws are overtightened and loosen them slightly if needed. - Mount Feels Unstable:
Solution: Ensure the desk clamp or grommet mount is securely tightened to the desk. Check that all screws connecting the arm components are firm. Verify that your monitor's weight is within the specified capacity. - Cables are Not Tidy:
Solution: Reroute cables through the integrated cable management clips along the arm. Ensure cables have enough slack for full range of motion without being stretched.
9. Warranty and Support
ONKRON products undergo multi-level quality control to ensure reliability. For specific warranty information, please refer to the documentation included with your purchase or visit the official ONKRON website. If you require further assistance or have questions not covered in this manual, please contact ONKRON customer support.
You can often find support contact details on the product packaging or the ONKRON brand store page on Amazon.