
1. Safety Information
Please read all safety instructions carefully before operating the device. Failure to follow these instructions may result in injury or damage to the product.
- Laser Radiation: This product contains a Class I laser. Avoid direct eye exposure to the laser beam. Do not look directly into the aperture.
- Power Supply: Use only the provided power adapter. Ensure the power source matches the voltage requirements specified on the device.
- Ventilation: Ensure adequate ventilation around the unit to prevent overheating. Do not block ventilation openings.
- Environment: Do not expose the device to rain, moisture, extreme temperatures, or dusty environments. This product is for indoor use only.
- Installation: Securely mount the device to prevent accidental falls. Ensure the mounting surface can support the weight of the unit.
- Maintenance: Refer to the maintenance section for cleaning and care. Do not attempt to open or repair the unit yourself. Contact qualified service personnel for assistance.
2. Product Overview
The Warmdance DJ Laser Lights (Model ZQ03266) is a versatile lighting unit designed to create dynamic visual effects for various events. It combines multiple light sources and control options for diverse applications.
2.1 Key Features
- 4-in-1 Lighting Effects: Integrates RED and BLUE gobo lights, RED and Green laser lights, and RGB strobe lights.
- Extensive Pattern Library: Generates over 100 patterns and 200 laser lighting effects, including 32 dual-image grating patterns and 51 scanning single images.
- Multiple Control Modes: Supports Auto, Sound-Activated, Master/Slave, Remote Control, and DMX512 operation.
- DMX512 Compatibility: Professional 11-channel / 34-channel DMX control for advanced lighting design.
- Compact and Durable Design: Constructed from aluminum, featuring a rectangular shape and a modern aesthetic.
- Adjustable Beam: Allows for adjustment of beam pattern size and angle to suit different venue sizes.

Image: The Warmdance DJ Laser Lights unit showcasing its diverse range of colorful laser and gobo patterns in action.
2.2 Package Contents
Verify that all items are present in the package:
- Warmdance DJ Laser Lights Machine (x1)
- Instruction Manual (x1)
- Power Cord (x1)
- Remote Control (x1)

Image: A visual representation of the items included in the product package, ensuring all components are accounted for.
3. Setup Instructions
Follow these steps to set up your Warmdance DJ Laser Lights unit.
- Unpack: Carefully remove the laser light unit and all accessories from the packaging.
- Placement/Mounting:
- Place the unit on a stable, flat surface (Table Mount).
- Alternatively, use the integrated mounting bracket to securely hang the unit from a truss or ceiling. Ensure all clamps and safety cables are properly secured.
- Position the light to project patterns onto a desired surface, avoiding direct eye-level projection.
- Power Connection: Connect the provided power cord to the unit's power input and then to a suitable electrical outlet (AC110-240V, 50/60Hz).
- Initial Power On: Flip the power switch to the 'ON' position. The display screen should illuminate.
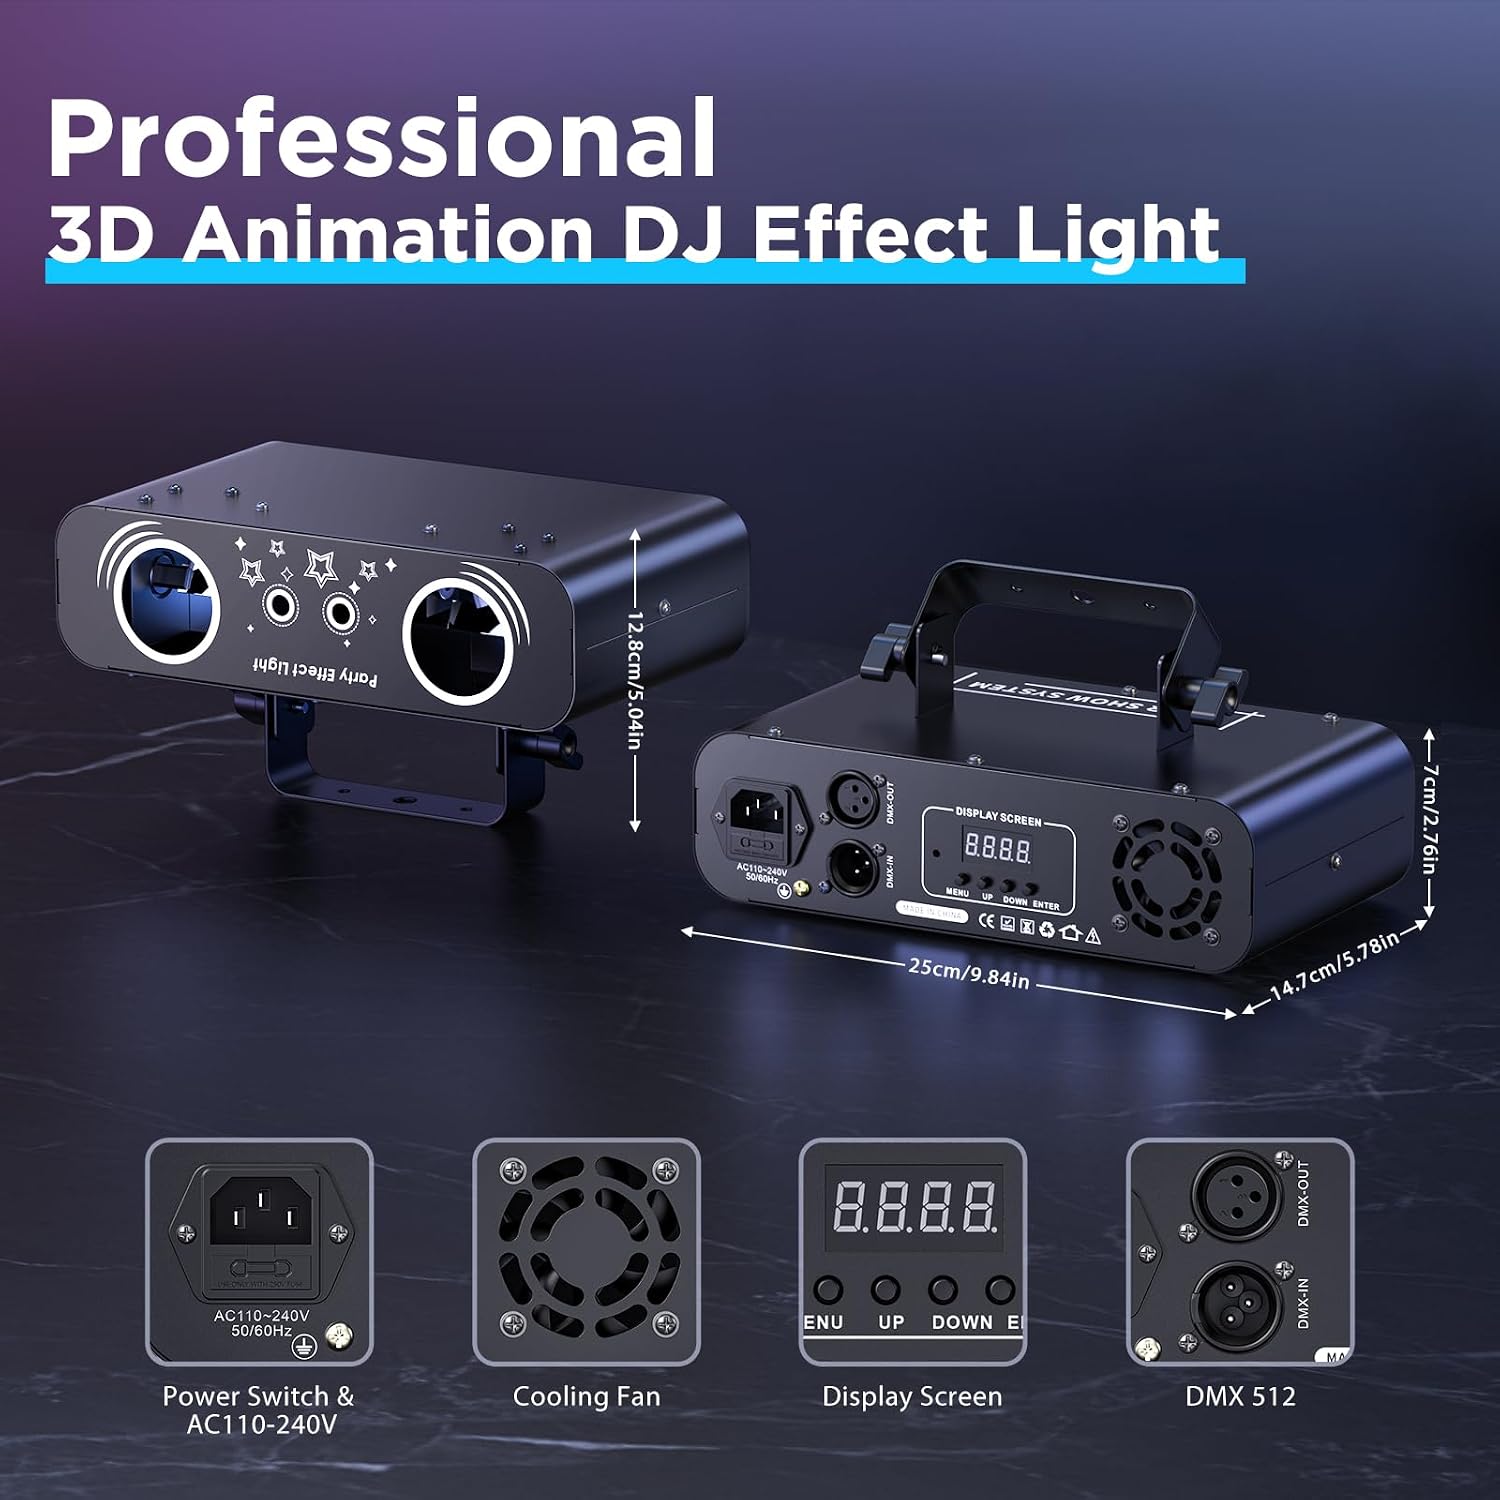
Image: The rear panel of the laser light unit, detailing the power input, cooling fan, display screen, and DMX connections, along with product dimensions.
4. Operating Modes
The Warmdance DJ Laser Lights offer five distinct control modes to suit various operational needs.
4.1 Auto Mode
In Auto Mode, the unit cycles through its pre-programmed patterns and effects automatically. This mode is ideal for quick setup and continuous operation without manual intervention.
- Press the 'Auto' button on the remote control to activate.
- Multiple Auto modes (Auto 1, Auto 2, Auto 3, Auto 4) may be available, offering different sequences.
4.2 Sound-Activated Mode
The Sound-Activated Mode allows the laser light to synchronize its patterns and effects with the rhythm of music or ambient sound. A built-in microphone detects sound levels.
- Press a 'Sound' button (Sound 1, Sound 2, Sound 3, Sound 4) on the remote control to activate.
- Adjust the sensitivity using the 'SEN' button on the remote to fine-tune responsiveness to sound.
4.3 Master/Slave Mode
For synchronized lighting across multiple units, connect them in a Master/Slave configuration. One unit acts as the Master, controlling all connected Slave units.
- Connect the DMX OUT port of the Master unit to the DMX IN port of the first Slave unit using a DMX cable.
- Continue connecting DMX OUT to DMX IN for subsequent Slave units in a daisy chain.
- Set the Master unit to an operating mode (e.g., Auto or Sound-Activated).
- Set all Slave units to 'Slave' mode (refer to the unit's display or remote control for specific instructions).
4.4 Remote Control Operation
The included remote control provides convenient access to various functions and modes.

Image: A detailed diagram illustrating the remote control and the functions of each button for easy operation.
Remote Control Functions:
- ON/OFF: Powers the unit on or off.
- DMX: Activates DMX address code setting.
- Auto 1-4: Selects different automatic pattern sequences.
- Sound 1-4: Selects different sound-activated modes.
- SEN (Sensitivity): Adjusts the microphone sensitivity for sound-activated modes.
- The beam Light 1-4: Controls specific beam light effects.
- UP/DOWN: Navigates menus or adjusts parameters (e.g., DMX address, speed).
Note: When using the remote control, ensure it is pointed towards the front of the laser light unit for optimal signal reception.
4.5 DMX512 Control
For professional lighting control, connect the unit to a DMX512 console. The unit supports 11-channel or 34-channel DMX modes.
- Connect DMX: Connect the DMX OUT of your console to the DMX IN of the laser light unit. For multiple units, daisy-chain them (DMX OUT to DMX IN).
- Set DMX Address: Use the display screen and UP/DOWN buttons on the unit, or the DMX button on the remote, to set a unique DMX starting address for each unit.
- Select DMX Channel Mode: Choose between 11CH or 34CH mode on the unit's display, depending on your console and desired control depth.
- Control: Use your DMX console to control various parameters such as movement, rotation, zoom, drawing, speed, and individual light effects.

Image: A visual display of the numerous 3D animation RGB effect patterns that can be projected by the laser light unit.

Image: Illustrations showing how the beam pattern size and angle can be adjusted to fit various room sizes and environments.
5. Maintenance
Regular maintenance ensures optimal performance and longevity of your laser light unit.
- Cleaning Lenses: Periodically clean the optical lenses with a soft, lint-free cloth and a mild lens cleaning solution. Ensure the unit is powered off and unplugged before cleaning.
- Exterior Cleaning: Wipe the exterior casing with a dry or slightly damp cloth. Do not use harsh chemicals or abrasive cleaners.
- Ventilation: Ensure the cooling fan and ventilation openings are free from dust and debris. Use compressed air to gently clear any blockages.
- Storage: When not in use, store the unit in a cool, dry place, away from direct sunlight and extreme temperatures.
6. Troubleshooting
If you encounter issues with your Warmdance DJ Laser Lights, refer to the following common problems and solutions.
| Problem | Possible Cause | Solution |
|---|---|---|
| Unit does not power on. | No power supply; faulty power cord; power switch off. | Check power connection; ensure power switch is ON; try a different outlet. |
| No light output. | Unit in standby; mode not selected; laser aperture blocked. | Ensure unit is ON and not in standby; select an operating mode (Auto, Sound, DMX); check for obstructions on the lens. |
| Remote control not working. | Battery depleted; remote not pointed at unit; IR sensor blocked. | Replace remote battery; point remote directly at the front of the unit; ensure no obstructions between remote and unit. |
| Sound-activated mode unresponsive. | Low sound input; sensitivity too low. | Increase music volume; adjust 'SEN' (Sensitivity) on the remote control. |
| DMX control issues. | Incorrect DMX address; faulty DMX cable; incorrect channel mode. | Verify DMX address settings; check DMX cable connections; ensure unit and console are in the same DMX channel mode. |
7. Specifications
| Specification | Detail |
|---|---|
| Model Number | ZQ03266 |
| Brand | Warmdance |
| Color | Multicolor |
| Shape | Rectangular |
| Material | Aluminum Alloy |
| Finish Type | Painted |
| Light Source Type | Light Emitting Diode (LED) |
| Laser Level | Class I (Red 0.3mW, Green 0.3mW, Blue 0.3mW) |
| Power Source | Corded Electric |
| Voltage | 15 Volts |
| Wattage | 50 Watts |
| Mounting Type | Table Mount (with bracket for hanging) |
| Product Dimensions | 5.9"L x 5.7"W x 5"H (14.7cm x 14.5cm x 12.7cm) |
| Item Weight | 4.49 pounds (2.04 kg) |
| Certifications | FCC, FDA, UL |
8. Warranty and Support
For warranty information or technical support, please refer to the contact details provided with your purchase documentation or visit the official Warmdance website. Keep your purchase receipt as proof of purchase.