1. Introduction
This manual provides detailed instructions for the safe installation, operation, and maintenance of your WINGBO 48 Inch Flush Mount DC Ceiling Fan. Please read all instructions carefully before beginning installation and retain this manual for future reference. Proper installation and operation are essential for optimal performance and safety.
Safety Information
- Always disconnect power at the main circuit breaker before installation or servicing.
- Ensure all electrical connections comply with local codes and ordinances. If you are unsure, consult a qualified electrician.
- The fan must be mounted to a ceiling joist or support structure capable of supporting a minimum of 35 lbs (15.9 kg).
- Ensure the fan blades are at least 7 feet (2.1 meters) from the floor and 18 inches (0.46 meters) from any wall or obstruction.
- Do not bend the blade holders during installation or cleaning.
- Do not operate the fan without the blades installed.
2. Package Contents
Carefully unpack all components and ensure you have received all items listed below. If any parts are missing or damaged, contact WINGBO customer service before proceeding with installation.
- DC Motor Assembly
- Fan Blades (4)
- Mounting Bracket
- Canopy
- LED Light Kit
- Lamp Cover
- Remote Control with Wall Mount
- Hardware Pack (screws, wire nuts, washers)
- Instruction Manual

Image: WINGBO 48 Inch Flush Mount DC Ceiling Fan with remote control.
3. Setup and Installation
Follow these step-by-step instructions for installing your WINGBO ceiling fan. It is recommended to have two people for certain steps.
Installation Video Guide
Video: A detailed installation guide for the WINGBO Flush Mount Ceiling Fan with Light.
Step-by-Step Instructions
- Install the Mounting Bracket: Secure the mounting bracket to the ceiling junction box using the screws provided. Ensure the bracket is firmly attached and can support the fan's weight.
- Hang the Motor Assembly: Carefully lift the motor assembly and hang it onto the hook provided on the mounting bracket. This will support the fan while you make electrical connections.
- Connect Electrical Wires: Connect the fan's electrical wires to the household wiring according to the wiring diagram in the manual. Typically, this involves connecting live, neutral, and ground wires. Use wire nuts to secure connections.
- Install the Receiver: Tuck the remote control receiver into the mounting bracket, ensuring wires are not pinched.
- Attach the Canopy: Slide the canopy up over the mounting bracket and secure it with the provided screws.
- Attach the Blades: Secure each fan blade to the motor housing using the provided screws. Ensure all screws are tightened securely.
- Install the LED Light Kit: Connect the LED light kit wires to the corresponding wires from the motor assembly. Secure the light kit to the fan.
- Install the Lamp Cover: Carefully attach the lamp cover to the light kit, twisting or snapping it into place as designed.
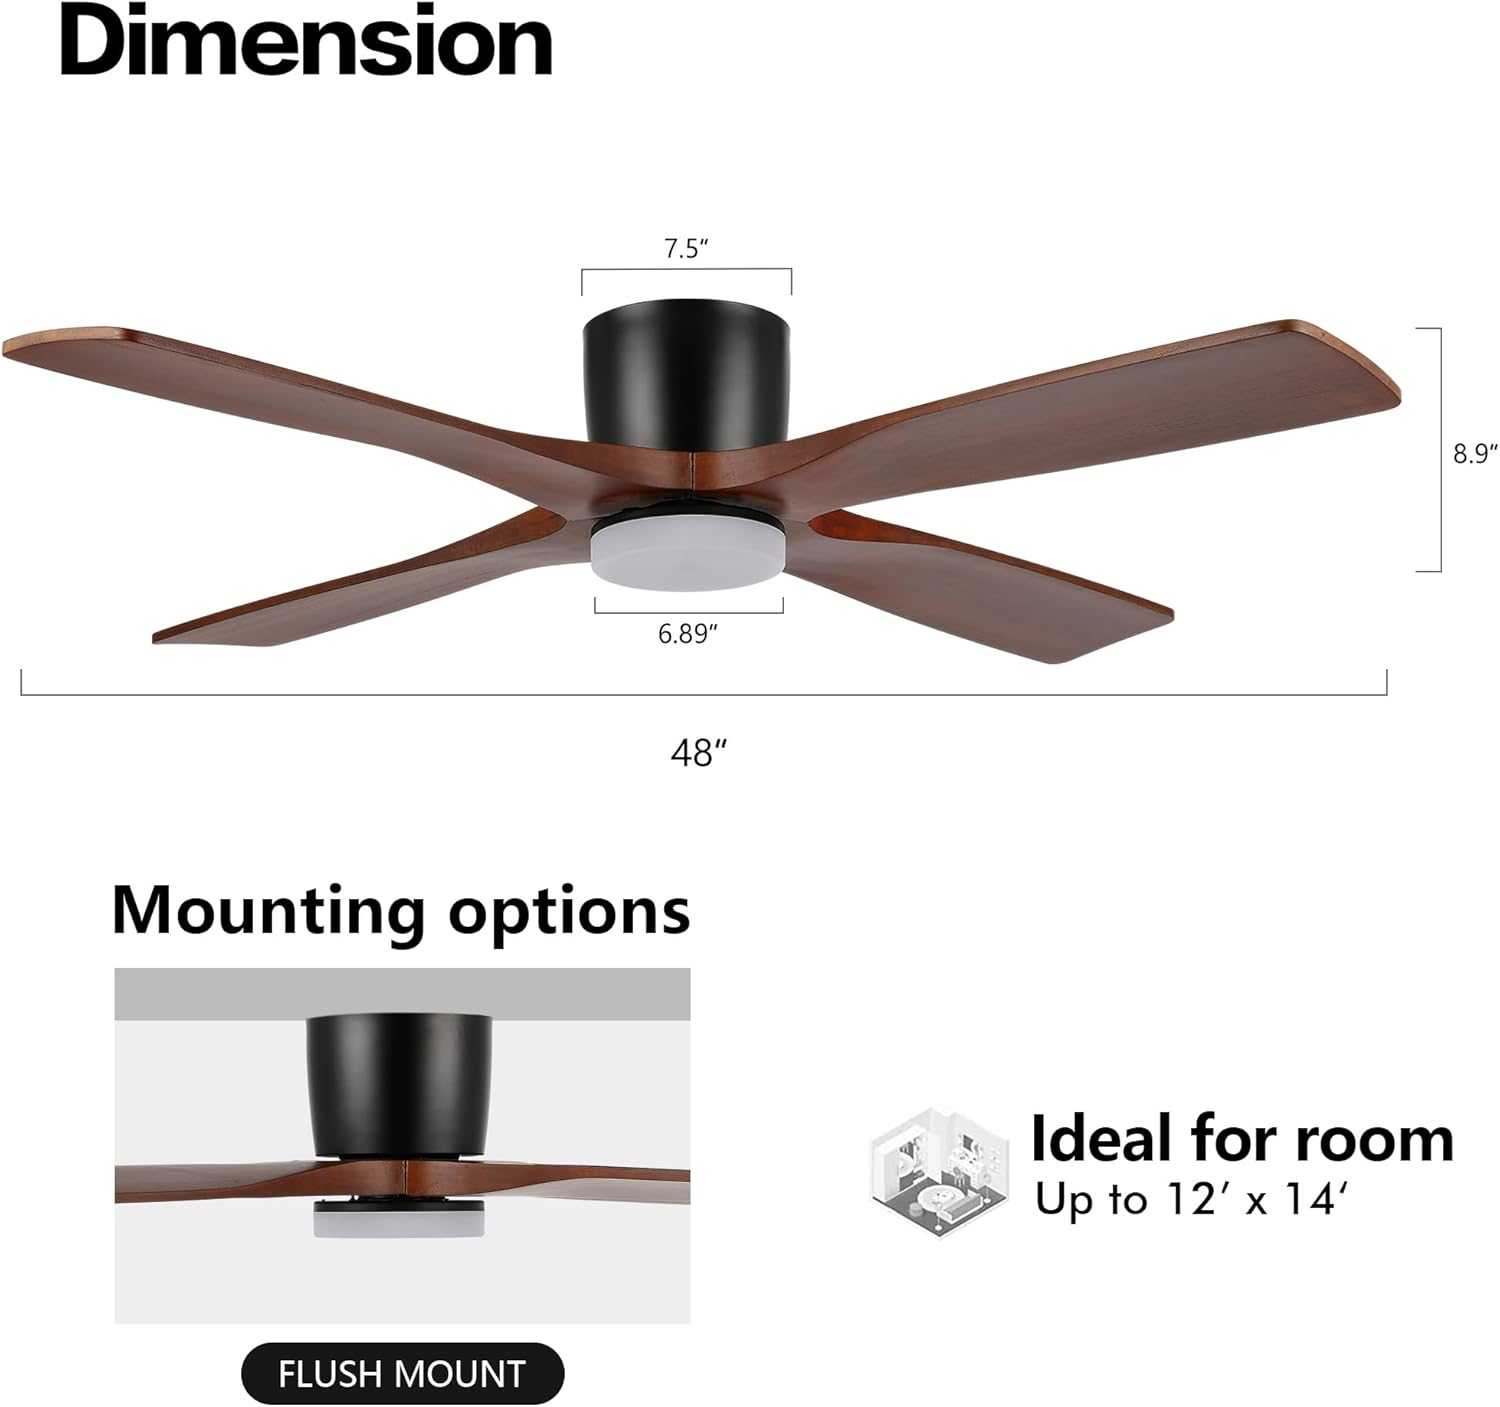
Image: Product dimensions and flush mount installation detail, showing the fan's compact 9-inch total height.
4. Operating Instructions
Your WINGBO ceiling fan is operated using the included remote control. Ensure the remote has fresh batteries installed.
Remote Control Functions

Image: Overview of the remote control, detailing buttons for fan speed, light control, nature mode, and timer functions.
- Fan Control (1-6): Press buttons 1 through 6 to adjust the fan speed from low (1) to high (6).
- Light Control: Press the light button to turn the light ON/OFF. Hold the button to dim or brighten the light.
- Color Temperature (3000K/4500K/6000K): Press the color temperature button to cycle through warm white (3000K), natural white (4500K), and cool white (6000K) light options.
- Reverse Function: Press the reverse button to change the direction of the fan blades. This is used for Summer and Winter modes.
- Nature Mode: Activates a fluctuating fan speed to simulate a natural breeze.
- Timer (1H/2H/4H/8H): Set the fan to automatically turn off after 1, 2, 4, or 8 hours.
Summer and Winter Modes

Image: Diagram illustrating the airflow direction for Summer Mode (downward airflow) and Winter Mode (upward airflow).
- Summer Mode (Counter-clockwise rotation): The fan blades rotate counter-clockwise, pushing air downwards to create a cooling breeze.
- Winter Mode (Clockwise rotation): The fan blades rotate clockwise, drawing cool air upwards and circulating warm air trapped near the ceiling.

Image: Visual representation of the three available light color temperatures: Warm Light (3000K), Natural Light (4500K), and Day Light (6000K).
5. Maintenance
Regular maintenance helps ensure the longevity and optimal performance of your ceiling fan.
- Cleaning: Use a soft, damp cloth to clean the fan blades and motor housing. Do not use abrasive cleaners or solvents.
- Tighten Screws: Periodically check all screws on the fan blades and mounting hardware to ensure they are tight. Loose screws can cause wobbling or noise.
- Dusting: Dust the fan regularly to prevent buildup, which can affect performance and appearance.
- No Lubrication Required: The DC motor is permanently lubricated and does not require additional oiling.
6. Troubleshooting
If you experience issues with your fan, refer to the following common problems and solutions:
| Problem | Possible Cause | Solution |
|---|---|---|
| Fan does not start | No power to the fan; Loose wire connections; Remote control battery low. | Check circuit breaker; Verify all wire connections are secure; Replace remote control battery. |
| Fan wobbles | Loose blade screws; Improperly balanced blades; Loose mounting bracket. | Tighten all blade screws; Use a balancing kit (not included) to balance blades; Ensure mounting bracket is securely fastened. |
| Light does not work | Loose light kit wire connection; Faulty LED light kit. | Check light kit wire connections; Contact customer service for a replacement light kit if necessary. |
| Remote control not working | Low or dead battery; Incorrect pairing. | Replace battery; Refer to remote pairing instructions (usually in a separate remote manual or quick start guide). |
7. Specifications
- Model: SYCF4802
- Blade Span: 48 inches
- Number of Blades: 4
- Blade Material: Carved Wood (Walnut finish)
- Motor Type: DC Motor (6-speed, reversible)
- Light Kit: Integrated 24 Watt LED
- Color Temperature: 3000K (Warm), 4500K (Natural), 6000K (Daylight)
- Control: Remote Control
- Installation Type: Flush Mount
- Recommended Room Size: Up to 12' x 14'
- Total Height: Approximately 9 inches
- Item Weight: 16.33 pounds
- Safety Certification: ETL Listed
8. Warranty and Support
For warranty information or technical support, please contact WINGBO customer service. Keep your purchase receipt as proof of purchase for any warranty claims.
WINGBO Customer Service: Refer to the contact information provided with your product packaging or visit the official WINGBO website.