1. Introduction
Thank you for choosing the Greenvelly 36-inch Metal Locking Storage Cabinet. This manual provides essential information for the safe assembly, operation, and maintenance of your new storage cabinet. Please read these instructions carefully before beginning assembly and retain them for future reference.

Image 1.1: Greenvelly 36-inch Metal Locking Storage Cabinet with doors open.
2. Safety Information
- Always assemble the cabinet on a clean, flat, and stable surface to prevent damage or injury.
- Ensure all parts are present and undamaged before assembly. Do not proceed with assembly if any parts are missing or damaged.
- Use appropriate tools as specified in the assembly instructions.
- Do not overtighten screws during assembly to avoid stripping the metal.
- For stability, secure the cabinet to a wall using the provided anti-toppling design features, especially in areas with children or pets.
- Do not exceed the maximum weight limit of 180 pounds for the entire cabinet, or the individual shelf weight capacity.
- Keep children and pets away from the assembly area.
3. Package Contents
Verify that all components are included in your package before beginning assembly. If any parts are missing or damaged, please contact customer support.
- Cabinet Panels (sides, top, bottom, back, doors)
- 4 x Removable Shelves
- Locking Mechanism and Handle Assembly
- 2 x Keys
- Assembly Hardware (screws, bolts, etc.)
- Anti-toppling Hardware
- Installation Tool (e.g., screwdriver)
- Instruction Manual

Image 3.1: Product dimensions and packaging details.
4. Setup (Assembly Instructions)
Assembly typically takes approximately 25-40 minutes for one person. Follow the steps below carefully. It is recommended to wear the provided cotton gloves during assembly to protect your hands.
- Unpack and Identify Parts: Carefully remove all components from the packaging. Lay them out on a soft, clean surface to prevent scratches. Refer to the parts list in your manual to identify each piece.
- Assemble the Frame: Attach the side panels to the bottom panel, ensuring proper alignment of screw holes. Secure with the provided hardware, tightening screws gently at first.
- Install Back Panel: Slide or attach the back panel into the designated grooves or secure it to the frame.
- Attach Top Panel: Secure the top panel to the assembled frame using the remaining hardware. Ensure all connections are firm but do not overtighten.
- Install Shelves: Insert the shelf clips or supports into the desired slots on the side panels. Place the removable shelves onto these supports. The shelves are adjustable to accommodate various item sizes.
- Mount Doors and Locking Mechanism: Attach the doors to the cabinet frame using the hinges. Install the handle and the 3-point interlocking locking mechanism according to the specific instructions provided in your package. Ensure the lock operates smoothly with the keys.
- Secure to Wall (Anti-Toppling): Position the cabinet in its final location. Use the anti-toppling hardware to securely fix the cabinet to a wall. This step is crucial for safety and stability.

Image 4.1: Visual representation of assembly process and estimated time.
5. Operating Instructions
5.1 Using the Locking Mechanism
Your Greenvelly cabinet features a high-security 3-point interlocking system. Insert one of the provided keys into the lock on the door handle and turn to lock or unlock the cabinet. Always ensure the doors are fully closed before attempting to lock them. Keep the two keys in a safe, separate location.

Image 5.1: Detail of the cabinet's locking mechanism and keys.
5.2 Adjusting Shelves
The cabinet includes 4 removable shelves that can be adjusted to different heights. To adjust a shelf, first remove all items from it. Then, carefully lift the shelf and reposition the shelf clips or supports to the desired slots on the side panels. Ensure all four clips are securely in place before placing the shelf back and loading items.

Image 5.2: Adjustable shelves for versatile storage.
5.3 Loading the Cabinet
Distribute weight evenly across the shelves. Avoid placing heavy items exclusively on one side or on the top shelf without proper support. Each shelf is designed for strong capacity, with a thickness up to 0.789 inches, approximately 2.5 times the thickness of a standard phone.
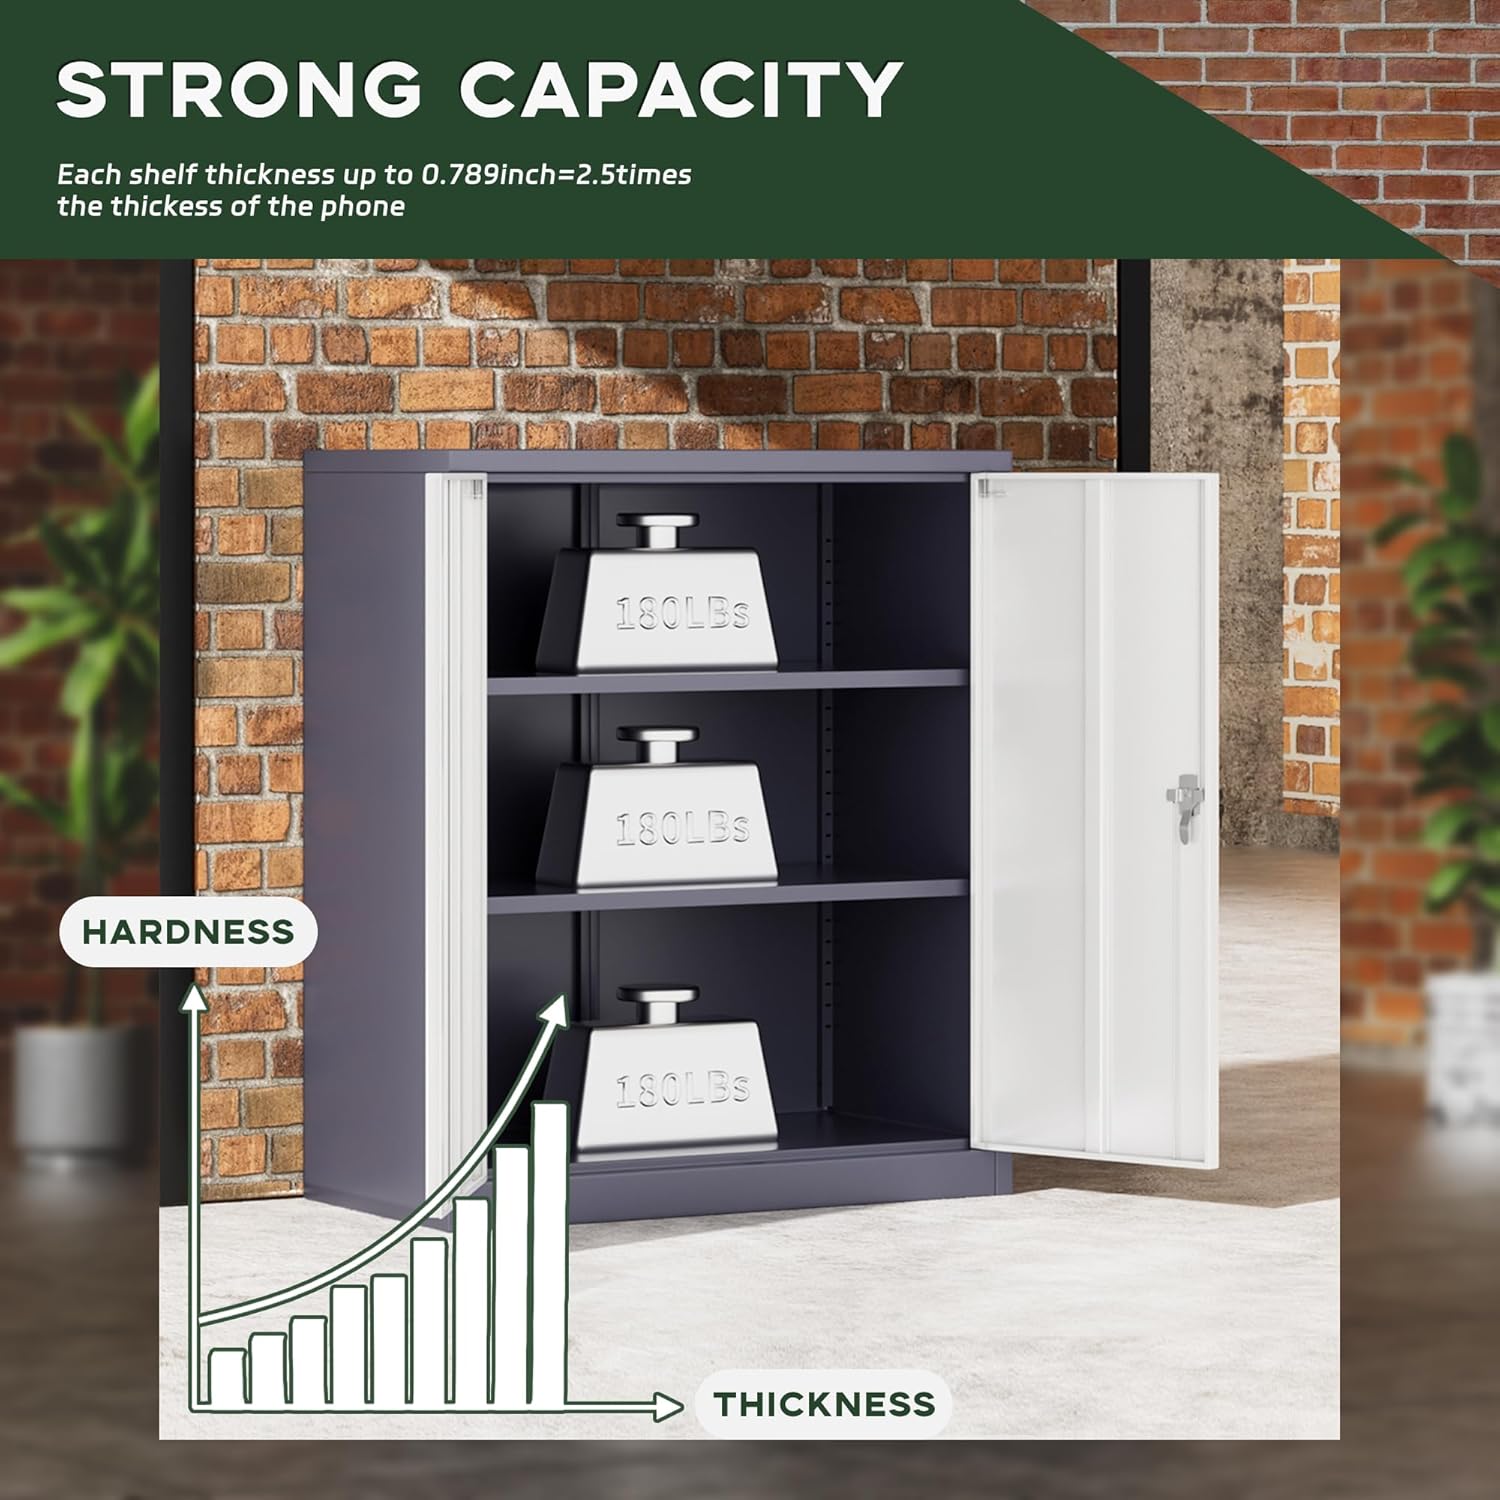
Image 5.3: Shelf thickness and capacity illustration.
6. Maintenance
The Greenvelly metal storage cabinet is designed for durability and easy maintenance. The new imported paint is scratch and wear resistant.
- Cleaning: Wipe the cabinet surfaces with a soft, damp cloth. For stubborn marks, a mild soap solution can be used, followed by drying with a clean cloth. Avoid abrasive cleaners or harsh chemicals that could damage the finish.
- Inspection: Periodically check all screws and connections to ensure they remain tight. Retighten if necessary, but avoid overtightening.
- Lock Mechanism: If the lock mechanism becomes stiff, a small amount of graphite lubricant can be applied to the keyhole.

Image 6.1: Benefits of an organized storage solution.
7. Troubleshooting
| Problem | Possible Cause | Solution |
|---|---|---|
| Missing parts upon arrival | Packaging error or transit damage. | Contact Greenvelly customer support immediately with your purchase details. |
| Difficulty during assembly | Incorrect step order, misaligned parts, or overtightened screws. | Review the assembly instructions carefully. Ensure parts are correctly oriented before tightening. Do not overtighten screws. If issues persist, contact customer support. |
| Cabinet feels unstable | Not properly secured to the wall, uneven floor, or loose connections. | Ensure the anti-toppling hardware is correctly installed and secured to a sturdy wall. Check that all assembly screws are tightened. Place the cabinet on a level surface. |
| Lock mechanism is stiff or not working | Debris in lock, mechanism misalignment, or key issue. | Ensure the doors are fully closed and aligned. Apply a small amount of graphite lubricant to the keyhole. If the issue persists, contact customer support. |
| Doors do not close properly | Hinges are loose, cabinet is not level, or frame is misaligned. | Check and tighten hinge screws. Ensure the cabinet is on a level surface. Verify that the cabinet frame was assembled squarely. |
8. Specifications
- Brand: Greenvelly
- Model Name: 36 X 32 X 16 inch Cabinet
- Color: Grey White
- Material: 100% Cold-Rolled Steel
- Product Dimensions: 16"D x 32"W x 36"H
- Special Feature: Lockable (3-point interlocking system)
- Mounting Type: Floor Mount, Wall Mount (anti-toppling design)
- Number of Shelves: 4 (adjustable)
- Weight Limit: 180 Pounds (total cabinet)
- Finish Type: Painted
- Lock Type: Key (2 keys included)
- Assembly Required: Yes
- UPC: 749346715437
- ASIN: B0D83GZ34Z
9. Warranty and Support
Greenvelly is committed to customer satisfaction. While specific warranty details are not provided in this manual, if you have any questions or encounter issues after purchase, please contact Greenvelly customer support. We aim to respond promptly and ensure your satisfaction.
For assistance, please refer to the contact information provided with your purchase or visit the official Greenvelly website.


