
1. Product Overview
The PowMr 15A 12V/24V MPPT Solar Charge Controller is designed to efficiently manage power from your solar panels to charge various battery types. Utilizing advanced Maximum Power Point Tracking (MPPT) technology, it optimizes solar energy harvesting, leading to faster battery charging compared to conventional controllers. This compact and portable device features a user-friendly LCD display for easy monitoring and control, making it suitable for a wide range of solar power applications.

Figure 1.1: PowMr 15A MPPT Solar Charge Controller with included cables.
2. Safety Information
Please read all safety instructions carefully before installation and operation. Failure to follow these instructions may result in damage to the unit, personal injury, or property damage.
- Electrical Safety: Always connect the battery to the charge controller first, followed by the solar panel. Disconnect in the reverse order (solar panel first, then battery).
- Voltage Compatibility: This controller is designed for 12V/24V batteries only. Do not connect higher voltage batteries.
- Battery Types: Ensure the selected battery type setting on the controller matches your battery chemistry (AGM, Gel, Deep Cycle, Sealed, Lead Acid, Flooded, LiFePO4). Incorrect settings can damage the battery.
- Environmental Protection (IP32): The controller has an IP32 protection rating, meaning it is suitable for indoor use (offices, homes) and protects against occasional drips. It is not waterproof. Avoid outdoor exposure, rain, splashes, or wet areas (bathrooms/kitchens). Do not spray water directly on the unit.
- Ventilation: Ensure adequate ventilation around the controller to prevent overheating.
- Polarity: Always observe correct polarity when making connections. Incorrect polarity can cause severe damage to the controller and connected devices.

Figure 2.1: The controller features 8 protection systems including over charge, over temperature, over voltage, over current, over load, short circuit, discharge, and reverse polarity protection.
3. Setup & Installation
Follow these steps for proper installation of your solar charge controller.
3.1 Unpacking and Inspection
Carefully unpack the controller and inspect it for any signs of damage during transit. Ensure all components listed in the packaging are present: MPPT Solar Charge Controller, instruction manual, and SAE Cables.
3.2 Connection Sequence
- Connect the Battery: First, connect the SAE connector from the controller to your 12V/24V battery. Ensure correct polarity. The controller will power on once connected to the battery.
- Connect the Solar Panel: Next, connect your solar panel(s) to the MC4 input connectors on the controller. Ensure the solar panel voltage is within the controller's specified range (Max PV 180W for 12V systems, 360W for 24V systems).
- Verify Connections: Double-check all connections for tightness and correct polarity.

Figure 3.1: Example wiring diagrams for connecting photovoltaic modules in parallel and series to the charge controller and battery system.
3.3 Battery Type Selection
The controller supports various battery types. It is crucial to select the correct battery type for optimal charging and battery longevity. Refer to the table below for supported battery types and their charging parameters.

Figure 3.2: Supported battery types and their three-stage charging parameters (Boost Charging, Float Charging, MPP Tracking Return).
To toggle battery mode, long press the "BAT" button on the controller. Cycle through the options (SEL, GEL, F04 for LiFePO4) until your battery type is displayed.
3.4 System Integration Example
The controller can be integrated into various solar power systems. Below is an example of an 800W 24V solar panel kit setup.
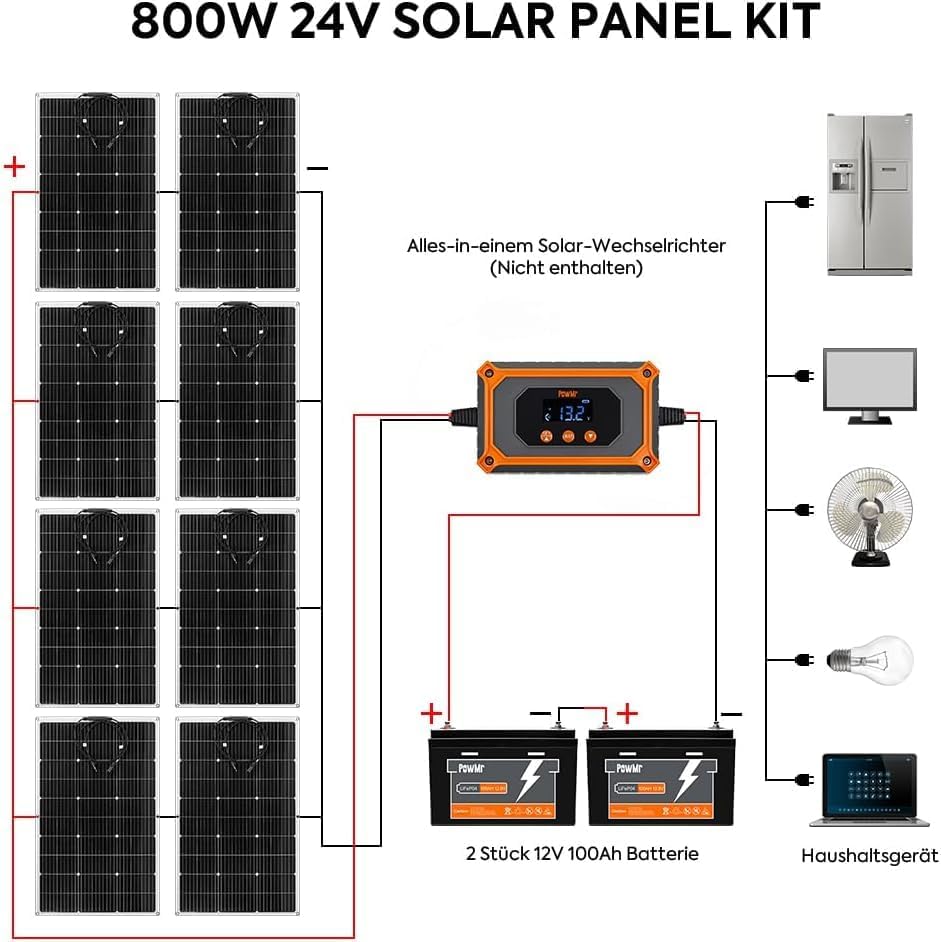
Figure 3.3: Example diagram of an 800W 24V solar panel kit connected to the charge controller, battery bank, and an inverter for household appliances.
4. Operation
The PowMr solar charge controller features an intuitive LCD display and three buttons for easy monitoring and configuration.
4.1 LCD Display
The LCD display shows real-time information about your solar system, including battery voltage, charging current, and charging status.
4.2 Button Functions
- SET Button: Used to enter and exit settings menus.
- BAT Button: Used to cycle through battery type settings (long press) and view battery parameters.
- Up/Down Arrows: Used to navigate through display screens or adjust values in settings.
Refer to the detailed instruction manual included with your product for specific menu navigation and parameter adjustments.
5. Maintenance
Regular maintenance ensures the longevity and optimal performance of your solar charge controller.
- Cleaning: Periodically wipe the controller's exterior with a dry, soft cloth to remove dust and dirt. Do not use liquid cleaners or solvents.
- Connection Check: Annually inspect all wiring connections to ensure they are secure and free from corrosion.
- Environmental Conditions: Ensure the controller remains in a dry, indoor environment, protected from direct water exposure, as per its IP32 rating.
- Ventilation: Keep the area around the controller clear to allow for proper airflow and heat dissipation.
6. Troubleshooting
If you encounter issues with your PowMr solar charge controller, refer to the following common problems and solutions.
| Problem | Possible Cause | Solution |
|---|---|---|
| Controller not powering on. | Battery not connected or low voltage; reverse polarity. | Ensure battery is connected first and has sufficient voltage. Check battery polarity. |
| No charging from solar panel. | Solar panel not connected; insufficient sunlight; incorrect panel voltage; faulty panel. | Verify solar panel connections. Ensure adequate sunlight. Check panel voltage compatibility. Test panel independently if possible. |
| Low charging wattage/current. | Panel shading; suboptimal panel angle; battery full; undersized panel for load. | Adjust panel angle for direct sunlight. Clear any shading. Verify battery is not already full. Ensure panel wattage matches system requirements. |
| Incorrect battery voltage reading. | Loose battery connection; incorrect battery type setting. | Check battery connections. Verify the correct battery type is selected on the controller. |
| Controller overheating. | Poor ventilation; excessive load; high ambient temperature. | Ensure adequate airflow around the unit. Reduce load if possible. Operate within specified temperature range. |
If the problem persists after attempting these solutions, please contact customer support.
7. Technical Specifications
Below are the detailed technical specifications for the PowMr 15A MPPT Solar Charge Controller.
| Feature | Value |
|---|---|
| Model Number | POW-LTW-15A |
| Rated Solar Charge Current | 15A |
| System Voltage | 12V/24V Auto-recognition |
| Max Solar Input Voltage | 12V: 30V, 24V: 60V |
| Max Solar Input Power | 12V: 180W, 24V: 360W |
| No-load Loss | 12V: 20mA, 24V: 25mA |
| Display Type | LCD |
| IP Protection Rating | IP32 |
| Operating Temperature | -20°C ~ +45°C (-4°F ~ +113°F) |
| Temperature Compensation | -35°C ~ +75°C (-31°F ~ +167°F) |
| Product Dimensions (L x W x H) | 5 x 1.18 x 3 inches (129 x 78 x 30 mm excluding built-in wiring) |
| Item Weight | 8.3 Ounces (237g) |
| Material | Plastic |
| Included Components | MPPT Solar Charge Controller, instruction manual, SAE Cables |

Figure 7.1: Key technical parameters of the PowMr 15A MPPT Solar Charge Controller.

Figure 7.2: The controller is suitable for ambient temperatures ranging from -35°C to +75°C (-31°F to +167°F) for internal protection.
8. Warranty & Support
For warranty information and customer support, please refer to the documentation included with your purchase or contact the manufacturer directly.
You can also visit the official PowMr store for additional resources and contact information: PowMr Official Store.