1. Product Overview
The WTW-TC33 is a compact, high-performance trail camera designed for security and monitoring. It features a 24-megapixel still image resolution and 2-megapixel video recording capability, ensuring clear and detailed captures. Its battery-powered operation allows for versatile placement without the need for external power sources, making it ideal for remote locations.

The WTW-TC33 Trail Camera, shown with its included solar panel and an open view of the battery compartment and internal monitor.
Key Features:
- High-Resolution Imaging: Captures 24 million pixel still images and 2 million pixel videos.
- Battery-Powered Operation: Runs on 4 AA dry cell batteries, offering up to 6 months of standby time.
- Infrared Night Vision: Equipped with infrared LEDs for clear black-and-white recording in low-light conditions.
- Motion Detection: Features a wide-range human sensor that detects motion and temperature differences to trigger automatic recording.
- Built-in Monitor: Allows for immediate review of captured images and videos directly on the camera.
- SD Card Support: Compatible with SD cards up to 128GB for extensive recording capacity.
- Waterproof Design: Suitable for both indoor and outdoor security applications.

A palm-sized compact trail camera, WTW-TC33, highlighting its 24MP still image, 2MP video, 6-month standby, IR night vision, and motion detection capabilities.
Solar Panel Options:
The WTW-TC33 can be paired with two types of solar panels to extend battery life and provide continuous power:
- Household Solar Panel: Lightweight and portable, with a 1,500mAh capacity.
- Business Solar Panel: Large capacity options (12,000mAh, 18,000mAh, 21,000mAh) for extended long-term use.

Illustration showing the two types of solar panels available: a compact household panel and a larger business-grade panel with higher capacities.
2. Setup
2.1 Battery Installation
The WTW-TC33 operates on 4 AA dry cell batteries. Ensure the batteries are inserted with the correct polarity as indicated inside the battery compartment.

The camera's battery compartment, illustrating the insertion of four AA dry cell batteries for operation without external power.
2.2 SD Card Insertion
Insert a compatible SD card (up to 128GB) into the designated slot. Ensure the card is inserted correctly until it clicks into place. Note: SD cards requiring a size conversion adapter are not compatible.
The camera connected to a laptop, demonstrating how to connect for data transfer, with an SD card visible next to the camera.
2.3 Waterproofing for Outdoor Installation
When installing the camera outdoors, especially if using a power adapter, it is crucial to waterproof all cable connections to prevent malfunction due to water ingress. Use self-adhesive tape or a waterproof junction box for all exposed connections.

A detailed diagram illustrating the importance and method of waterproofing cable connections for outdoor camera installations, showing both successful and failed examples.
3. Operation
3.1 Powering On/Off
Locate the power switch on the camera. Slide it to the 'ON' position to power on the device. To power off, slide the switch to the 'OFF' position.
3.2 Using the Built-in Monitor
The camera features an internal monitor for immediate viewing of captured footage and for adjusting settings. Open the camera's casing to access the monitor and control buttons.

The camera's internal monitor displaying a live view, allowing users to check the camera's field of view and captured images directly.
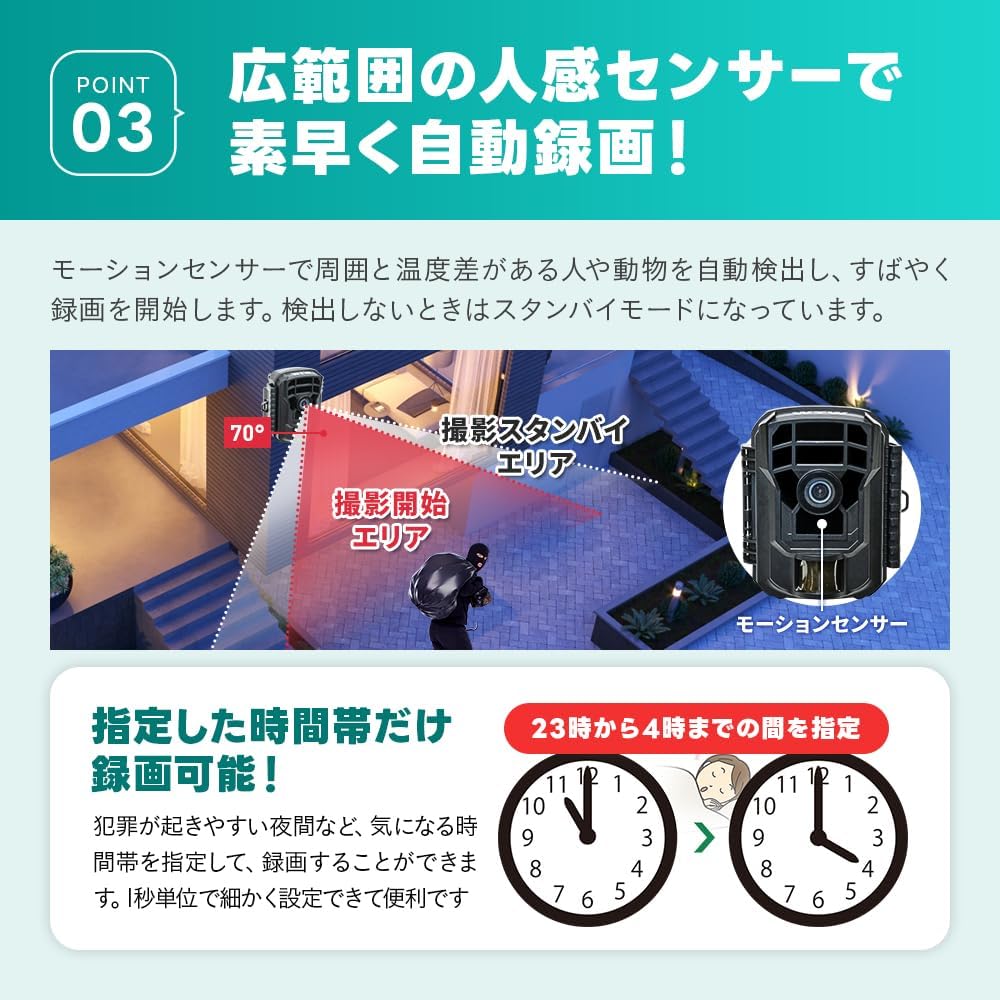
3.3 Motion Detection and Recording
The camera utilizes a motion sensor to detect movement and temperature changes, automatically initiating recording. You can also set specific time periods for recording, such as during nighttime hours, for targeted surveillance.

A diagram illustrating the camera's motion detection area and how it triggers recording when movement is detected within the specified zone.
3.4 Night Vision
The integrated infrared LEDs enable clear recording in complete darkness. Night vision footage will be captured in black and white. Avoid placing the camera to shoot through glass at night, as infrared light may reflect and obscure the image.

A side-by-side comparison showing a daytime color image and a nighttime black-and-white image captured by the camera, demonstrating its night vision capability.
3.5 Connecting to a PC
To view or transfer recorded files, connect the camera to a computer using the included USB cable. Alternatively, you can remove the SD card and insert it into a card reader connected to your PC.
4. Maintenance
4.1 Battery Replacement
When the battery indicator shows low power or the camera stops functioning, replace all four AA dry cell batteries. Ensure to use fresh batteries for optimal performance.
4.2 SD Card Management
Regularly check the SD card capacity. Transfer important files to a computer and format the SD card periodically to maintain optimal recording performance and prevent data corruption.
4.3 Cleaning
Gently wipe the camera lens and body with a soft, dry cloth. Avoid using abrasive cleaners or solvents that could damage the camera's surface or lens.
4.4 Waterproofing Checks
Periodically inspect all external connections and seals for any signs of wear or damage, especially if the camera is installed outdoors. Reapply waterproofing tape or replace damaged components as needed to maintain the camera's waterproof integrity.
5. Troubleshooting
5.1 Camera Not Powering On
- Check if the batteries are inserted correctly with the proper polarity.
- Ensure the batteries are fresh and fully charged.
- Verify the power switch is in the 'ON' position.
5.2 Poor Image/Video Quality
- Clean the camera lens to remove any dirt or smudges.
- Ensure sufficient lighting during daytime recording.
- For night vision, ensure there are no obstructions (like glass) between the camera and the subject that could cause infrared reflection.
- Check if the camera is placed too close to objects that might interfere with infrared detection.
5.3 Short Battery Life
- Frequent motion detection events will consume more battery power. Consider adjusting sensitivity or placement.
- Ensure you are using high-quality, fresh AA dry cell batteries.
- Consider using a compatible solar panel for extended operation.
5.4 Recording Issues (No Files/Incomplete Files)
- Ensure an SD card is properly inserted and not full.
- Format the SD card if it's a new card or if you experience issues.
- Check if the camera's settings for recording (e.g., motion detection sensitivity, recording duration) are configured correctly.
6. Specifications
| Product Model Number | WTW-TC33 |
| Product Dimensions (L x W x H) | 6 x 8.5 x 11 cm |
| Still Image Resolution | 24 Million Pixels |
| Video Capture Resolution | 2 Million Pixels |
| Power Source | 4 x AA Dry Cell Batteries (Battery powered) |
| Waterproof Level | Waterproof |
| Connectivity Technology | Wireless |
| Mounting Type | Tabletop Mount (Versatile placement) |
| Recommended Use | Indoor Security, Outdoor Security |
| Included Components | WTW-TC33 Camera Body, Household Solar Panel |
7. Warranty and Support
The WTW-TC33 Trail Camera comes with a 1-year warranty from the date of purchase. This warranty covers manufacturing defects and ensures reliable operation under normal use conditions.

WTW offers a 1-year warranty to ensure customer satisfaction and support for unexpected issues.
For any inquiries, technical assistance, or warranty claims, please contact our domestic support team. Our dedicated support staff is available to assist you with any questions or issues you may encounter.
Please refer to your purchase documentation for specific contact details or visit the official WTW website for the most up-to-date support information.


