Introduction
This manual provides essential information for the safe operation, maintenance, and troubleshooting of your STANLEY SCD10D2K-IN 12V Brushed Cordless Drill Driver. Please read it thoroughly before first use and keep it for future reference.

Figure 1: STANLEY SCD10D2K-IN 12V Brushed Cordless Drill Driver kit, including the drill, two batteries, a charger, and a carrying case.
Safety Information
Always follow basic safety precautions to reduce the risk of fire, electric shock, and personal injury when operating power tools.
General Safety Rules:
- Work Area Safety: Keep your work area clean and well-lit. Cluttered or dark areas invite accidents. Do not operate power tools in explosive atmospheres, such as in the presence of flammable liquids, gases, or dust.
- Electrical Safety: Avoid body contact with earthed or grounded surfaces. Do not expose power tools to rain or wet conditions.
- Personal Safety: Always wear eye protection. Use hearing protection when operating for extended periods. Dress properly; avoid loose clothing or jewelry.
- Tool Use and Care: Do not force the power tool. Use the correct power tool for your application. Disconnect the battery pack from the power tool before making any adjustments, changing accessories, or storing power tools.
- Battery Pack Use and Care: Recharge only with the charger specified by the manufacturer. Do not disassemble the battery pack.
Package Contents
Your STANLEY SCD10D2K-IN package should contain the following items:
- 1 x STANLEY SCD10D2K-IN 12V Brushed Cordless Drill Driver
- 2 x 2Ah 12V Lithium-Ion Batteries
- 1 x 1.5A Battery Charger
- 1 x Carrying Case
- 1 x Warranty Card
- 1 x User Manual (this document)

Figure 2: Contents of the STANLEY SCD10D2K-IN package, showing the drill driver, two batteries, and the charger.
Product Features and Components
Familiarize yourself with the various parts of your drill driver for optimal use.
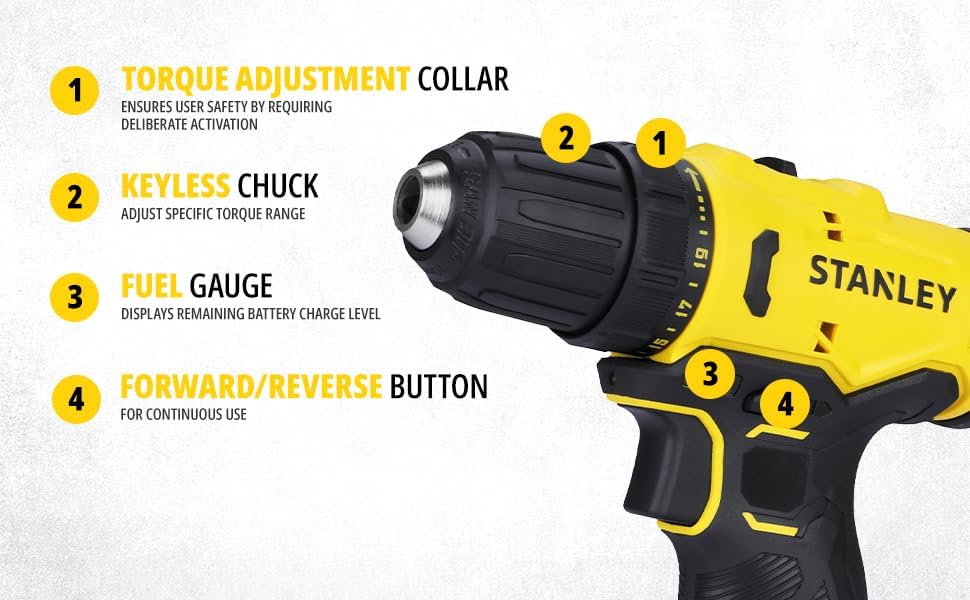
Figure 3: Key components of the STANLEY SCD10D2K-IN Drill Driver.
- Keyless Chuck: Allows for quick and easy bit changes without a chuck key.
- Variable Speed Switch: Controls the drilling/driving speed based on pressure applied.
- Forward/Reverse Slider: Changes the direction of rotation for drilling or driving/removing screws.
- Battery: Provides power to the drill driver.
- Torque Adjustment Collar: Adjusts the clutch setting to prevent overdriving screws or damaging materials. (Refer to Figure 4)
- Fuel Gauge (Battery Indicator): Displays the remaining battery charge level. (Refer to Figure 4)
- Worklight (LED Light): Illuminates the work area for improved visibility. (Refer to Figure 5)
- Battery Release Button: Used to detach the battery pack from the tool. (Refer to Figure 5)
- Gear Shifter (Dual Range Gear Selector): Allows selection between two speed ranges (low speed for high torque, high speed for drilling). (Refer to Figure 6)

Figure 4: Detailed view of the drill driver's front section, highlighting the torque adjustment collar, keyless chuck, fuel gauge, and forward/reverse button.

Figure 5: Detailed view of the drill driver's handle and battery area, highlighting the worklight, variable speed trigger switch, battery release button, and battery pack.

Figure 6: Close-up of the gear shifter mechanism on the top of the drill driver.
Setup
1. Charging the Battery
Before first use, fully charge the battery. Connect the charger to a power outlet and insert the battery pack into the charger. The indicator lights on the charger will show the charging status. A full charge typically takes approximately 1.5 hours.
2. Installing/Removing the Battery Pack
- To Install: Align the battery pack with the base of the tool and slide it in until it clicks securely into place.
- To Remove: Press the battery release button (8) and slide the battery pack out.
3. Installing/Removing Drill Bits
- To Install: Rotate the keyless chuck (1) counter-clockwise to open the jaws. Insert the drill bit fully into the chuck. Rotate the chuck clockwise to tighten the jaws firmly around the bit.
- To Remove: Rotate the keyless chuck (1) counter-clockwise to loosen the jaws and pull the bit out.

Figure 7: Close-up view of the keyless chuck, demonstrating its design for easy bit insertion and removal.
Operating Instructions
1. Variable Speed Trigger Switch
The variable speed trigger switch (2) allows you to control the drilling/driving speed. Press the trigger lightly for slower speeds and increase pressure for higher speeds. This provides precise control for various applications.
2. Forward/Reverse Operation
The forward/reverse slider (3) is located above the trigger. Push the slider to the left for forward rotation (drilling/driving screws) and to the right for reverse rotation (removing screws). Ensure the slider is in the center position to lock the trigger and prevent accidental starting.
3. Torque Adjustment (Clutch Setting)
The torque adjustment collar (5) allows you to set the amount of torque before the clutch disengages. This prevents overdriving screws or damaging the workpiece. Rotate the collar to select a setting from 1 to 20 for driving screws, or the drill symbol for drilling applications where maximum torque is required.
4. Gear Selection
The gear shifter (9) on top of the tool allows you to select between two speed ranges:
- Gear 1 (Low Speed, High Torque): Ideal for driving large screws or drilling large holes in tough materials. (No-load speed: 400 RPM)
- Gear 2 (High Speed, Low Torque): Suitable for drilling small holes or driving small screws quickly. (No-load speed: 1500 RPM)
5. Using the Worklight
The integrated LED worklight (7) automatically illuminates when the trigger is pressed, providing visibility in dimly lit work areas.
Figure 8: The drill driver in use, demonstrating its application for drilling into various materials.

Figure 9: The drill driver being used for driving screws, showcasing its utility in assembly tasks.
Maintenance
Regular maintenance ensures the longevity and optimal performance of your drill driver.
Cleaning:
- Keep the ventilation slots clean to prevent overheating.
- Use a soft, damp cloth to clean the tool's exterior. Do not use harsh chemicals or abrasive cleaners.
- Periodically blow compressed air through the ventilation openings to clear dust and debris.
Storage:
- Store the tool, batteries, and charger in a cool, dry place, away from direct sunlight and moisture.
- When storing for extended periods, ensure batteries are partially charged (around 50%) to prolong their lifespan.
- Store the tool in its original carrying case to protect it from damage.
Troubleshooting
If you encounter issues with your drill driver, refer to the following common problems and solutions:
| Problem | Possible Cause | Solution |
|---|---|---|
| Tool does not start. | Battery not charged or not properly inserted. | Charge the battery. Ensure battery is fully inserted until it clicks. |
| Reduced power or short runtime. | Battery needs recharging or is at end of life. | Recharge the battery. If issue persists, consider replacing the battery. |
| Chuck not holding bit securely. | Chuck not tightened sufficiently or bit shank is dirty. | Ensure chuck is tightened firmly. Clean the bit shank before insertion. |
| Overheating during use. | Blocked ventilation slots or continuous heavy use. | Clear ventilation slots. Allow tool to cool down during prolonged use. |
For issues not listed here, please contact STANLEY customer support.
Specifications
Technical specifications for the STANLEY SCD10D2K-IN 12V Brushed Cordless Drill Driver:
| Feature | Specification |
|---|---|
| Model Number | SCD10D2K |
| Voltage | 12 Volts |
| Battery Capacity | 2 Ah (Lithium-Ion) |
| Charger Amperage | 1.5 Amps |
| No-Load Speed (Gear 1) | 400 RPM |
| No-Load Speed (Gear 2) | 1500 RPM |
| Max Torque | 30 Nm |
| Chuck Capacity | 10 mm (Keyless) |
| Max. Drilling Capacity (Wood) | 20 mm |
| Max. Drilling Capacity (Metal) | 10 mm |
| Item Weight | 300 Grams |
| Product Dimensions | 20L x 20W x 20H Centimeters |

Figure 10: Visual summary of the drill driver's key specifications.
Warranty and Support
Your STANLEY SCD10D2K-IN 12V Brushed Cordless Drill Driver comes with a 1-year warranty from the date of purchase. For warranty claims, technical support, or service inquiries, please contact STANLEY customer care.
Customer Care Contact:
- Phone: 1800-203-0644
- Email: SBD-CUSTOMERCOMMUNICATIONS@SBDINC.COM
- Operating Hours: Monday - Saturday, 09:00 AM - 06:00 PM IST (Except Government Holidays)
- WhatsApp: +91 96060 55835 (Scan QR code for direct chat)
- Authorized Service Centers: 500+ locations available.

Figure 11: STANLEY Total Care contact information for sales, service, and support.