
1. Introduction
Thank you for choosing the KCO Lighting Round Large LED Flush Mount Ceiling Light, Model C1085-Y. This manual provides essential information for the safe installation, effective operation, and proper maintenance of your new lighting fixture. Please read these instructions carefully before beginning installation or use, and retain them for future reference.

Image 1.1: KCO Lighting Round Large LED Flush Mount Ceiling Light, featuring a yellow ribbed glass shade.
2. Safety Information
To reduce the risk of fire, electric shock, or personal injury, always follow these basic safety precautions:
- WARNING: Disconnect power at the circuit breaker or fuse box before installation or servicing.
- All electrical connections must be in accordance with local codes, ordinances, or the National Electric Code (NEC). Consult a qualified electrician if you are unfamiliar with electrical wiring.
- Do not install this fixture in wet locations. It is designed for indoor use only.
- Handle glass components with care to prevent breakage.
- Ensure the mounting surface can support the weight of the fixture.
3. Package Contents
Carefully unpack your fixture and check that all parts are included. If any parts are missing or damaged, contact KCO Lighting customer service before proceeding with installation.
- LED Flush Mount Ceiling Light Fixture
- Remote Control
- Mounting Hardware (screws, wire nuts, mounting bracket)
- Instruction Manual
4. Setup and Installation
Professional installation is recommended for this product. Ensure power is disconnected at the circuit breaker before starting.
4.1 Pre-Installation
- Turn off the main power supply at the circuit breaker.
- Carefully remove the old fixture (if applicable) and its mounting hardware.
- Unpack the new fixture and identify all components.
4.2 Mounting the Fixture
- Attach the mounting bracket to the junction box using the provided screws.
- Connect the electrical wires: connect the black wire from the fixture to the black wire from the junction box, the white wire from the fixture to the white wire from the junction box, and the ground wire to the ground wire from the junction box. Secure connections with wire nuts.
- Carefully tuck the wires into the junction box.
- Align the fixture base with the mounting bracket and secure it with the provided screws.
- Attach the yellow ribbed glass shade to the fixture base, ensuring it is securely fastened.

Image 4.1: Detail of the integrated LED strip and the yellow ribbed glass shade.
5. Operating Instructions
Your KCO Lighting fixture comes with a remote control for convenient operation.
5.1 Remote Control Pairing
To ensure the remote control functions correctly, it must be paired with the ceiling light:
- Turn on the ceiling light using your wall switch.
- Within 5 seconds of turning on the light, point the remote towards the ceiling light.
- Press and hold the middle "SETUP" button on the remote for 3-5 seconds.
- Release the button when the ceiling light flashes twice. This indicates successful pairing.
5.2 Remote Control Functions
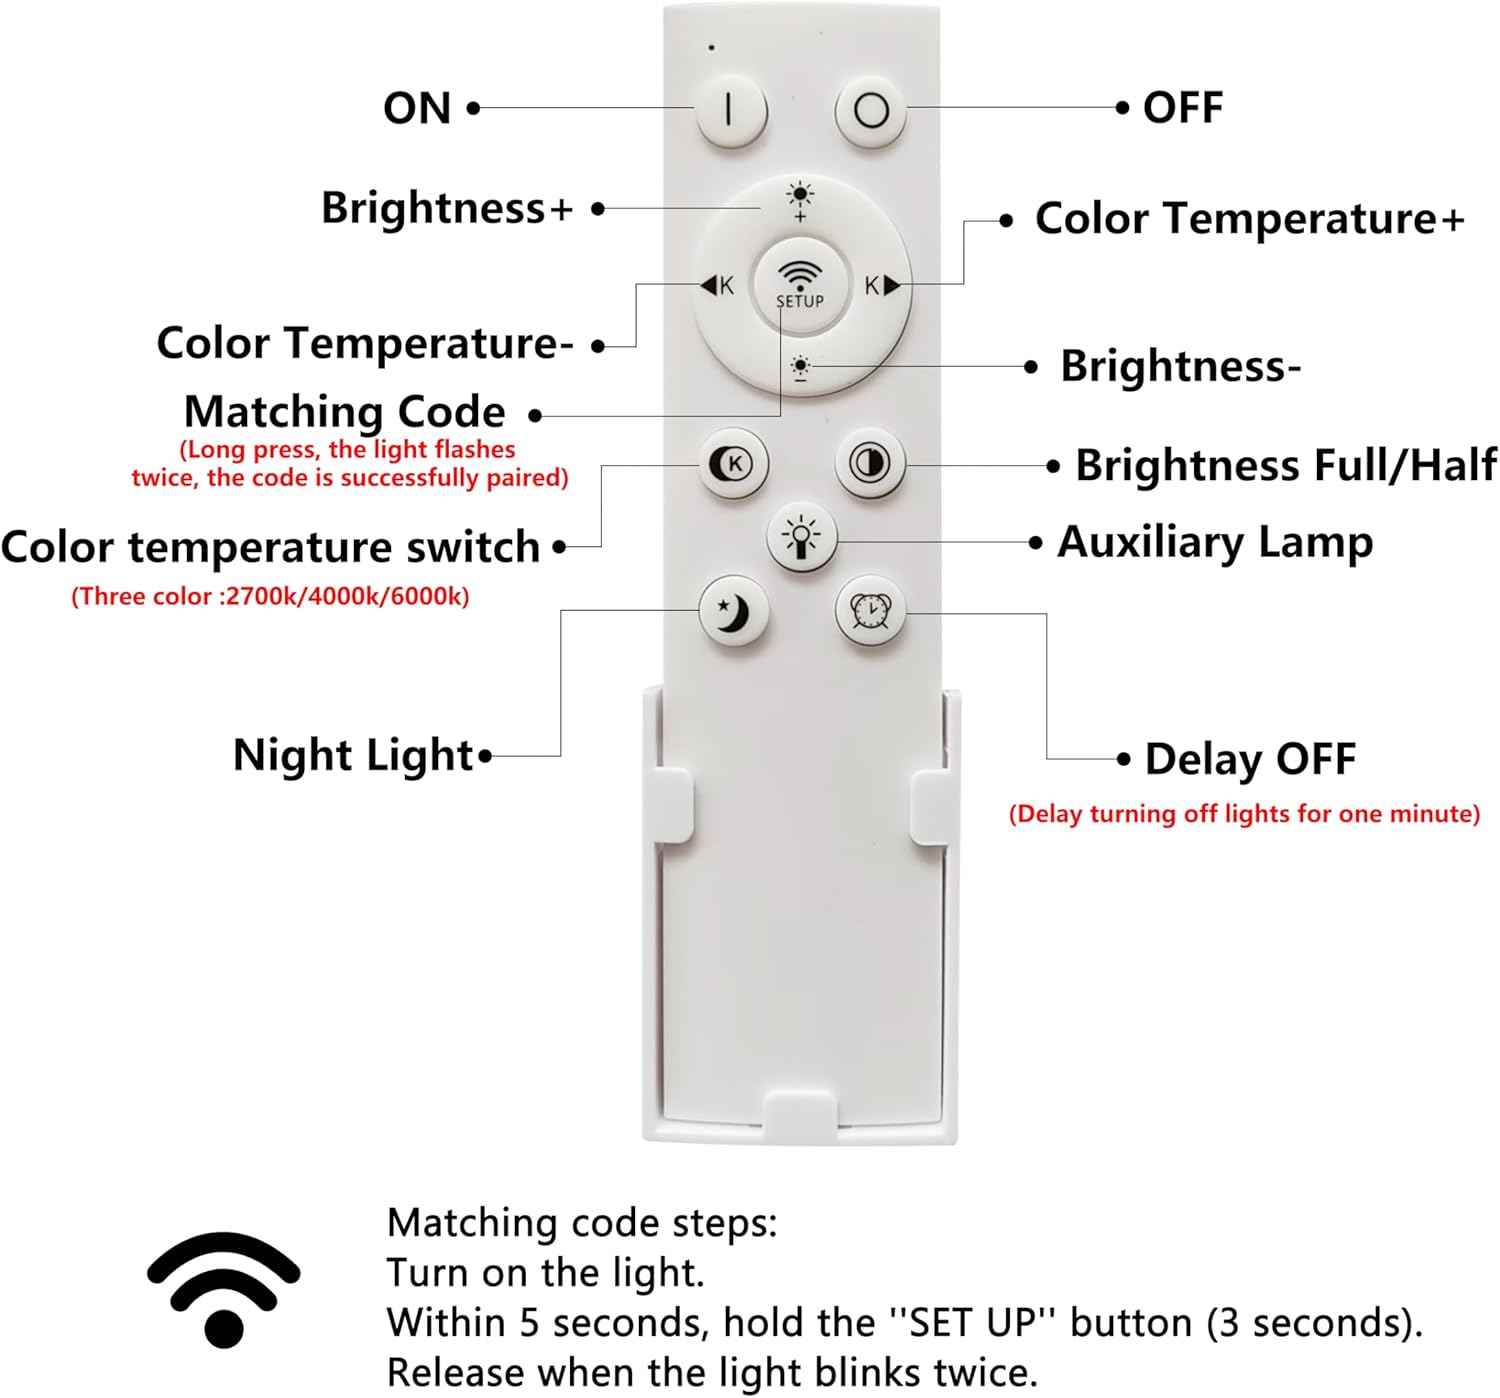
Image 5.1: Diagram of the remote control and its various functions.
- ON/OFF: Power the light on or off.
- Brightness +/-: Adjust the light intensity.
- Color Temperature +/-: Adjust the color temperature (e.g., from warm to cool white).
- Color Temperature Switch: Cycle through preset color temperatures (2700K Warm Light, 4000K Neutral Light, 6000K White Light).
- Brightness Full/Half: Quickly set brightness to full or half.
- Auxiliary Lamp: Activates a specific lighting mode.
- Night Light: Activates a low-brightness night light mode.
- Delay OFF: Sets a timer for the light to turn off (e.g., 1 minute delay).
Important: To maintain your preferred light settings (brightness and color temperature), always use the remote control to turn the light on and off, rather than a standard wall switch.
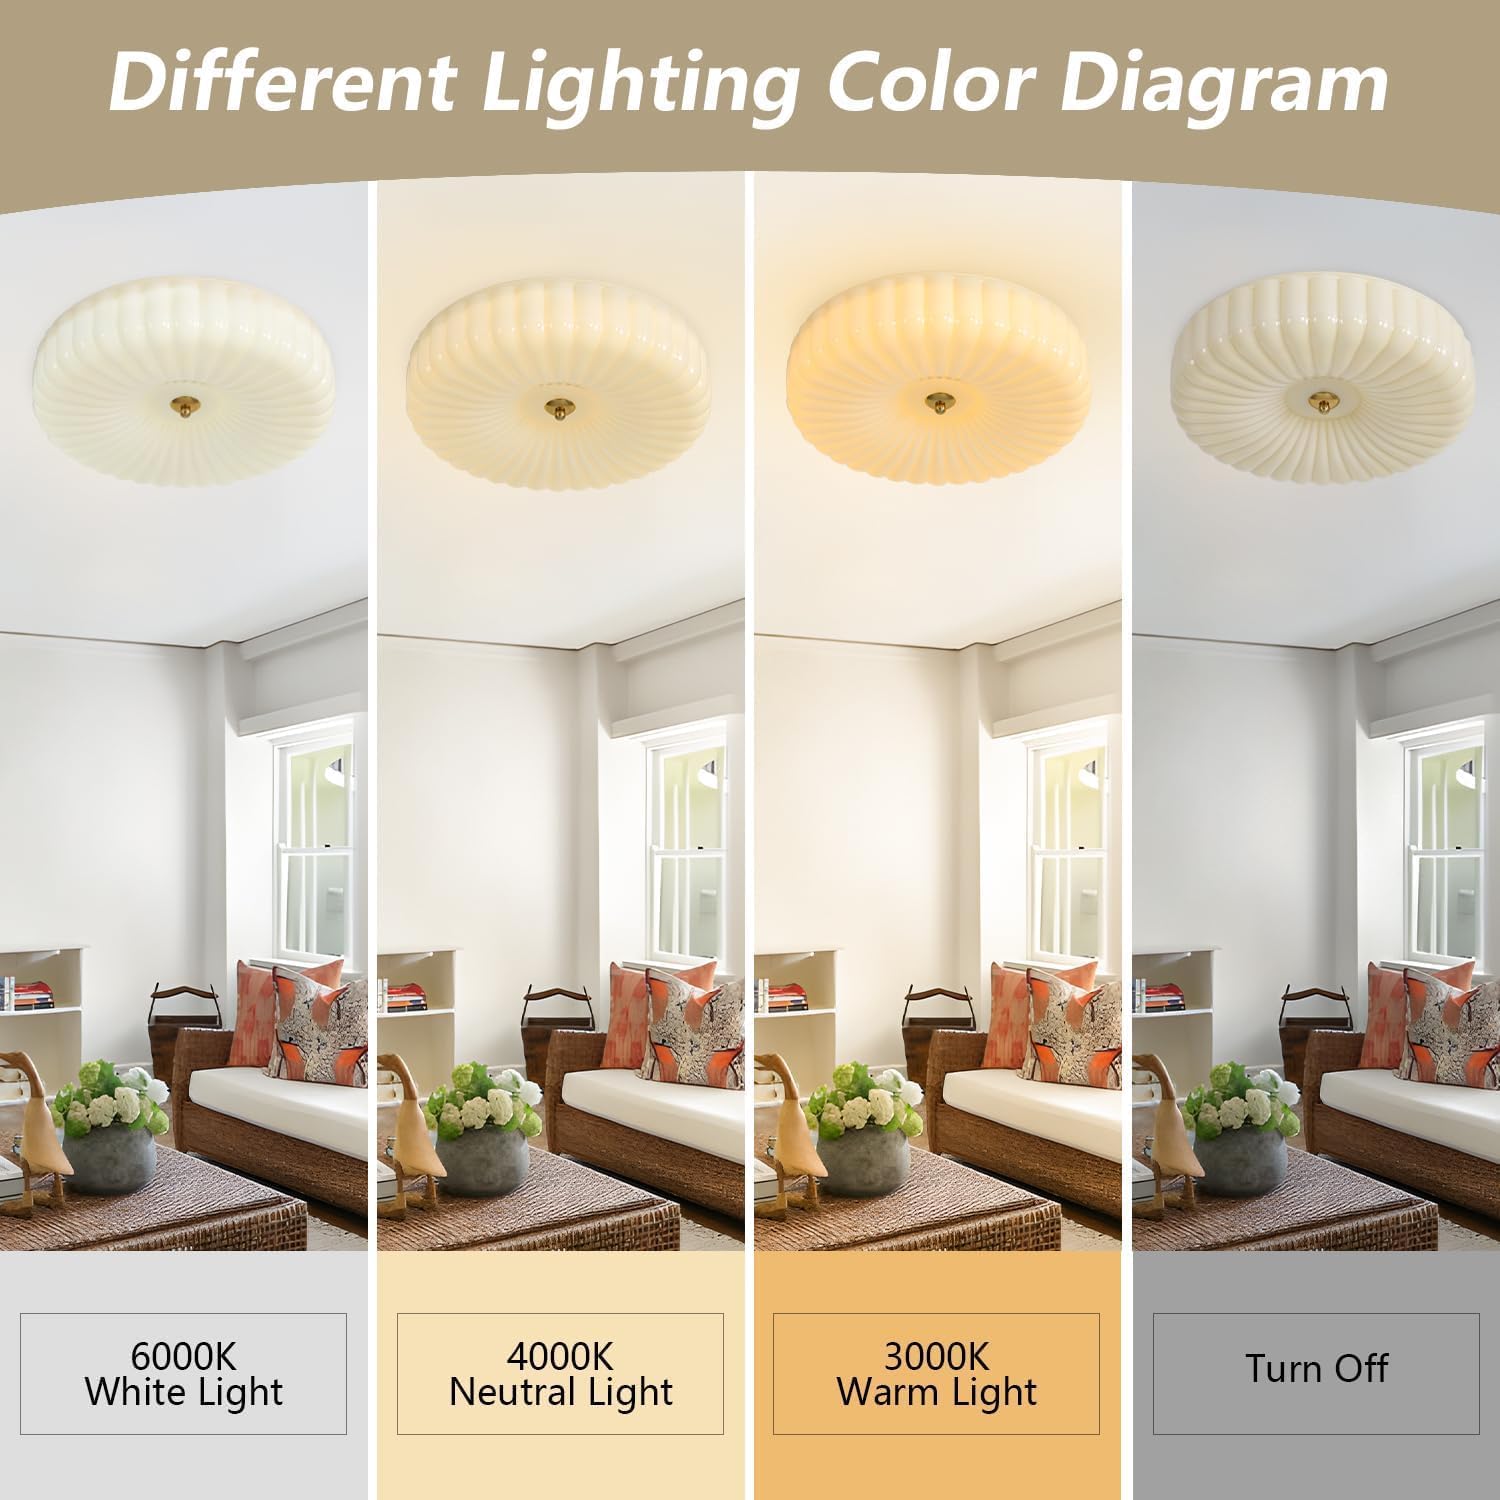
Image 5.2: Visual representation of different color temperatures: 6000K White Light, 4000K Neutral Light, and 3000K Warm Light.
6. Maintenance
Regular maintenance ensures the longevity and optimal performance of your light fixture.
- Cleaning: Always disconnect power before cleaning. Wipe the fixture with a soft, dry cloth. Do not use abrasive cleaners or solvents, as they may damage the finish or glass.
- Bulb Replacement: This fixture uses an integrated LED light source and does not require bulb replacement.
7. Troubleshooting
If you encounter issues with your light fixture, refer to the following common problems and solutions:
| Problem | Possible Cause | Solution |
|---|---|---|
| Light does not turn on. | No power supply. Loose wiring. Remote control battery depleted. | Check circuit breaker. Verify all wire connections are secure (ensure power is off first). Replace remote control battery. |
| Remote control not working. | Remote not paired. Remote control battery depleted. | Re-pair the remote control following section 5.1. Replace remote control battery. |
| Light flickers or dims unexpectedly. | Loose wiring. Incompatible dimmer switch (if applicable). | Check all wire connections (ensure power is off first). This fixture is dimmable via its remote control. Using an external dimmer switch may cause issues. Ensure any wall dimmer is set to full power or removed. |
If the problem persists after attempting these solutions, please contact KCO Lighting customer service.
8. Specifications

Image 8.1: Dimensions of the KCO Lighting Round Large LED Flush Mount Ceiling Light.
| Feature | Detail |
|---|---|
| Brand | KCO |
| Model Name | C1085-Y |
| Product Dimensions | 15.7"L x 15.7"W x 5.1"H (40cm x 40cm x 13cm) |
| Material | Glass |
| Light Source Type | LED |
| Voltage | 110-220 Volts (Worldwide compatible) |
| Wattage | 12 watts |
| Brightness | 800 lumens |
| Color Temperature | Adjustable (3000K Warm White, 4000K Neutral Light, 6000K White Light) |
| Control Method | Remote Control |
| Installation Type | Flush Mount |
| Indoor/Outdoor Usage | Indoor |
| Special Feature | Dimmable |
| Assembly Required | Yes |
| Item Weight | 6.49 pounds |
9. Warranty and Support
KCO Lighting is committed to providing high-quality products and excellent customer service.
9.1 Warranty Information
This product is covered by a 3-year warranty. If you receive a broken, damaged, cracked glass lampshade, or if any parts are missing, please contact KCO Lighting directly for a replacement.
9.2 Customer Support
For any questions, concerns, or assistance with your product, please contact KCO Lighting customer service. We aim to provide a solution within 24 hours.
- Contact Method: Please communicate with the seller "KCO Lighting" via your order number.
- Return Policy: This product is eligible for a refund or replacement within 30 days of purchase.