
1. Introduction
The PEAKMETER PM8215 is a compact, handheld digital multimeter designed for measuring various electrical parameters. This instrument offers high stability and accuracy, featuring a 4000-count display. It is suitable for a wide range of users, from hobbyists to professionals, for tasks requiring AC/DC voltage, AC/DC current, resistance, frequency, and capacitance measurements, along with continuity and diode testing.
2. Safety Information
Always read and understand all safety instructions before operating the multimeter.
- This device complies with safety standards EN61010-1, EN61010-2-033, EN61326, and is rated for CAT. III 600V.
- Do not apply voltage or current that exceeds the maximum specified limits for the multimeter.
- Exercise extreme caution when working with live circuits. High voltages can cause severe injury or death.
- Ensure the test leads are in good condition, without any damage to the insulation.
- Do not operate the multimeter if it appears damaged or if the casing is open.
- Replace the battery immediately when the low battery indicator appears to ensure accurate readings.
- Always disconnect the test leads from the circuit before changing functions.
3. Product Overview
3.1 Key Features
- Display: 4000 counts digital display.
- Measurement Functions: AC/DC Voltage, AC/DC Current, Resistance, Frequency, Capacitance.
- Special Functions: Buzzer, Continuity Test, Diode Test, Low Battery Indication.
- Operating Modes: Auto Range, Auto Power Off.
- Portability: Mini pocket design, lightweight (approx. 75g), and ultra-thin (12mm thickness).
- Safety: Equipped with a 400mA/250V fuse for protection.
3.2 Physical Characteristics




4. Setup
4.1 Battery Installation
The PM8215 multimeter is powered by one 3.0V CR2032 button battery.
- Ensure the multimeter is turned OFF.
- Locate the battery compartment on the back of the device.
- Use a small screwdriver or coin to open the battery cover.
- Insert the CR2032 battery, observing the correct polarity (+/-).
- Securely close the battery cover.
Note: Replace the battery when the low battery indicator appears on the display to maintain measurement accuracy.
5. Operating Instructions
5.1 Power On/Off
To power on the multimeter, rotate the central selector knob from the 'OFF' position to any desired measurement function. To power off, rotate the knob back to the 'OFF' position.
5.2 Auto Range Function
The PM8215 features an auto-ranging function, which automatically selects the appropriate measurement range. This simplifies operation as you do not need to manually select the range for most measurements.
5.3 Measurement Functions
Connect the test leads to the appropriate input jacks and the circuit under test. Select the desired function using the rotary switch.
- DC Voltage (V–): Rotate the knob to the 'V–' position. Connect the red test lead to the positive side and the black test lead to the negative side of the DC voltage source.
- AC Voltage (V∼): Rotate the knob to the 'V∼' position. Connect the test leads across the AC voltage source.
- DC Current (mA/µA–): Rotate the knob to the 'mA/µA–' position. Use the 'SEL' button to switch between mA and µA. Connect the multimeter in series with the circuit.
- AC Current (mA/µA∼): Rotate the knob to the 'mA/µA∼' position. Use the 'SEL' button to switch between mA and µA. Connect the multimeter in series with the circuit.
- Resistance (Ω): Rotate the knob to the 'Ω' position. Ensure the circuit is de-energized before measuring resistance. Connect the test leads across the component.
- Frequency (Hz): Rotate the knob to the 'Hz' position. Connect the test leads across the signal source.
- Capacitance (F): Rotate the knob to the 'F' position. Ensure the capacitor is discharged before measurement. Connect the test leads across the capacitor.
- Diode Test (→|): Rotate the knob to the '→|' position. Connect the red lead to the anode and the black lead to the cathode of the diode. The display will show the forward voltage drop. Reverse the leads to check for open circuit.
- Continuity Test (♫): Rotate the knob to the '♫' position. If the resistance between the test leads is below a certain threshold (typically 50Ω), the buzzer will sound, indicating continuity.
5.4 Function Buttons
- SEL (Select): Used to toggle between different measurement types within a single rotary switch position (e.g., AC/DC current, or diode/continuity).
- RANGE: Allows manual selection of measurement ranges, overriding the auto-ranging function. Press repeatedly to cycle through available ranges.
- HOLD: Freezes the current reading on the display. Press again to release.
6. Maintenance
6.1 Cleaning
Wipe the multimeter casing with a damp cloth and mild detergent. Do not use abrasive cleaners or solvents. Ensure the device is completely dry before use.
6.2 Battery Replacement
Refer to Section 4.1 for instructions on replacing the CR2032 button battery.
6.3 Fuse Replacement
The multimeter is equipped with a 400mA/250V fuse. If the current measurement function stops working, the fuse may need replacement. Fuse replacement should only be performed by qualified personnel. Open the casing carefully, replace the fuse with one of identical specifications, and ensure the casing is properly sealed before reuse.
7. Troubleshooting
- No Display: Check if the multimeter is turned ON. Verify battery installation and replace if necessary.
- Incorrect Readings: Ensure test leads are properly connected and not damaged. Verify the correct function is selected for the measurement. Check battery level.
- Current Measurement Not Working: The fuse may be blown. Refer to Section 6.3 for fuse replacement.
- Buzzer Not Sounding in Continuity Test: The resistance of the circuit may be too high, or the function is not correctly selected.
8. Specifications
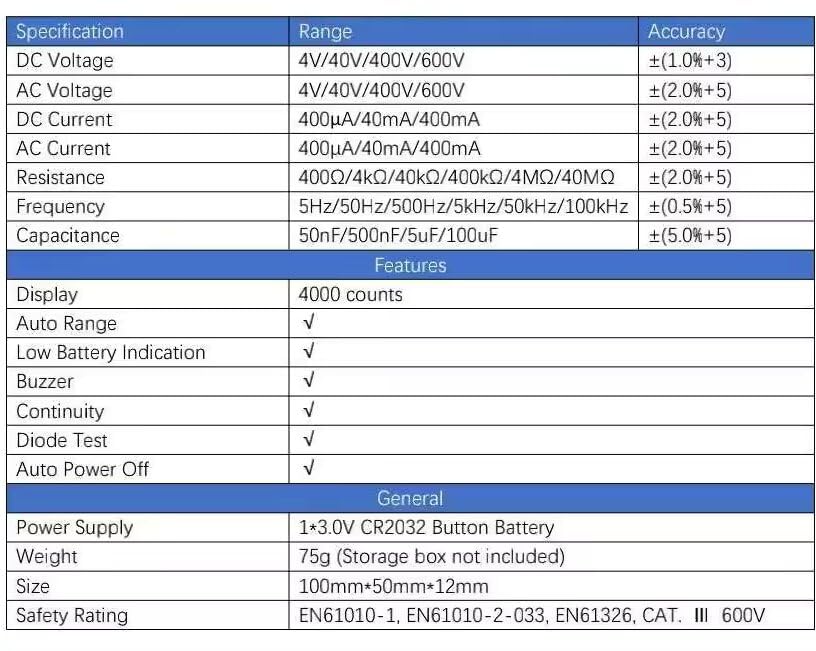
| Specification | Range | Accuracy |
|---|---|---|
| DC Voltage | 4V/40V/400V/600V | ±(1.0%+3) |
| AC Voltage | 4V/40V/400V/600V | ±(2.0%+5) |
| DC Current | 400µA/40mA/400mA | ±(2.0%+5) |
| AC Current | 400µA/40mA/400mA | ±(2.0%+5) |
| Resistance | 400Ω/4kΩ/40kΩ/400kΩ/4MΩ/40MΩ | ±(2.0%+5) |
| Frequency | 5Hz/50Hz/500Hz/5kHz/50kHz/100kHz | ±(0.5%+5) |
| Capacitance | 50nF/500nF/5uF/100uF | ±(5.0%+5) |
| Features | ||
| Display | 4000 counts | |
| Auto Range | √ | |
| Low Battery Indication | √ | |
| Buzzer | √ | |
| Diode Test | √ | |
| Auto Power Off | √ | |
| General | ||
| Power Supply | 1*3.0V CR2032 Button Battery | |
| Weight | 75g (Storage box not included) | |
| Size | 100mm*50mm*12mm | |
| Safety Rating | EN61010-1, EN61010-2-033, EN61326, CAT. III 600V | |
9. Warranty and Support
9.1 Warranty Information
The PEAKMETER PM8215 Digital Mini Multimeter comes with a 1-year warranty from the date of purchase. This warranty covers manufacturing defects and ensures the product meets its specified performance. Please retain your proof of purchase for warranty claims.
9.2 Customer Support
For technical assistance, troubleshooting beyond this manual, or warranty inquiries, please contact your retailer or the manufacturer directly. Refer to the product packaging or the manufacturer's official website for contact details.


