
1. Safety Information
Before using the PEAKMETER PM8248S Digital Multimeter, please read and understand all safety warnings and operating instructions. Failure to do so may result in electric shock, injury, or damage to the meter or equipment under test.
- Always ensure the meter is in good working condition and free from damage before use.
- Do not apply voltage or current that exceeds the maximum specified limits for the meter. The meter has overload protection for resistance and frequency measurements.
- The safety rating for this device is EN61010-1, EN61010-2-033, EN61326, CAT. III 600V. Adhere to these ratings.
- Use caution when working with voltages above 30V AC RMS, 42V peak, or 60V DC. These voltages pose a shock hazard.
- Always connect the common (COM) test lead first and disconnect it last.
- Ensure test leads are fully seated into the correct input terminals for the desired measurement.
- Replace batteries promptly when the low battery indicator appears to ensure accurate readings.
- Do not operate the meter in explosive gas, vapor, or dusty environments.
2. Product Overview
The PEAKMETER PM8248S is a smart, auto-ranging digital multimeter designed for professional and general electrical measurements. It features a 6000-count display with an analog bar graph, providing clear and precise readings. This multi-functional device can measure AC/DC voltage, AC/DC current, resistance, capacitance, frequency, and temperature. It also includes Non-Contact Voltage (NCV) detection, continuity testing, live wire detection, data hold, and a backlight for improved visibility in various conditions.
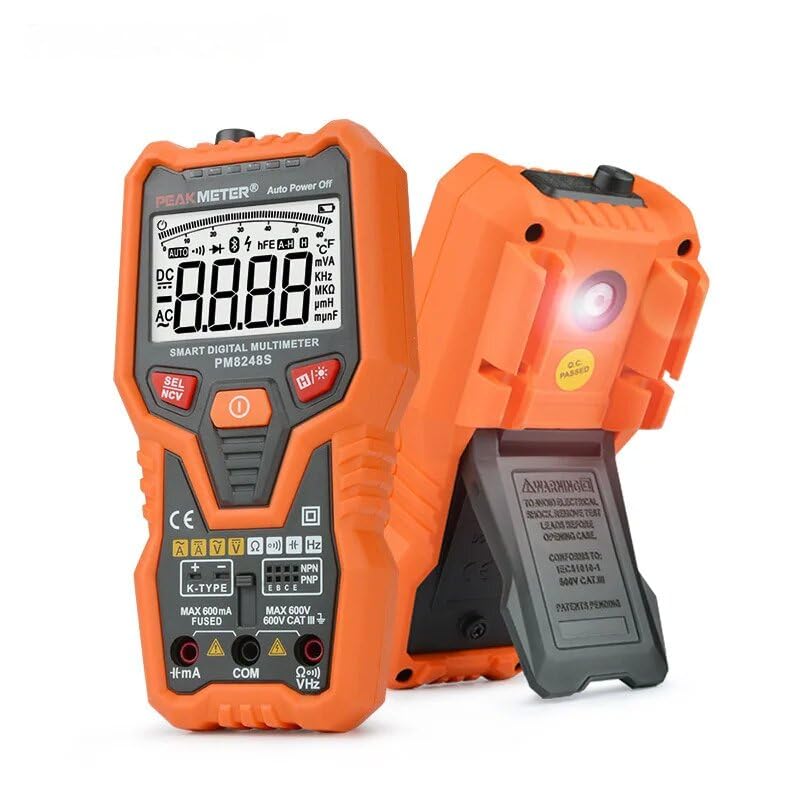
Figure 2.1: Front view of the PEAKMETER PM8248S Digital Multimeter, showcasing its display, function buttons, and input terminals.
2.1 Key Features
- Smart Auto-Range: Automatically selects the correct measurement range.
- 6000 Counts Display: High-resolution digital display with an analog bar graph.
- Measurement Functions: AC/DC Voltage, AC/DC Current, Resistance, Capacitance, Frequency, Temperature.
- Special Functions: Non-Contact Voltage (NCV) detection, Continuity Test, Live Test, Transistor Test.
- Convenience Features: Data Hold, Backlight, Auto Power Off, Flashlight.
- Overload Protection: PTC protection circuit for resistance and frequency measurements.
2.2 Component Identification

Figure 2.2: Labeled diagram of the PM8248S, indicating the NCV sensor, LED alarm, clear LCD, SEL/NCV button, Data hold/Backlight button, ON/OFF button, soft cover, and input terminals.
- NCV Sensor: Detects non-contact voltage.
- LED Alarm: Visual indicator for NCV and other alerts.
- Clear LCD: Digital display for measurement readings.
- SEL/NCV Button: Selects functions or activates NCV mode.
- ON/OFF Button: Powers the multimeter on or off.
- Data Hold/Backlight Button: Freezes the current reading or activates the display backlight.
- Input Terminals: Sockets for connecting test leads (VΩHz, COM, mA).
- Soft Cover: Provides protection against impacts.
3. Setup
3.1 Battery Installation
The PM8248S multimeter requires 3 x 1.5V AAA batteries for operation. Batteries are typically not included and must be purchased separately.
- Ensure the multimeter is powered off.
- Locate the battery compartment cover on the back of the meter.
- Use a screwdriver to loosen the screw(s) securing the battery cover.
- Remove the cover.
- Insert 3 x 1.5V AAA batteries, observing the correct polarity (+ and -) as indicated inside the compartment.
- Replace the battery cover and secure it with the screw(s).
3.2 Connecting Test Leads
Always ensure test leads are properly connected before taking any measurements.
- Insert the black test lead into the COM (Common) terminal.
- For most measurements (Voltage, Resistance, Capacitance, Frequency, Temperature, NCV), insert the red test lead into the VΩHz terminal.
- For current measurements (mA), insert the red test lead into the mA terminal.
4. Operating Instructions
The PM8248S features a fully automatic cruise test system, simplifying operation as it intelligently detects the measurement type without requiring manual function selection for most common tasks.

Figure 4.1: The PM8248S multimeter actively measuring voltage from a power outlet, demonstrating its practical application.
4.1 Power On/Off
- Press the ON/OFF button to power on the multimeter.
- Press the ON/OFF button again to power off the multimeter.
- The meter will automatically shut down after 10 minutes of inactivity to conserve battery life.
4.2 Automatic Measurement Mode
In its default state after powering on, the PM8248S operates in a smart automatic measurement mode. It will automatically identify and measure AC/DC voltage, resistance, and continuity when test leads are applied.
4.3 Manual Function Selection (SEL/NCV Button)
While the meter is smart, some specific functions may require manual selection using the SEL/NCV button.
- NCV (Non-Contact Voltage) Detection: Press and hold the SEL/NCV button to activate NCV mode. Bring the NCV sensor near an AC voltage source to detect its presence. The LED alarm and audible beeps will indicate detection.
- Function Cycling: In certain modes (e.g., when measuring voltage), pressing the SEL/NCV button may cycle between AC and DC measurements if the auto-detection needs refinement, or between different sub-functions like diode test or capacitance.
4.4 Data Hold and Backlight
- Data Hold: Press the Data Hold/Backlight button briefly to freeze the current reading on the display. Press it again to release the hold.
- Backlight: Press and hold the Data Hold/Backlight button to turn the display backlight on or off.
4.5 Specific Measurement Procedures
Always ensure the test leads are connected to the correct terminals and the meter is set to the appropriate function (if not in auto-mode).
- Voltage Measurement (AC/DC): Connect red lead to VΩHz, black lead to COM. Connect probes in parallel to the circuit or component. The meter will automatically detect AC or DC.
- Current Measurement (AC/DC): Connect red lead to mA, black lead to COM. Connect probes in series with the circuit. Ensure the circuit is de-energized before connecting.
- Resistance Measurement: Connect red lead to VΩHz, black lead to COM. Connect probes across the component. Ensure the circuit is de-energized.
- Continuity Test: Connect red lead to VΩHz, black lead to COM. Touch probes across the circuit. An audible beep indicates continuity.
- Capacitance Measurement: Connect red lead to VΩHz, black lead to COM. Connect probes across the capacitor. Ensure the capacitor is discharged before testing.
- Frequency Measurement: Connect red lead to VΩHz, black lead to COM. Connect probes to the signal source.
- Temperature Measurement: Use the included K-type thermocouple. Insert the thermocouple into the designated K-TYPE ports (positive to +, negative to -).
- Transistor Test: Use the dedicated transistor test socket (NPN/PNP) on the meter.
5. Maintenance
5.1 Cleaning
To clean the multimeter, wipe the case with a damp cloth and a mild detergent. Do not use abrasives or solvents. Ensure the meter is completely dry before use.
5.2 Battery Replacement
When the low battery indicator appears on the display, replace the batteries as soon as possible to ensure accurate readings. Refer to Section 3.1 for battery installation instructions.
5.3 Fuse Replacement
The current input terminals (mA) are fused for protection. If the meter fails to measure current, the fuse may need replacement. Refer to the markings on the meter for the correct fuse rating (e.g., MAX 600mA FUSED). Fuse replacement should only be performed by qualified personnel.
- Ensure the multimeter is powered off and all test leads are disconnected.
- Open the battery compartment cover (refer to Section 3.1).
- Locate the fuse(s) inside the compartment.
- Carefully remove the old fuse and replace it with a new fuse of the exact same type and rating.
- Replace the battery cover and secure it.
6. Troubleshooting
- Meter does not power on: Check battery installation and ensure batteries are not depleted. Replace if necessary.
- No display or incorrect readings: Ensure test leads are correctly inserted into the appropriate terminals. Check for damaged test leads. Verify the battery level.
- Meter automatically shuts off: This is a normal function (Auto Power Off) after 10 minutes of inactivity. Press any button to reactivate.
- Current measurement not working: Check the fuse for the current input terminal. Replace if blown (refer to Section 5.3).
- NCV not detecting: Ensure the NCV sensor is positioned correctly near the AC source. The NCV function is for detection, not precise measurement.
7. Specifications

Figure 7.1: Dimensions of the PM8248S multimeter, showing a height of 169mm and width of 83mm.
| Parameter | Range | Accuracy |
|---|---|---|
| DC Voltage | 6V/60V/600V | ±(0.8%+3) |
| AC Voltage | 6V/60V/600V | ±(1.2%+3) |
| DC Current | 600mA | ±(1.0%+3) |
| AC Current | 600mA | ±(1.5%+3) |
| Resistance | 6kΩ/60kΩ/600kΩ | ±(1.0%+3) |
| 6MΩ/10MΩ | ±(1.2%+5) | |
| Capacitance | 60nF/600nF/6µF/60µF/600µF/6mF | ±(4.0%+5) |
| Frequency | 30~1000Hz | ±(0.5%+2) |
| Temperature (℃) | -20℃~1300℃ | ±(1.0%+3) |
| Temperature (℉) | -4℉~2372℉ | ±(1.0%+3) |
7.1 General Specifications
- Display: 6000 counts LCD with Analog Bar Display
- Auto Range: Yes
- Auto Power Off: Yes (after 10 minutes of inactivity)
- Data Hold: Yes
- Backlight: Yes
- NCV: Yes
- Continuity Test: Yes
- Live Test: Yes
- Transistor Test: Yes
- Power Supply: 3 x 1.5V AAA batteries
- Dimensions: 165mm x 82mm x 51mm (approx. 16.5 x 8.2 x 5.1 cm)
- Net Weight: Approx. 247g (without batteries)
- Safety Rating: EN61010-1, EN61010-2-033, EN61326, CAT. III 600V
- Material: Acrylonitrile Butadiene Styrene (ABS)
- Operating Temperature: Upper temperature rating 60 Degrees Celsius
- Certifications: CE, RoHS, UL
8. Warranty and Support
For warranty information or technical support, please contact your retailer or the manufacturer directly. Keep your purchase receipt as proof of purchase.


