
MOOER GE200 Pro
Contents
MOOER GE200 Pro Intelligent Multi Effects Pedal User Manual
Model: GE200 Pro
Brand: MOOER
1. Introduction
The MOOER GE200 Pro is an advanced intelligent multi-effects pedal designed for guitarists seeking a comprehensive and versatile tone solution. It integrates a wide array of effects, amplifier models, and cabinet simulations, along with a powerful groove station, MIDI capabilities, and seamless app integration. This manual provides detailed instructions for setting up, operating, maintaining, and troubleshooting your GE200 Pro to ensure optimal performance and longevity.

Figure 1: Front view of the MOOER GE200 Pro Intelligent Multi Effects Pedal, showcasing its display, control knobs, and footswitches.
2. Safety Information
- Power Supply: Use only the specified power adapter. Incorrect voltage or polarity can damage the unit.
- Environment: Avoid exposing the unit to water, moisture, excessive heat, or direct sunlight. Operate in a well-ventilated area.
- Cleaning: Disconnect power before cleaning. Use a soft, dry cloth. Do not use liquid cleaners or aerosols.
- Servicing: Do not attempt to service the unit yourself. Refer all servicing to qualified personnel.
- Handling: Handle with care. Avoid dropping or subjecting the unit to strong impacts.
3. Getting Started / Setup
3.1 Unboxing and Initial Inspection
Carefully remove the GE200 Pro from its packaging. Inspect the unit for any signs of damage that may have occurred during transit. Ensure all accessories, including the power adapter, are present.
3.2 Power Connection
Connect the supplied 9V DC power adapter to the 'DC 9V' input on the rear panel of the GE200 Pro. Plug the adapter into a suitable power outlet. The unit will power on automatically.
3.3 Connecting Your Equipment
The GE200 Pro offers extensive input/output options for various setups:
- Guitar Input: Connect your guitar to the 'IN' 1/4" jack.
- Amplifier/PA Output: Connect the 'L-OUTPUT-R' 1/4" jacks to your amplifier's input or a PA system. For stereo output, use both L and R.
- XLR Balanced Output: Use the 'XLR L/R' outputs for direct connection to a mixer or audio interface, providing a balanced signal.
- Headphone Output: Connect headphones to the '3.5mm Headphone' jack for silent practice.
- FX Loop: The 'S-FX LOOP-R' send and return jacks allow integration of external effects pedals into your signal chain. This can be configured as parallel or serial.
- MIDI In/Out: Connect external MIDI devices for control or synchronization.
- USB-C Port: Connect to a computer for use as a low-latency ASIO USB audio interface, firmware updates, and software control via MOOER Studio.
- EXP 2: Connect an external expression pedal for additional real-time control.

Figure 2: Rear panel of the GE200 Pro, detailing all available input and output connections.

Figure 3: Detail of the USB-C port, essential for computer connectivity and audio interface functionality.
4. Key Features Overview
4.1 Extensive Effects and Amp Models
The GE200 Pro features 286 advanced effect modules and amp models, offering a vast palette of tones. It supports MOOER’s in-house MNRS amp sim impulse response files and allows downloading of third-party IR cabinet simulation files up to 2048 points, providing extensive customization.

Figure 4: The GE200 Pro's display interface, illustrating the selection of various effect modules and amp models.

Figure 5: Visual representation of the extensive number of amp models, cabinet simulations, and power amp options available.
4.2 Digital Connectivity
The GE200 Pro supports Bluetooth audio playback for streaming backing tracks and connects to the GE CLOUD app for easy preset and sample file management. The USB-C port functions as a professional low-latency ASIO USB audio interface.

Figure 6: A smartphone screen showing the GE Cloud app interface, demonstrating its connectivity with the GE200 Pro for preset management.
4.3 Groove Station
The integrated Groove Station includes a drum machine with 70 drum patterns and a 60-second phrase looper. The looper can be synchronized with the drum machine, making it an ideal tool for practice and creative composition.

Figure 7: An overview of the Groove Station's functionalities, including drum patterns, looper, and synchronization options.
4.4 Professional I/O
The GE200 Pro offers highly adaptable audio routing with standard 1/4" input/outputs, 3.5mm headphone output, parallel/serial FX loop, and stereo XLR outputs. Programmable MIDI inputs and outputs provide dynamic control options.

Figure 8: A visual summary of the extensive input/output options available on the GE200 Pro for diverse audio setups.
5. Operation
5.1 Basic Navigation
The GE200 Pro features a clear display, control knobs, and footswitches for intuitive operation. Use the main rotary knob for navigation and selection, and the footswitches (A, B, C) for preset changes, looper control, and other functions.
5.2 Preset Management
To select a preset, use the footswitches to cycle through banks or individual presets. To save a modified preset, press the 'SAVE' button and follow the on-screen prompts to name and store your tone.
5.3 Using the Looper and Drum Machine
Access the Groove Station mode to activate the drum machine and looper. Use the dedicated controls to start/stop recording, overdub, play, and clear looper phrases. The drum machine offers various patterns and tempo control, which can be synchronized with the looper.
5.4 Bluetooth and GE CLOUD App
Enable Bluetooth on your device and pair it with the GE200 Pro. Use the GE CLOUD app to browse, download, and upload presets, as well as manage sample files. This provides a convenient way to expand your tone library and share custom sounds.
5.5 USB Audio Interface Functionality
Connect the GE200 Pro to your computer via the USB-C port. Install the necessary ASIO drivers (available from MOOER's official website) to use the unit as a low-latency audio interface for recording or re-amping. The MOOER Studio software provides a graphical interface for deep editing and management.
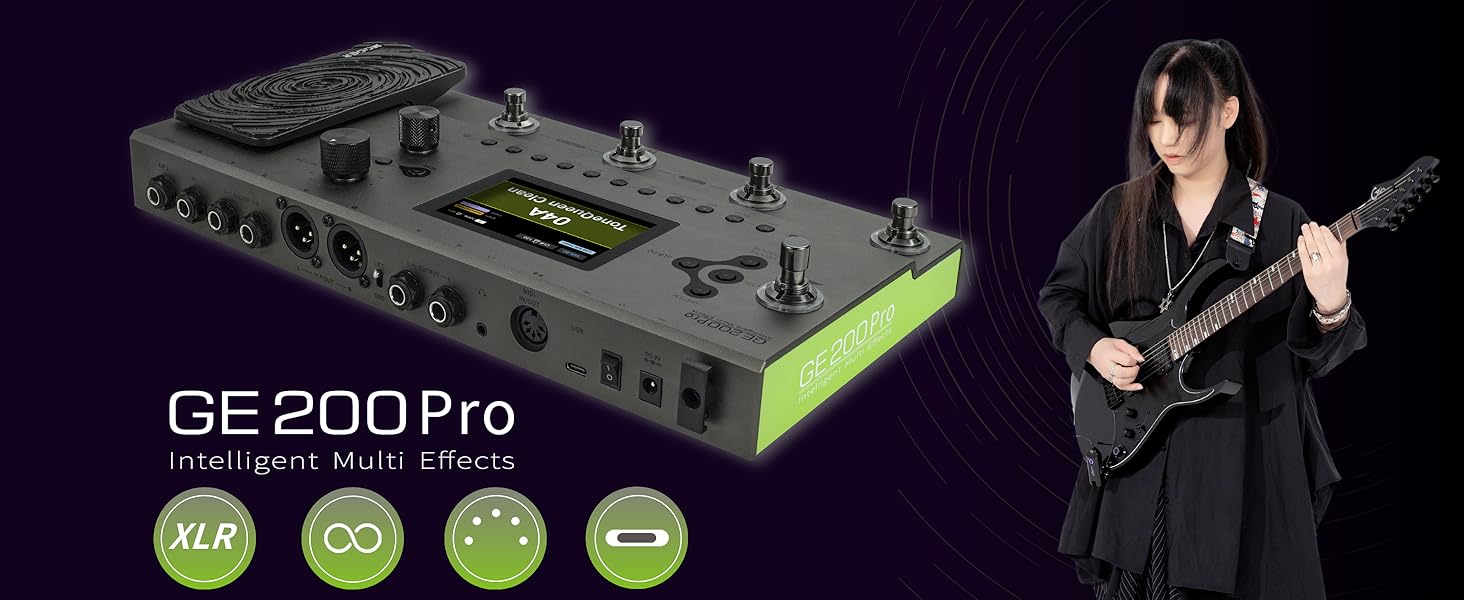
Figure 9: The MOOER Studio software interface, providing comprehensive control over the GE200 Pro's settings and effect chain.
6. Maintenance
6.1 Cleaning
To clean the unit, disconnect it from power. Use a soft, dry, lint-free cloth to wipe down the exterior. Avoid using abrasive cleaners, solvents, or waxes, as these can damage the finish.
6.2 Firmware Updates
Periodically check the official MOOER website for firmware updates. Updates can introduce new features, improve performance, or fix bugs. Follow the instructions provided with the firmware update package carefully, typically involving connecting the unit to a computer via USB and using the MOOER Studio software.
6.3 Storage
When not in use for extended periods, store the GE200 Pro in a cool, dry place, away from direct sunlight and extreme temperatures. It is recommended to keep it in its original packaging or a protective case to prevent dust accumulation and physical damage.
7. Troubleshooting
| Problem | Possible Cause | Solution |
|---|---|---|
| No sound output. | Incorrect cable connections, volume levels too low, unit not powered on. | Check all cable connections (input, output, power). Ensure master volume and individual effect levels are not at zero. Verify power adapter is correctly connected and unit is on. |
| Distorted or noisy sound. | Input gain too high, faulty cables, interference. | Adjust input gain to an appropriate level. Try different cables. Ensure unit is away from sources of electromagnetic interference. |
| Bluetooth connectivity issues. | Unit not in pairing mode, device too far, interference. | Ensure Bluetooth is enabled on both the GE200 Pro and your device. Move closer to the unit. Restart both devices. |
| Unit freezes or behaves erratically. | Software glitch, temporary error. | Power cycle the unit (turn off, wait 10 seconds, turn on). If issues persist, consider a factory reset (refer to the full manual for instructions, as this will erase user data). |
8. Specifications
| Feature | Specification |
|---|---|
| Item Weight | 3.85 pounds (1.75 Kilograms) |
| Package Dimensions | 13.78 x 6.89 x 4.72 inches |
| Item Model Number | GE200 Pro |
| Hardware Interface | Bluetooth, USB |
| Signal Format | Analog |
| Audio Output Effects | Multiple (286 effect modules and amp models) |
| Controls Type | Push Button, Knob |
9. Warranty and Support
The MOOER GE200 Pro comes with a standard manufacturer's warranty. For specific details regarding warranty coverage, duration, and terms, please refer to the warranty card included with your product or visit the official MOOER website. Keep your proof of purchase for warranty claims.
For technical support, troubleshooting assistance beyond this manual, or service inquiries, please contact MOOER customer support through their official website or the contact information provided in your product packaging. You can also visit the MOOER Store on Amazon for additional resources.
Ask a question about this manual
Ask about setup, troubleshooting, compatibility, parts, safety, or missing instructions. Manuals+ will review the question and use this page’s manual context to help answer it.