1. Introduction
This manual provides essential instructions for the safe and effective operation of your WASJOYE 25L Digital Safe. Please read this manual thoroughly before installation and use, and retain it for future reference. This digital safe is designed to secure valuables such as cash, jewelry, documents, and firearms in various environments including homes, offices, and hotels.

Image 1.1: WASJOYE 25L Digital Safe with its interior visible, containing various valuables.
2. Safety Information
- Always keep the emergency keys in a secure location, separate from the safe and away from unauthorized access. Do not store them inside the safe.
- Ensure the safe is installed on a stable surface or securely mounted to a wall or floor to prevent unauthorized removal.
- Do not expose the safe to extreme temperatures or humidity.
- Replace batteries promptly when the low battery indicator appears to ensure continuous operation.
- Keep the safe locked at all times when not in use.
3. Package Contents
Verify that all items are present in the package:
- 1 x WASJOYE 25L Digital Safe
- 1 x User Manual
- 2 x Emergency Keys
- 4 x Expansion Screws (for mounting)
- 1 x Floor Mat
- 1 x Type-C Cable (for emergency power)

Image 3.1: Contents of the WASJOYE 25L Digital Safe package.
4. Setup
4.1. Initial Opening and Battery Installation
- Open the Safe with Emergency Key: Insert one of the emergency keys into the hidden keyhole (usually behind the keypad cover or a small plate) and turn it. Simultaneously turn the handle to open the safe door.
- Install Batteries: Locate the battery compartment on the inside of the safe door. Insert 4 AA batteries (not included) according to the polarity markings.
- Close and Lock: Close the safe door and turn the handle to the locked position. Remove the emergency key and store it in a safe, external location.

Image 4.1: Correct battery installation inside the safe door.
4.2. Mounting the Safe
For enhanced security, it is recommended to mount the safe to a wall or floor using the provided expansion screws.
- Choose a Location: Select a stable, dry, and secure location. The safe has pre-drilled holes at the back and bottom.
- Mark Drilling Points: Position the safe in the desired location and mark the drilling points through the pre-drilled holes onto the wall or floor.
- Drill Holes: Drill holes at the marked points using an appropriate drill bit for your wall/floor material.
- Secure the Safe: Align the safe with the drilled holes, insert the expansion screws, and tighten them securely.
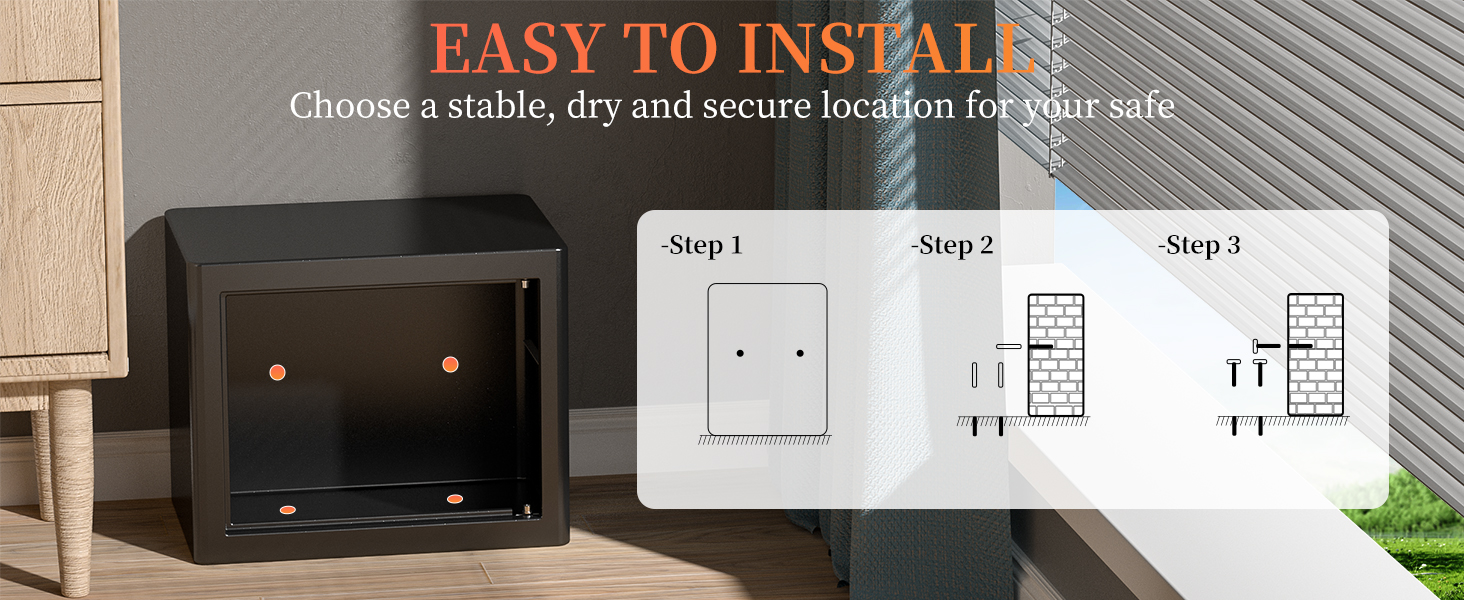
Image 4.2: Steps for securely installing the safe.
5. Operating Instructions
5.1. Setting Your Personal Passcode
You can set a personal passcode of 3 to 8 digits.
- With the safe door open, press the red reset button located on the inside of the door, near the hinge. The yellow indicator light on the keypad will illuminate.
- Enter your desired 3 to 8 digit passcode on the keypad.
- Press the "#" button to confirm. The green light will flash, indicating successful passcode setting.
Image 5.1: Steps for setting or changing your digital passcode.
5.2. Opening the Safe with Passcode
- Enter your 3 to 8 digit passcode on the keypad.
- Press the "#" button. The green indicator light will illuminate.
- Within 5 seconds, turn the handle clockwise to open the safe door.
5.3. Opening the Safe with Emergency Key
This method is used if you forget your passcode or if the batteries are depleted.
- Locate the hidden keyhole (usually behind the keypad cover).
- Insert one of the emergency keys and turn it counter-clockwise.
- Simultaneously turn the handle clockwise to open the safe door.
5.4. Emergency Power Supply (Type-C)
If the batteries are completely dead and you do not have access to the emergency keys, you can use an external power source.
- Connect a Type-C cable (included) to the Type-C port on the keypad.
- Connect the other end of the cable to a power bank or a USB power adapter.
- Once powered, you can enter your passcode and open the safe as described in section 5.2.

Image 5.2: Various methods for unlocking the safe, including emergency power via Type-C.
6. Features
6.1. Smart Alarm System
The safe is equipped with an anti-theft alarm system. If an incorrect passcode is entered three consecutive times, the alarm will activate, and the system will lock for a short period.
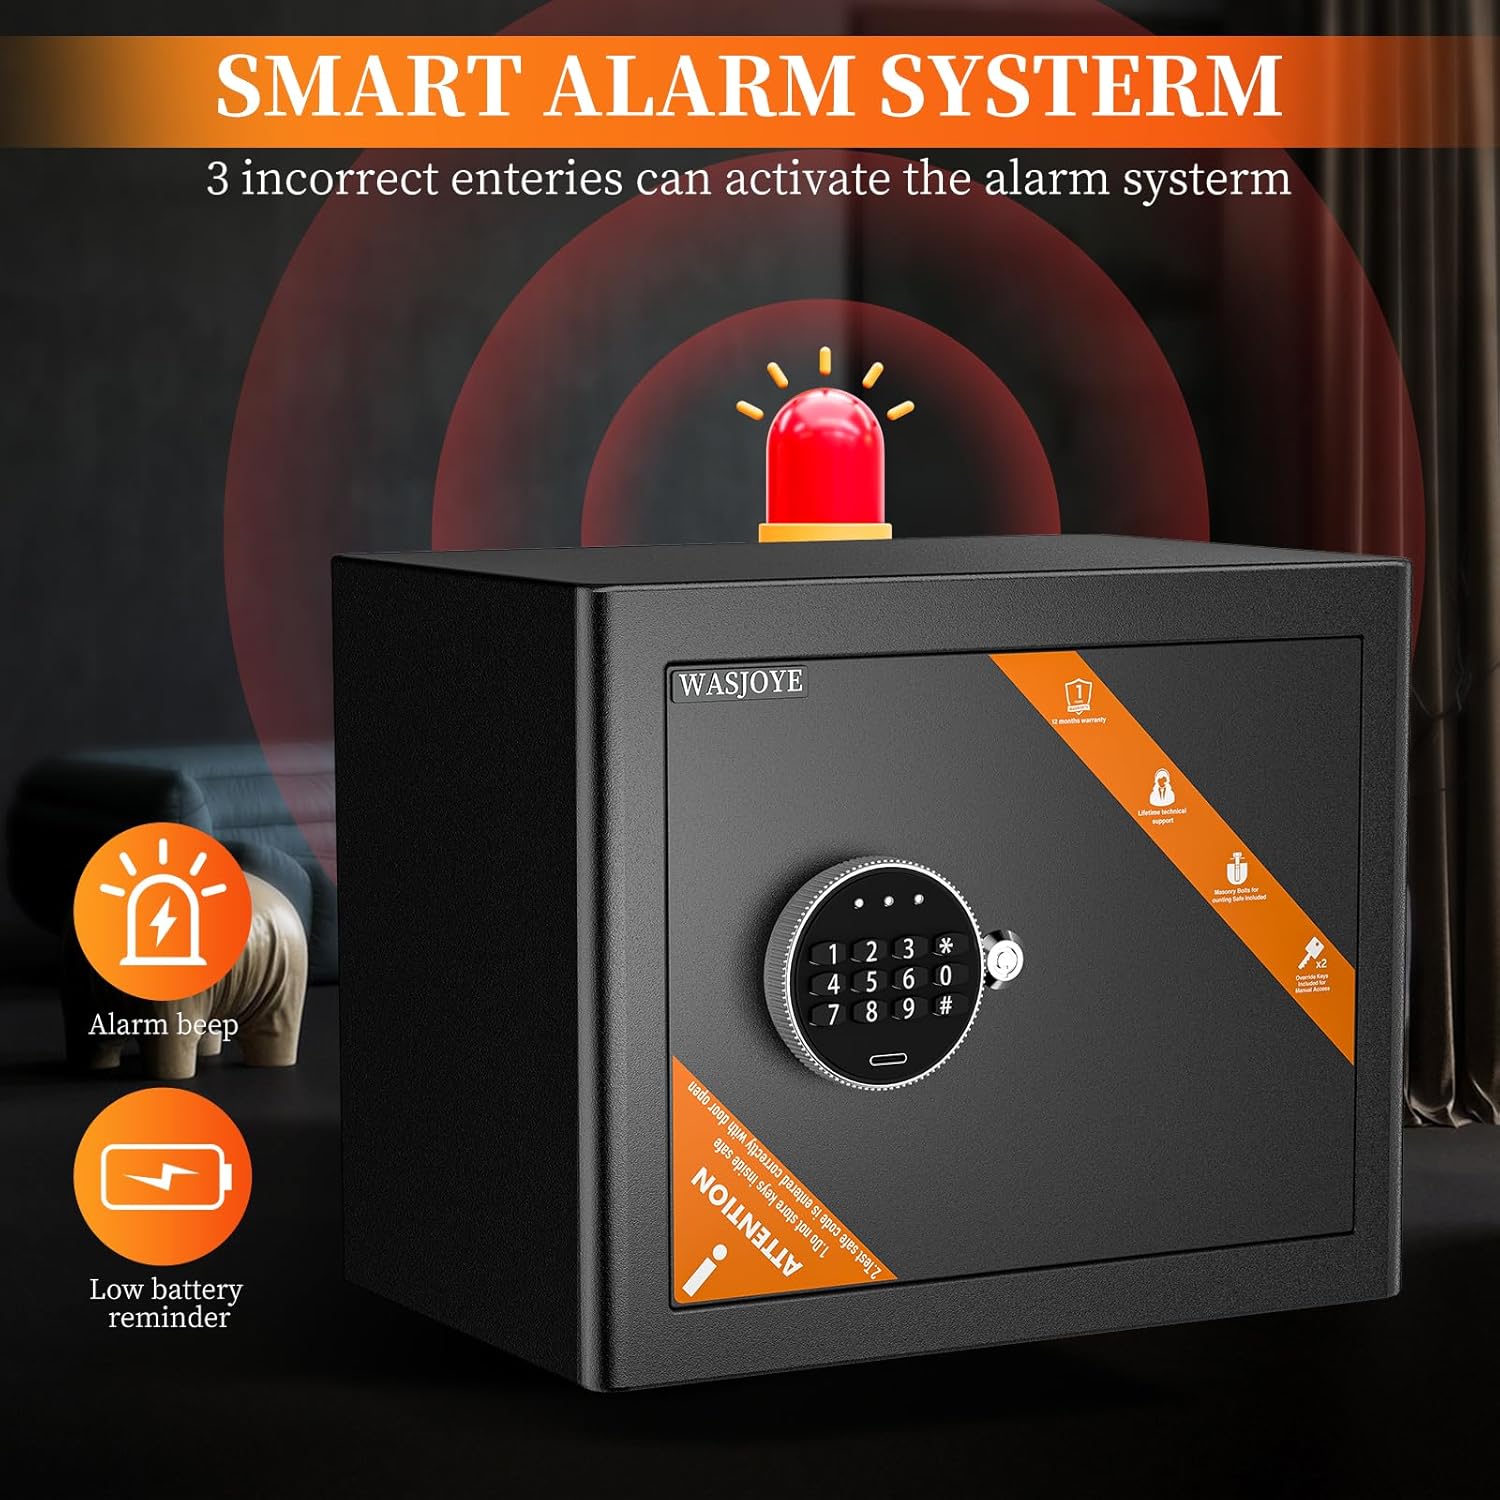
Image 6.1: Smart Alarm System and Low Battery Reminder.
6.2. Low Battery Reminder
When the batteries are running low, the red and green indicator lights on the keypad will illuminate simultaneously when you attempt to open the safe. Replace the batteries promptly to ensure continued functionality.
6.3. Adjustable Interior Space
The safe includes a removable shelf, allowing you to customize the interior space to accommodate items of various sizes, such as documents, jewelry, cash, or watches.

Image 6.2: Adjustable interior space with and without the shelf.
7. Maintenance
- Battery Replacement: When the low battery indicator appears, replace all 4 AA batteries with new ones. Do not mix old and new batteries.
- Cleaning: Clean the exterior of the safe with a soft, damp cloth. Avoid using abrasive cleaners or solvents that could damage the finish or electronic components.
- Keyhole Maintenance: Periodically check the emergency keyhole for any obstructions.
8. Troubleshooting
| Problem | Possible Cause | Solution |
|---|---|---|
| Safe does not open with passcode. | Incorrect passcode entered; batteries are low or dead; handle not turned within 5 seconds. | Re-enter passcode carefully. Replace batteries. Ensure handle is turned immediately after green light. Use emergency key or external power. |
| Alarm sounds unexpectedly. | Incorrect passcode entered three times; safe was moved or tampered with. | Enter correct passcode to disarm. Avoid tampering with the safe. |
| Keypad is unresponsive. | Batteries are completely dead. | Use emergency keys to open. If keys are unavailable, use the Type-C emergency power supply. Replace batteries immediately. |
9. Specifications
- Model: 25EO
- Brand: WASJOYE
- Dimensions (L x W x H): 25 x 25 x 35 cm (9.84 x 9.84 x 13.78 inches)
- Weight: 6.5 kg (14.3 lbs)
- Material: Carbon Steel
- Color: Black
- Lock Type: Electronic Keypad, Emergency Key
- Passcode Length: 3-8 digits
- Power Source: 4 x AA Batteries (not included)
- Special Features: Anti-theft, Alarm System, Removable Shelf, Emergency Type-C Power Port
- Mounting Type: Floor or Wall Mount (hardware included)
Image 9.1: WASJOYE 25L Digital Safe dimensions and key features.
10. Warranty and Support
WASJOYE products are designed for reliability and performance. For any questions, concerns, or support needs, please contact WASJOYE customer service.
- Emergency Key Replacement: If you need to replace your emergency keys, please contact the seller and provide the code found on the key cylinder within the keyhole.
- General Support: Refer to your purchase platform or the WASJOYE official website for contact information.