1. Introduction
Thank you for choosing the WIHTU Dusk to Dawn Outdoor Wall Light Fixtures. These fixtures are designed to provide reliable and efficient outdoor lighting for your home, porch, garage, or doorway. Featuring a built-in sensitive light sensor, the lights automatically activate at dusk and turn off at dawn, ensuring energy conservation and convenience. The durable construction includes a metal cage design and water ripple glass, offering both aesthetic appeal and weather resistance.
2. Safety Information
- Always turn off the power at the circuit breaker before beginning any electrical installation.
- Consult a qualified electrician if you are unsure about the installation process.
- Ensure all wiring connections are secure and comply with local electrical codes.
- Do not exceed the maximum wattage specified for the bulb socket.
- Handle glass components with care to prevent breakage.
- Keep children away from the installation area.
3. Package Contents
Verify that all components are present before installation:
- 2 x Lamps (Light Fixtures)
- 2 x Bulbs (E26 Base)
- Mounting Hardware
- Instruction Manual

Image: Two WIHTU outdoor wall light fixtures, still sealed in their clear plastic packaging, ready for unboxing and installation.
4. Specifications
| Feature | Specification |
|---|---|
| Brand | WIHTU |
| Model Name | Porch Light Fixture (STR-WL-0042) |
| Color | Black |
| Material | Glass, Metal |
| Product Dimensions | 13"L x 6"W x 17"H |
| Indoor/Outdoor Usage | Outdoor |
| Power Source | Corded Electric |
| Special Features | Anti-Rust, Sensor (Dusk to Dawn), Waterproof |
| Control Method | Touch (Sensor-based automatic operation) |
| Light Source Type | LED (Bulbs Included) |
| Voltage | 120 Volts |
| Wattage | 60 watts (Max) |
| Bulb Base | E26 |
| Brightness | 1600 Lumen (per included bulb) |
| Color Temperature | 2700 Kelvin |
| Water Resistance Level | Waterproof |
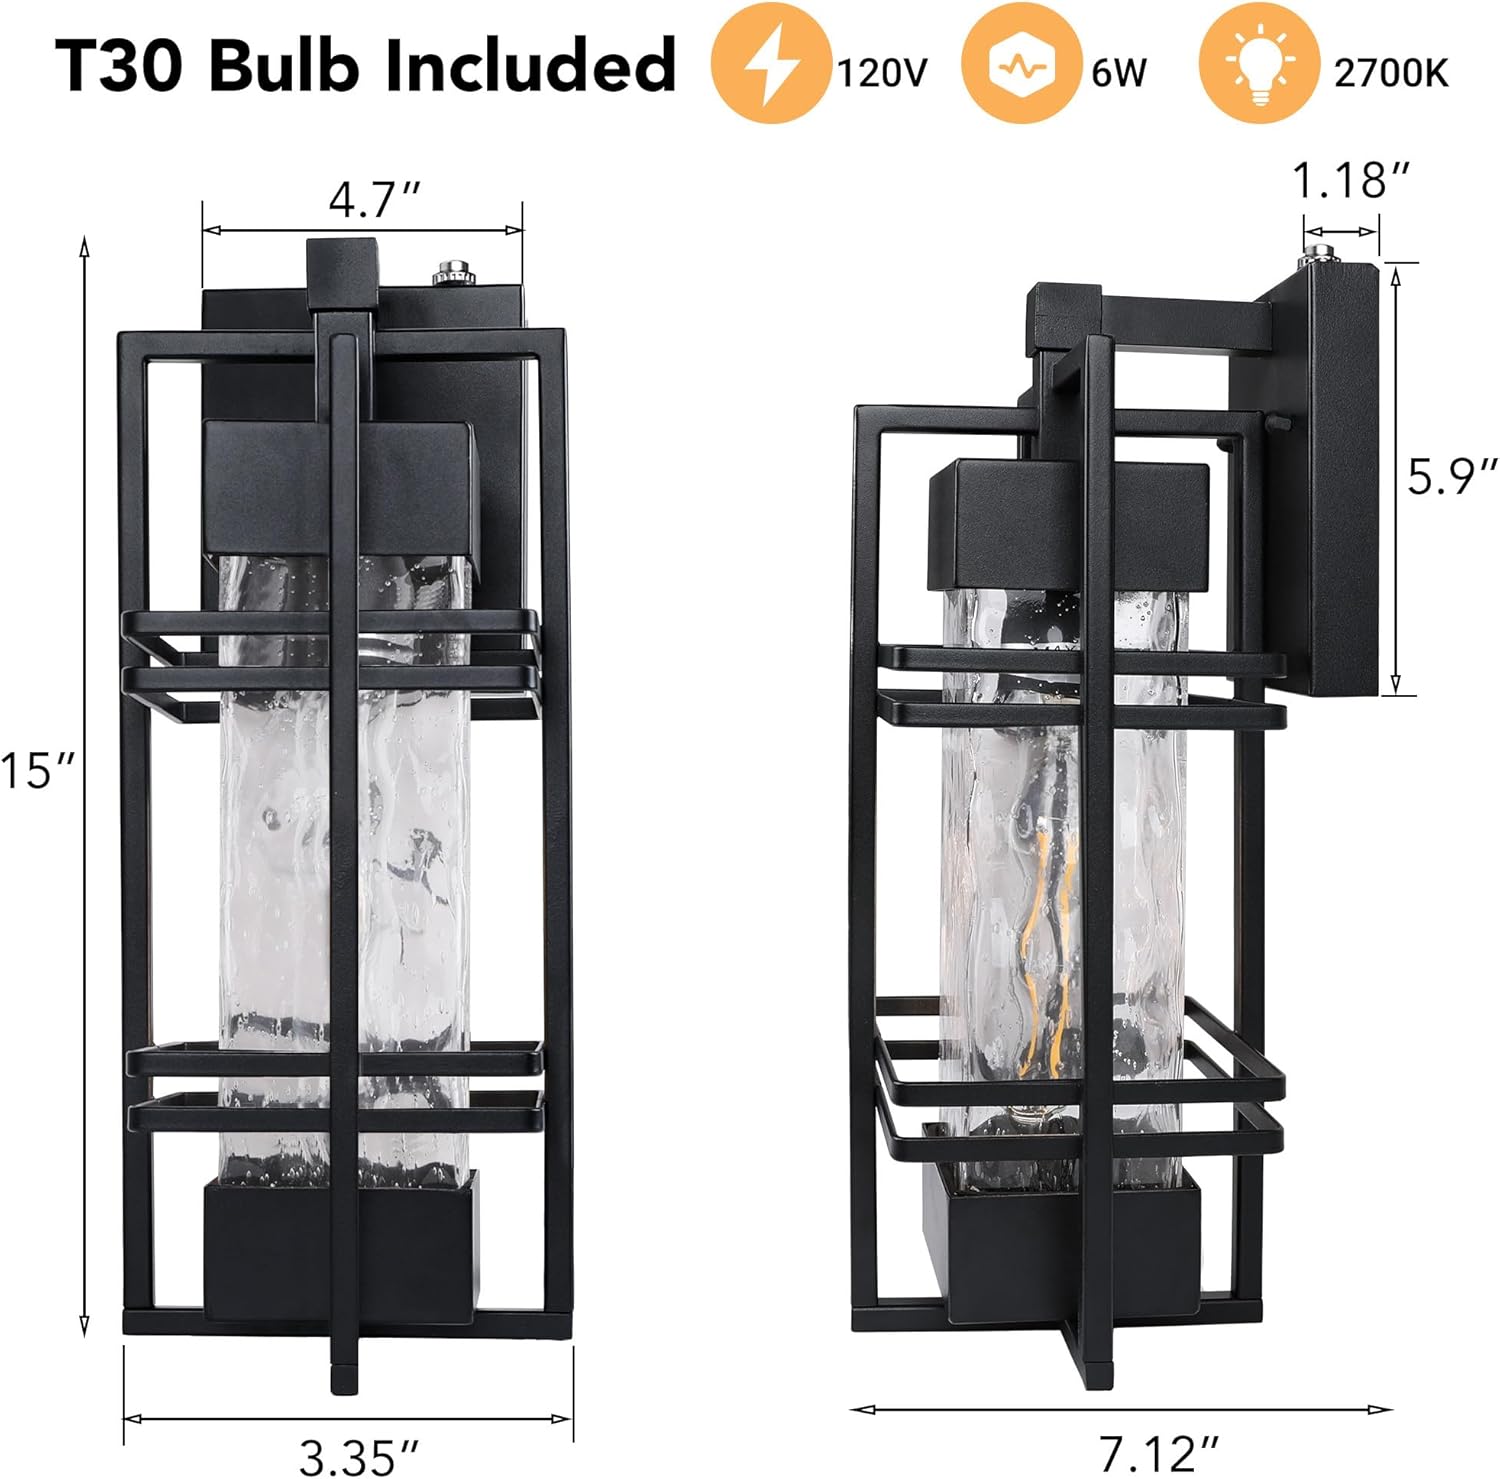
Image: A diagram illustrating the dimensions of the light fixture, including height, width, and depth, with a T30 bulb included specification.
5. Setup and Installation
These fixtures are pre-assembled for easy installation. Follow these steps:
- Turn Off Power: Before starting, ensure the power to the installation area is turned off at the circuit breaker to prevent electrical shock.
- Prepare Mounting Surface: If replacing an existing fixture, carefully remove it. Ensure the electrical box is clean and accessible.
- Install Mounting Bracket: Attach the provided mounting bracket to the electrical box using the screws. Ensure it is securely fastened.
- Connect Wiring: Connect the fixture's wires to your house wiring. Typically, connect the black wire (live) from the fixture to the black wire from the electrical box, the white wire (neutral) from the fixture to the white wire from the electrical box, and the ground wire (copper or green) from the fixture to the ground wire from the electrical box. Use wire nuts to secure connections.
- Mount the Fixture: Carefully align the fixture with the mounting bracket and secure it with the provided screws. Ensure the fixture is flush against the wall.
- Install Bulb: Insert the included E26 base bulb into the socket. Do not overtighten.
- Restore Power: Once the fixture is securely installed and the bulb is in place, turn the power back on at the circuit breaker.

Image: Detailed view of the light fixture's key components: the photocell sensor for automatic operation, the standard E26 bulb base, and the unique water ripple seeded glass for aesthetic lighting effects.

Image: Examples of the outdoor wall lights installed in various locations around a house, including the front door, porch, garage, and backyard, demonstrating their versatility.

Image: Two WIHTU outdoor wall lights mounted on either side of a front door, providing warm illumination to the entrance area at night.
6. Operating Instructions
The WIHTU outdoor wall light fixtures are equipped with an advanced dusk-to-dawn photocell sensor for automatic operation.
- Automatic On/Off: The built-in sensor detects ambient light levels. The fixture will automatically turn on when it gets dark (dusk) and turn off when it becomes light (dawn).
- Energy Saving: This automatic functionality ensures the lights are only on when needed, conserving energy and reducing electricity costs.
- Sensor Placement: Ensure the sensor on the fixture is not obstructed by objects, eaves, or other light sources (like other bright lights or reflections) that could interfere with its ability to accurately detect ambient light.

Image: A visual representation of the light fixture's automatic operation, showing it turning off during daylight hours and illuminating automatically as night falls.
7. Maintenance
- Cleaning: To maintain the appearance and performance of your light fixtures, clean them periodically with a soft, damp cloth. Do not use abrasive cleaners or solvents. Ensure power is off before cleaning.
- Bulb Replacement: These fixtures use standard E26 base bulbs. To replace a bulb, turn off the power at the circuit breaker, unscrew the old bulb, and screw in a new E26 bulb (maximum 60 watts).
- Inspection: Periodically inspect the wiring and fixture for any signs of wear, damage, or loose connections.

Image: The light fixture demonstrating its robust weather resistance, including protection against sun, rain (waterproof), strong winds (stormproof), and snow.
8. Troubleshooting
| Problem | Possible Cause | Solution |
|---|---|---|
| Light does not turn on at night. | 1. Power is off. 2. Bulb is faulty or loose. 3. Sensor is obstructed or receiving too much ambient light. | 1. Check circuit breaker and wall switch. 2. Replace bulb or ensure it's screwed in tightly. 3. Ensure sensor is clear of obstructions and not exposed to other light sources (e.g., streetlights, other fixtures). |
| Light stays on during the day. | 1. Sensor is obstructed or in a dark area. 2. Sensor is faulty. | 1. Ensure sensor is exposed to sufficient daylight. Remove any obstructions. Relocate if necessary. 2. Contact customer support if the issue persists after checking ambient light conditions. |
| Light flickers or dims. | 1. Loose wiring connection. 2. Faulty bulb. 3. Incompatible dimmer switch (if applicable). | 1. Turn off power and check all wiring connections. 2. Replace the bulb. 3. Ensure any dimmer switch used is compatible with LED bulbs (if using LED). |
9. Warranty
This product comes with a Limited Warranty. Please refer to the warranty documentation included with your purchase or contact WIHTU customer support for specific details regarding coverage and duration.
10. Customer Support
For any questions, technical assistance, or issues not covered in this manual, please contact WIHTU customer service. We are committed to providing professional and effective solutions.
Contact information can typically be found on the product packaging, the WIHTU official website, or through your retailer.
11. Product Videos
No official product videos with relevant creator type and m3u8 format were found in the provided data to embed in this manual.
Video: A short preview demonstrating the installation process of the WIHTU outdoor wall light fixture, from unboxing to final setup and illumination at night.


