
neculogy G9
neculogy G9 Gaming Audio Mixer User Manual
Model: G9
1. Introduction
The neculogy G9 Gaming Audio Mixer is a versatile audio interface designed for content creators, gamers, podcasters, and streamers. It offers comprehensive control over audio inputs and outputs, featuring various sound effects, voice modulation, and customizable sound pads to enhance your live broadcasts and recordings. This manual provides essential information for setting up, operating, maintaining, and troubleshooting your G9 mixer.
2. Safety Information
- Do not expose the device to water or excessive moisture.
- Avoid placing the device near heat sources or in direct sunlight.
- Use only the provided cables and power adapter.
- Do not attempt to disassemble or repair the device yourself. Refer to qualified service personnel.
- Keep out of reach of children.
3. Package Contents
Please check the box for the following items:
- neculogy G9 Gaming Audio Mixer
- 2 x 3.5mm Audio Cables
- USB-C Cable
- Split USB-C / Lightning Cable
- User Manual (this document)
4. Product Overview
The G9 mixer features an intuitive layout with dedicated controls for microphone input, music, monitoring, and output. It includes a display screen for visual feedback on levels and settings, along with various buttons for sound effects and voice modulation.

Figure 4.1: Front view of the G9 Gaming Audio Mixer.
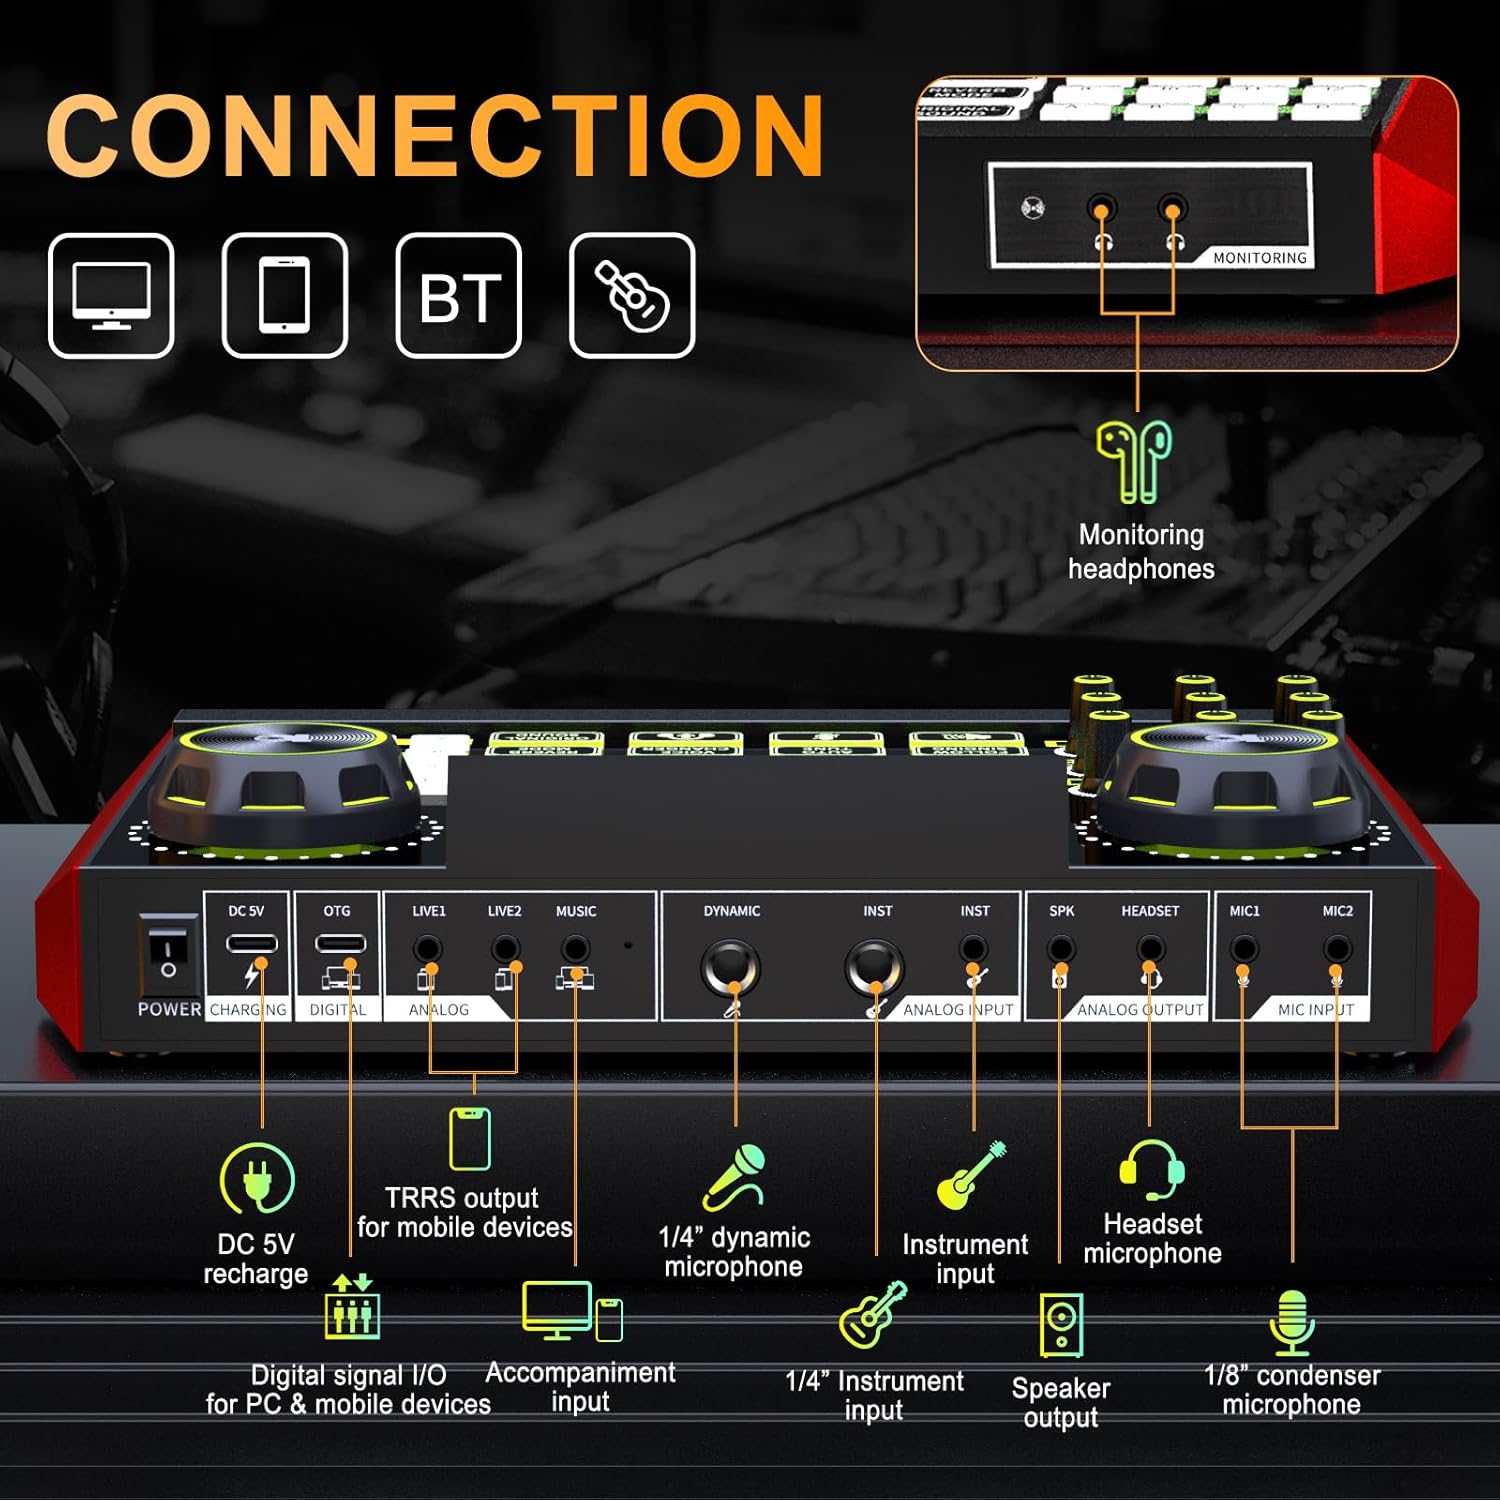
Figure 4.2: Rear connection panel of the G9 Gaming Audio Mixer.
4.1. Controls and Indicators
- MIC Knobs: Adjust microphone gain (High, Mid, Low).
- Reverb Knobs (REV-D, REV-L): Control reverb depth and length.
- Pitch Knob: Adjust vocal pitch.
- MON Knob: Adjust monitor headphone volume.
- OUT Knob: Adjust main output volume.
- MUSIC+ Knob: Adjust background music volume.
- Ducking Button: Automatically lowers background music when speaking.
- Denoise Button: Reduces background noise from microphone input.
- B/T Button: Activates Bluetooth pairing.
- Voice Changer Button: Cycles through different voice modes (e.g., female, uncle, baby, magic).
- Reverb Mode Button: Selects from preset reverb modes (e.g., KTV, Professional, Popular, Streamer, MC).
- Loopback Button: Enables or disables audio loopback for recording all sounds.
- Follow Singing Button: Removes vocals from music for sing-along (Bluetooth and MUSIC jack only).
- Auto Tune Button: Applies automatic pitch correction.
- Original Sound Button: Restores original vocal sound, bypassing effects.
- Customizable Sound Pads (1-12, A-D): Trigger pre-recorded or custom sound effects.
5. Setup
5.1. Initial Charging
Before first use, ensure the G9 mixer is fully charged. Connect the USB-C cable to the DC 5V port on the mixer and the other end to a USB power adapter (not included) or a computer USB port. The charging indicator will show the charging status.
5.2. Connecting Devices
The G9 mixer supports various connection methods for different devices and scenarios.
- To PC/Computer: Connect the USB-C cable from the mixer's OTG (Digital) port to your computer's USB port. This enables digital audio input/output.
- To Smartphone/Tablet (Digital): Use the split USB-C / Lightning cable to connect the OTG (Digital) port to your mobile device.
- To Smartphone/Tablet (Analog): Use a 3.5mm audio cable to connect the LIVE1 or LIVE2 (Analog) port to your mobile device's headphone jack.
- Microphones:
- Connect 1/8" condenser microphones to MIC1 or MIC2 ports.
- Connect 1/4" dynamic microphones to the DYNAMIC port.
- Connect headset microphones to the HEADSET port.
- Headphones: Connect your monitoring headphones to the MONITOR port.
- Instruments: Connect instruments to the INST ports using 1/4" cables.
- Speakers: Connect external speakers to the SPK (Speaker Output) port.
- Background Music Input: Connect an external audio source (e.g., phone, MP3 player) to the MUSIC port using a 3.5mm audio cable.
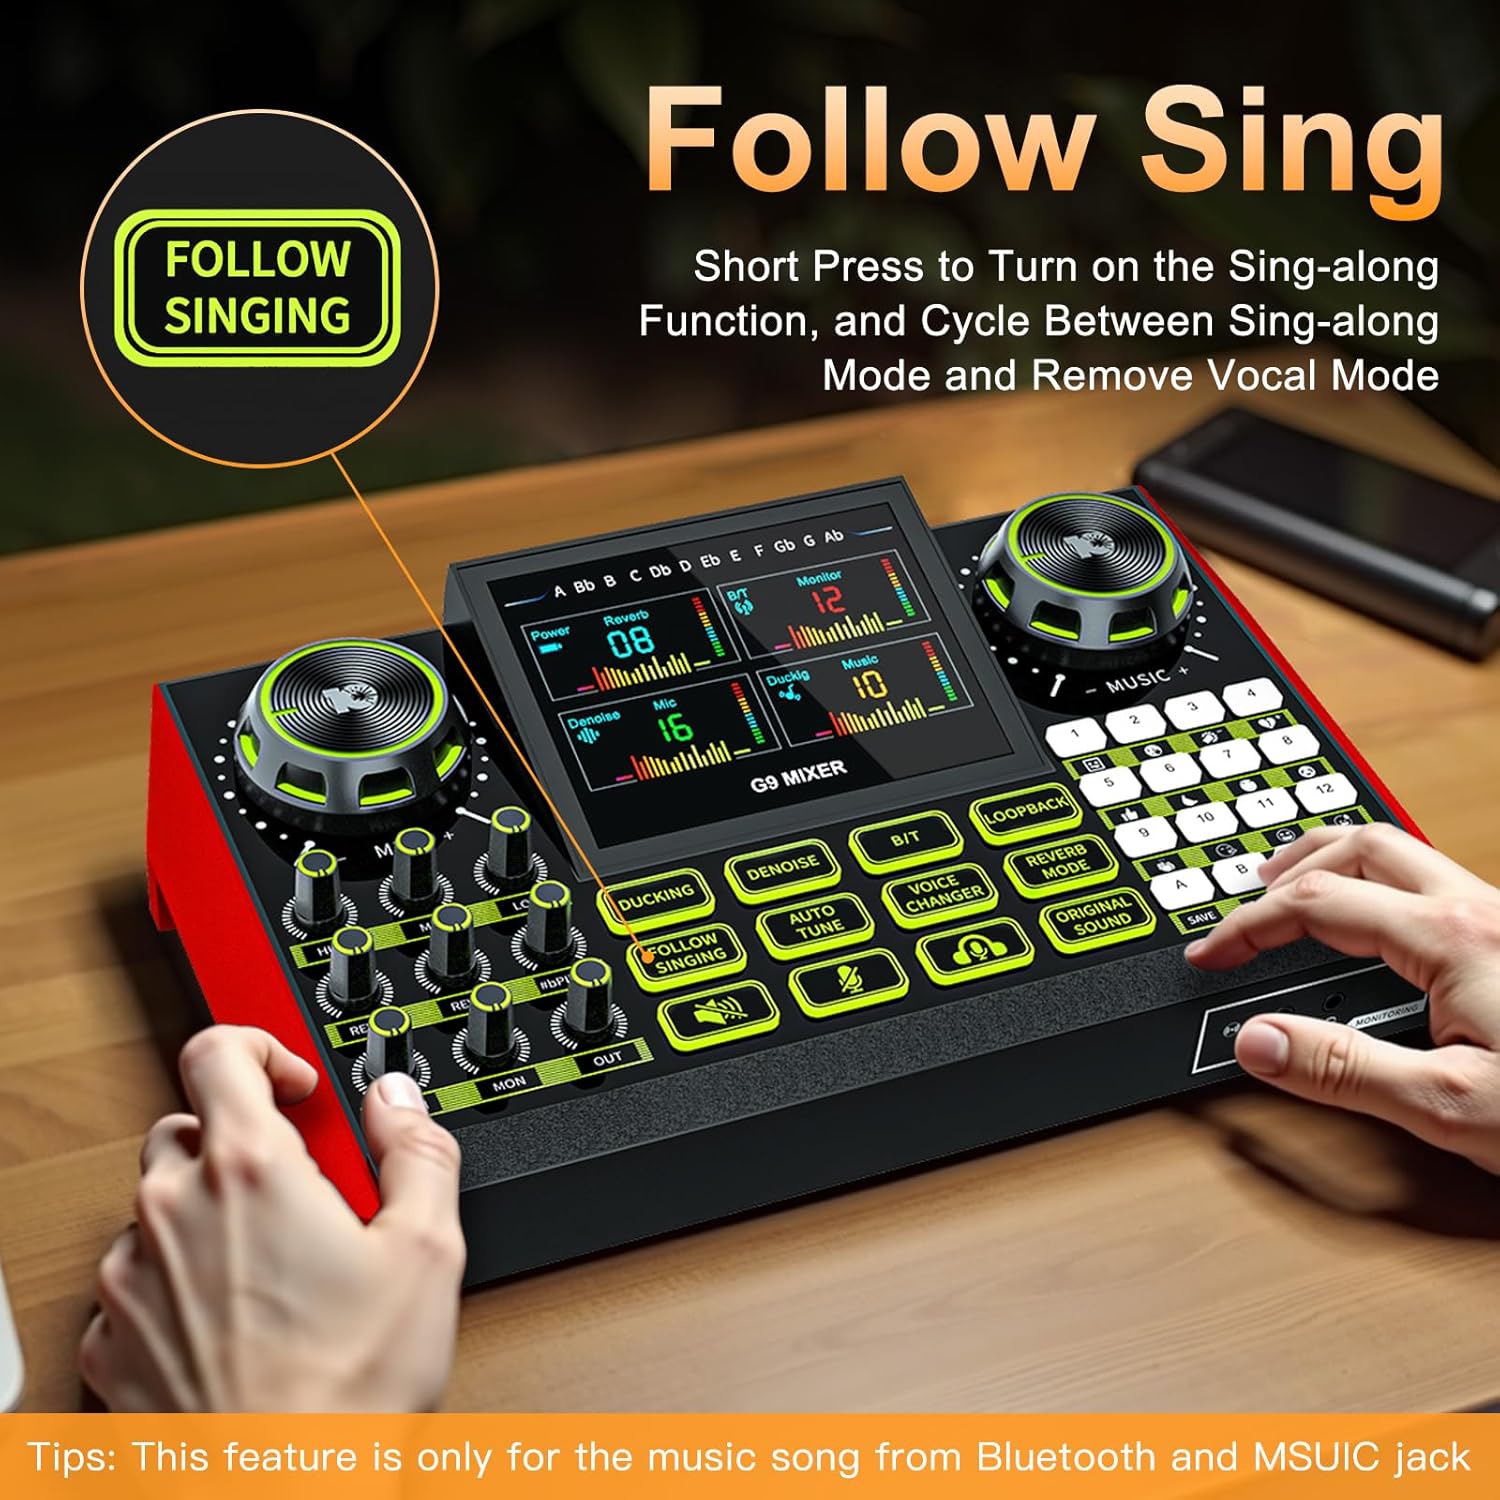
Figure 5.1: Connecting the G9 mixer to a computer and microphone.
6. Operating Instructions
6.1. Powering On/Off
Press and hold the Power button on the mixer to turn it on or off.
6.2. Adjusting Audio Levels
Use the dedicated knobs to control various audio levels:
- MIC Knobs (High, Mid, Low): Rotate to adjust the equalization of your microphone input.
- MUSIC+ Knob: Rotate to adjust the volume of background music from connected devices or Bluetooth.
- MON Knob: Adjust the volume of your monitoring headphones.
- OUT Knob: Adjust the overall output volume to your streaming device or speakers.
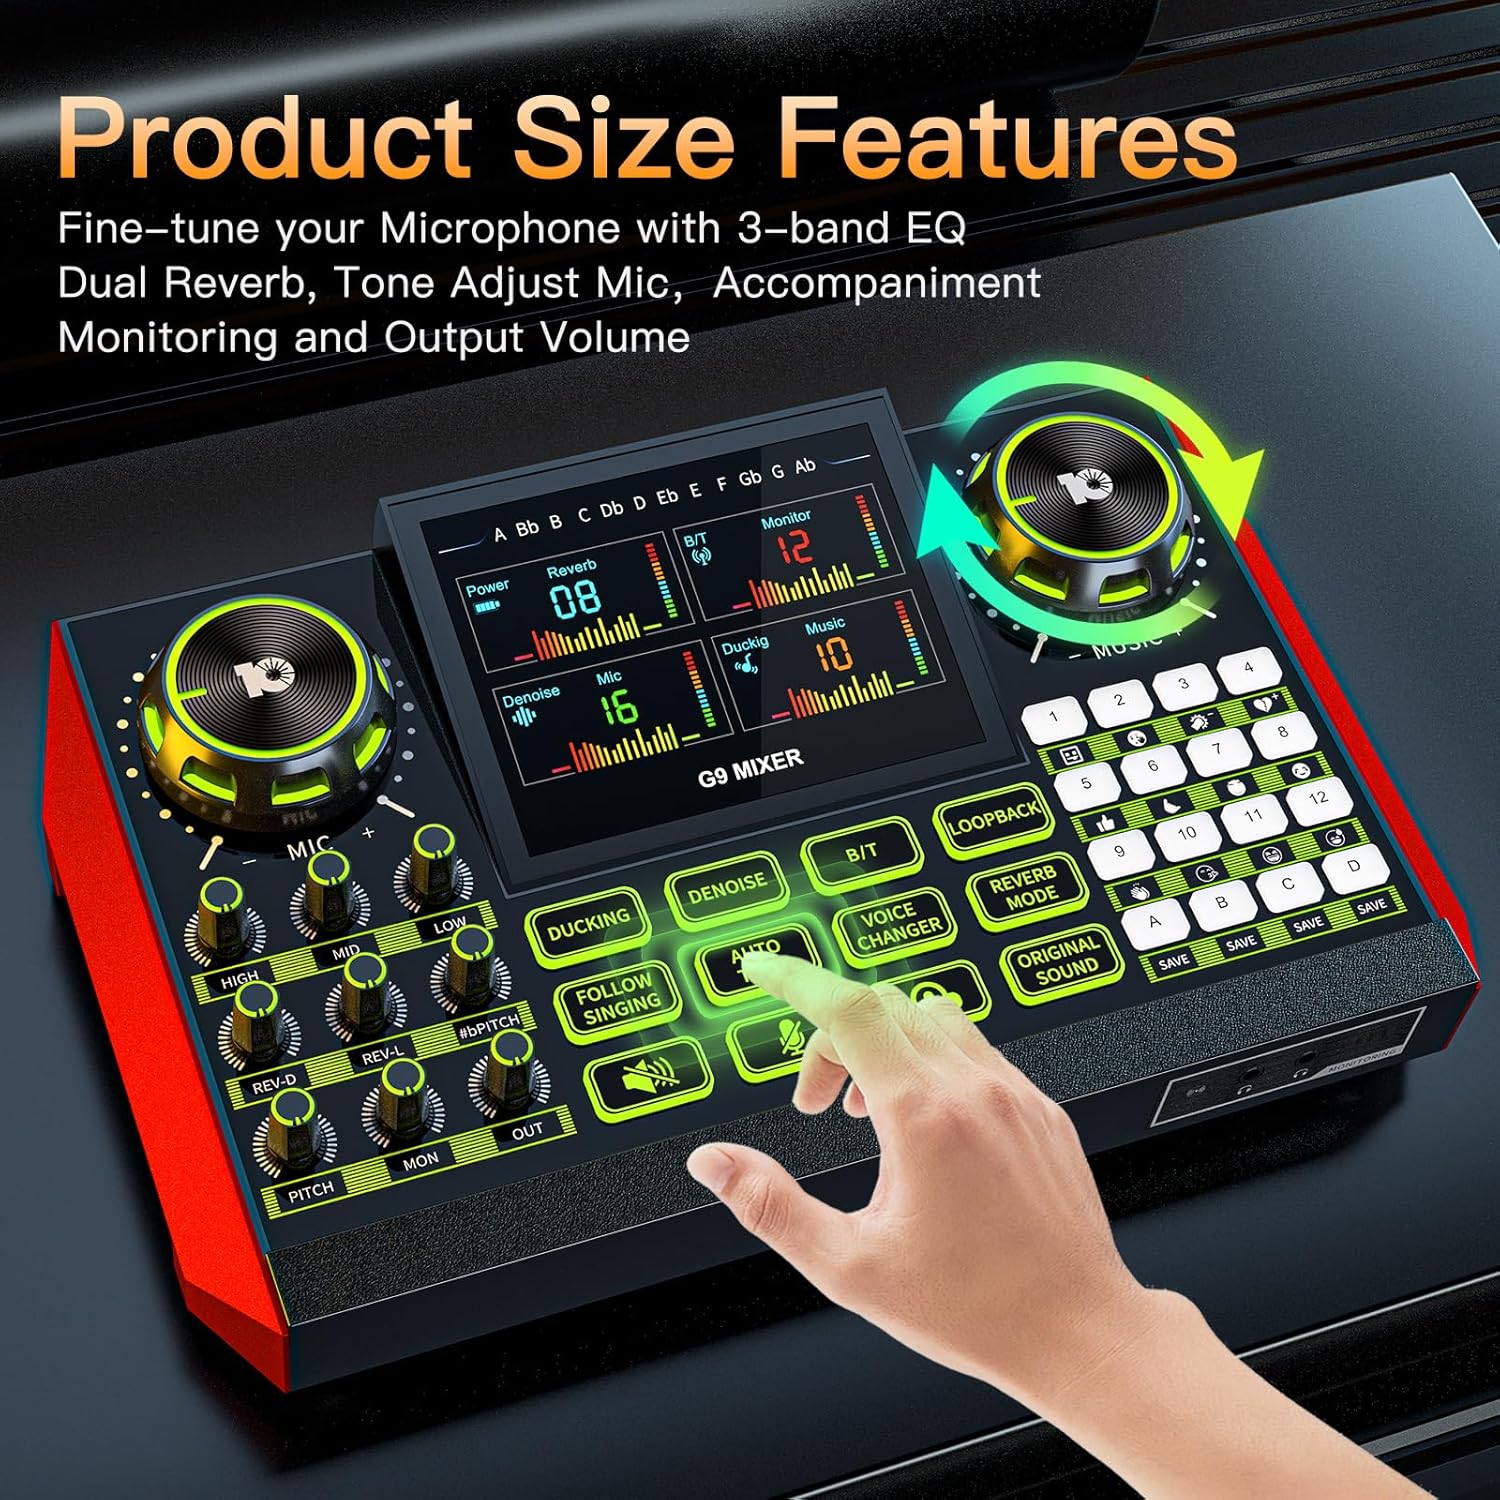
Figure 6.1: Fine-tuning audio with EQ and reverb controls.
6.3. Using Vocal Effects
The G9 mixer offers a range of vocal effects to enhance your voice:
- Reverb: Use the REV-D (Depth) and REV-L (Length) knobs to control the reverb effect. Press the Reverb Mode button to cycle through preset reverb types.
- Pitch: Rotate the Pitch knob to adjust your vocal pitch.
- Auto Tune: Press the Auto Tune button to activate automatic pitch correction.
- Voice Changer: Press the Voice Changer button to cycle through different voice effects (e.g., male, female, baby, robot).

Figure 6.2: Activating voice changing modes.
6.4. Sound Pads
The mixer features 12 preset sound pads (1-12) and 4 customizable sound pads (A-D). Press a pad to trigger its assigned sound effect. For customizable pads, press and hold to record your own sound, then press again to play.

Figure 6.3: Customizable sound pads for personalized effects.
6.5. Special Functions
- Ducking: Press the Ducking button to enable automatic music ducking. When you speak into the microphone, the background music volume will automatically decrease.
- Denoise: Press the Denoise button to activate noise reduction for your microphone input.
- Loopback: Press the Loopback button to enable or disable the loopback function. When enabled, all audio played on your computer/device (e.g., game audio, music) will be mixed with your microphone input and sent to your stream/recording.
- Follow Singing: Short press the Follow Singing button to turn on the sing-along function, which attempts to remove vocals from the music. This feature is primarily for music played via Bluetooth or the MUSIC jack.

Figure 6.4: Using the Follow Singing feature.
6.6. Bluetooth Connectivity
To connect a device via Bluetooth:
- Press the B/T button on the mixer. The Bluetooth indicator will start blinking.
- On your mobile device, search for Bluetooth devices and select "G9 Mixer".
- Once connected, the indicator will stop blinking. You can now play audio from your device through the mixer.
7. Maintenance
Proper maintenance ensures the longevity and optimal performance of your G9 mixer.
- Cleaning: Use a soft, dry cloth to wipe the surface of the mixer. Do not use liquid cleaners or abrasive materials.
- Storage: Store the mixer in a cool, dry place away from direct sunlight and extreme temperatures.
- Battery Care: If storing for an extended period, charge the battery periodically to maintain its health.
8. Troubleshooting
If you encounter issues with your G9 Gaming Audio Mixer, refer to the following common problems and solutions:
| Problem | Possible Cause | Solution |
|---|---|---|
| No sound output | Volume knobs are too low; incorrect cable connection; device not selected as audio output. | Increase OUT and MON knobs. Check all cable connections. Ensure G9 mixer is selected as the default audio output device on your computer/streaming software. |
| Microphone not working | MIC knob too low; microphone not properly connected; microphone type mismatch. | Increase MIC knobs. Ensure microphone is securely plugged into the correct port (e.g., condenser mic to MIC1/MIC2, dynamic mic to DYNAMIC). |
| Distorted audio | Input levels too high; faulty cable. | Lower input levels (e.g., MIC knobs, MUSIC+ knob). Try a different audio cable. |
| Bluetooth not connecting | Mixer not in pairing mode; device too far; interference. | Press the B/T button to enter pairing mode. Ensure your device is within range. Avoid strong electromagnetic interference. |
| Sound effects not working | Effect not activated; volume too low. | Ensure the specific effect button (e.g., Voice Changer, Auto Tune) is pressed. Check overall output volume. |
9. Specifications
| Feature | Detail |
|---|---|
| Brand | neculogy |
| Model Number | G9 |
| Item Weight | 1.84 pounds |
| Product Dimensions (LxWxH) | 12.4 x 3.54 x 2.36 inches |
| Power Source | Battery Powered |
| Batteries | 1 A battery required (included) |
| Number of Channels | 2 |
| Connectivity Technology | XLR, TRS, USB, Bluetooth |
| Output Connector Type | TRS |
10. Warranty and Support
The neculogy G9 Gaming Audio Mixer comes with a standard manufacturer's warranty. For specific warranty terms and conditions, please refer to the warranty card included in your product packaging or contact neculogy customer support.
For technical support, troubleshooting assistance, or any inquiries regarding your product, please visit the official neculogy website or contact their customer service team. Contact details are typically available on the product packaging or the brand's official online store.
11. Official Product Videos
No official product videos from the seller were found in the provided data to embed in this manual.
Ask a question about this manual
Ask about setup, troubleshooting, compatibility, parts, safety, or missing instructions. Manuals+ will review the question and use this page’s manual context to help answer it.