Thermaltake GEA-MSR-DMSBLK-01
Thermaltake Dual Heavy Duty RGB Monitor Arm
Model: GEA-MSR-DMSBLK-01
Introduction
This manual provides comprehensive instructions for the installation, operation, and maintenance of your Thermaltake Dual Heavy Duty RGB Monitor Arm, model GEA-MSR-DMSBLK-01. Please read this manual thoroughly before installation and retain it for future reference.
Safety Information
Please observe the following safety precautions to prevent injury or damage to the product:
- Ensure the desk surface is stable and capable of supporting the combined weight of the monitor arm and two monitors (up to 44 lbs per arm, total 88 lbs).
- Do not exceed the maximum weight capacity of 20 kg (44 lbs) per arm.
- Ensure all screws and bolts are securely tightened during installation. Loose connections can cause instability.
- Keep children and pets away from the installation area.
- Adjust the gas spring tension carefully. Improper adjustment can cause monitors to drop or spring up unexpectedly.
- Avoid pinching cables during installation and adjustment.
- If you encounter any difficulties or have questions, contact Thermaltake customer support.
Package Contents
Verify that all components are present before beginning installation. If any parts are missing or damaged, please contact your retailer or Thermaltake customer support.
- Dual Monitor Arm Assembly (Main Pole, Arms)
- VESA Mounting Plates (2x)
- Desk Clamp Assembly
- Grommet Mount Components
- Hardware Kit (Screws for monitors, washers, Allen wrenches)
- Cable Management Clips
- User Manual
Specifications
| Feature | Specification |
|---|---|
| Model Number | GEA-MSR-DMSBLK-01 |
| Fit Screen Size | 17" ~ 35" |
| Weight Capacity | 2 ~ 20 kg x2 (4.4 lbs ~ 44 lbs x2) |
| Mounting System | Gas Spring |
| VESA Compatibility | 75 x 75 mm, 100 x 100 mm |
| Tilt Range | +50° ~ -20° |
| Swivel Range | +90° ~ -90° |
| Screen Rotation | +108° ~ -108° |
| Max. Arm Height | 217 ~ 500 mm |
| Max. Arm Extension | 458 mm |
| Edge Installation (Clamp) | 10 ~ 85 mm (0.39" ~ 3.3") |
| Grommet Installation | 10 ~ 48 mm (0.39" ~ 1.9") |
| Back-Light | 16.8 Million RGB Colors (20 RGB Lighting Modes) |
| Material | Metal |
| Color | Dark Grey |
Setup and Installation
The Thermaltake Dual RGB Monitor Arm supports two installation methods: desk clamp and grommet mount. Choose the method suitable for your desk.
1. Desk Clamp Installation
- Attach the Clamp: Secure the desk clamp assembly to the edge of your desk. Ensure the clamp is tightened firmly to prevent movement. The clamp supports desk thicknesses from 10 mm to 85 mm.

Image: Detail of the desk clamp mechanism, showing the tightening screws. This clamp allows for secure attachment to desk edges.
- Insert the Main Pole: Place the main pole of the monitor arm into the clamp base. Tighten any securing screws on the clamp to hold the pole in place.
2. Grommet Mount Installation
- Prepare the Grommet Hole: If your desk has a grommet hole, ensure it is clear. If not, you may need to drill a hole (consult a professional if unsure). The grommet mount supports desk thicknesses from 10 mm to 48 mm.
- Assemble Grommet Components: Follow the instructions provided with the grommet mount components to secure the main pole through the desk hole. Tighten the bottom plate and nut securely from underneath the desk.
3. Attaching Monitor Arms and VESA Plates
- Attach Arms to Pole: Slide the monitor arms onto the main pole at your desired height. Secure them using the provided screws or levers.
- Attach VESA Plates to Monitors: Remove the VESA plates from the monitor arms. Attach one VESA plate to the back of each monitor using the appropriate screws from the hardware kit. Ensure the screws are tightened securely but do not overtighten. The VESA plates are compatible with 75x75mm and 100x100mm patterns.
- Mount Monitors: Carefully slide the monitors (with attached VESA plates) onto the monitor arms. Ensure they click into place or are secured with any locking mechanisms.
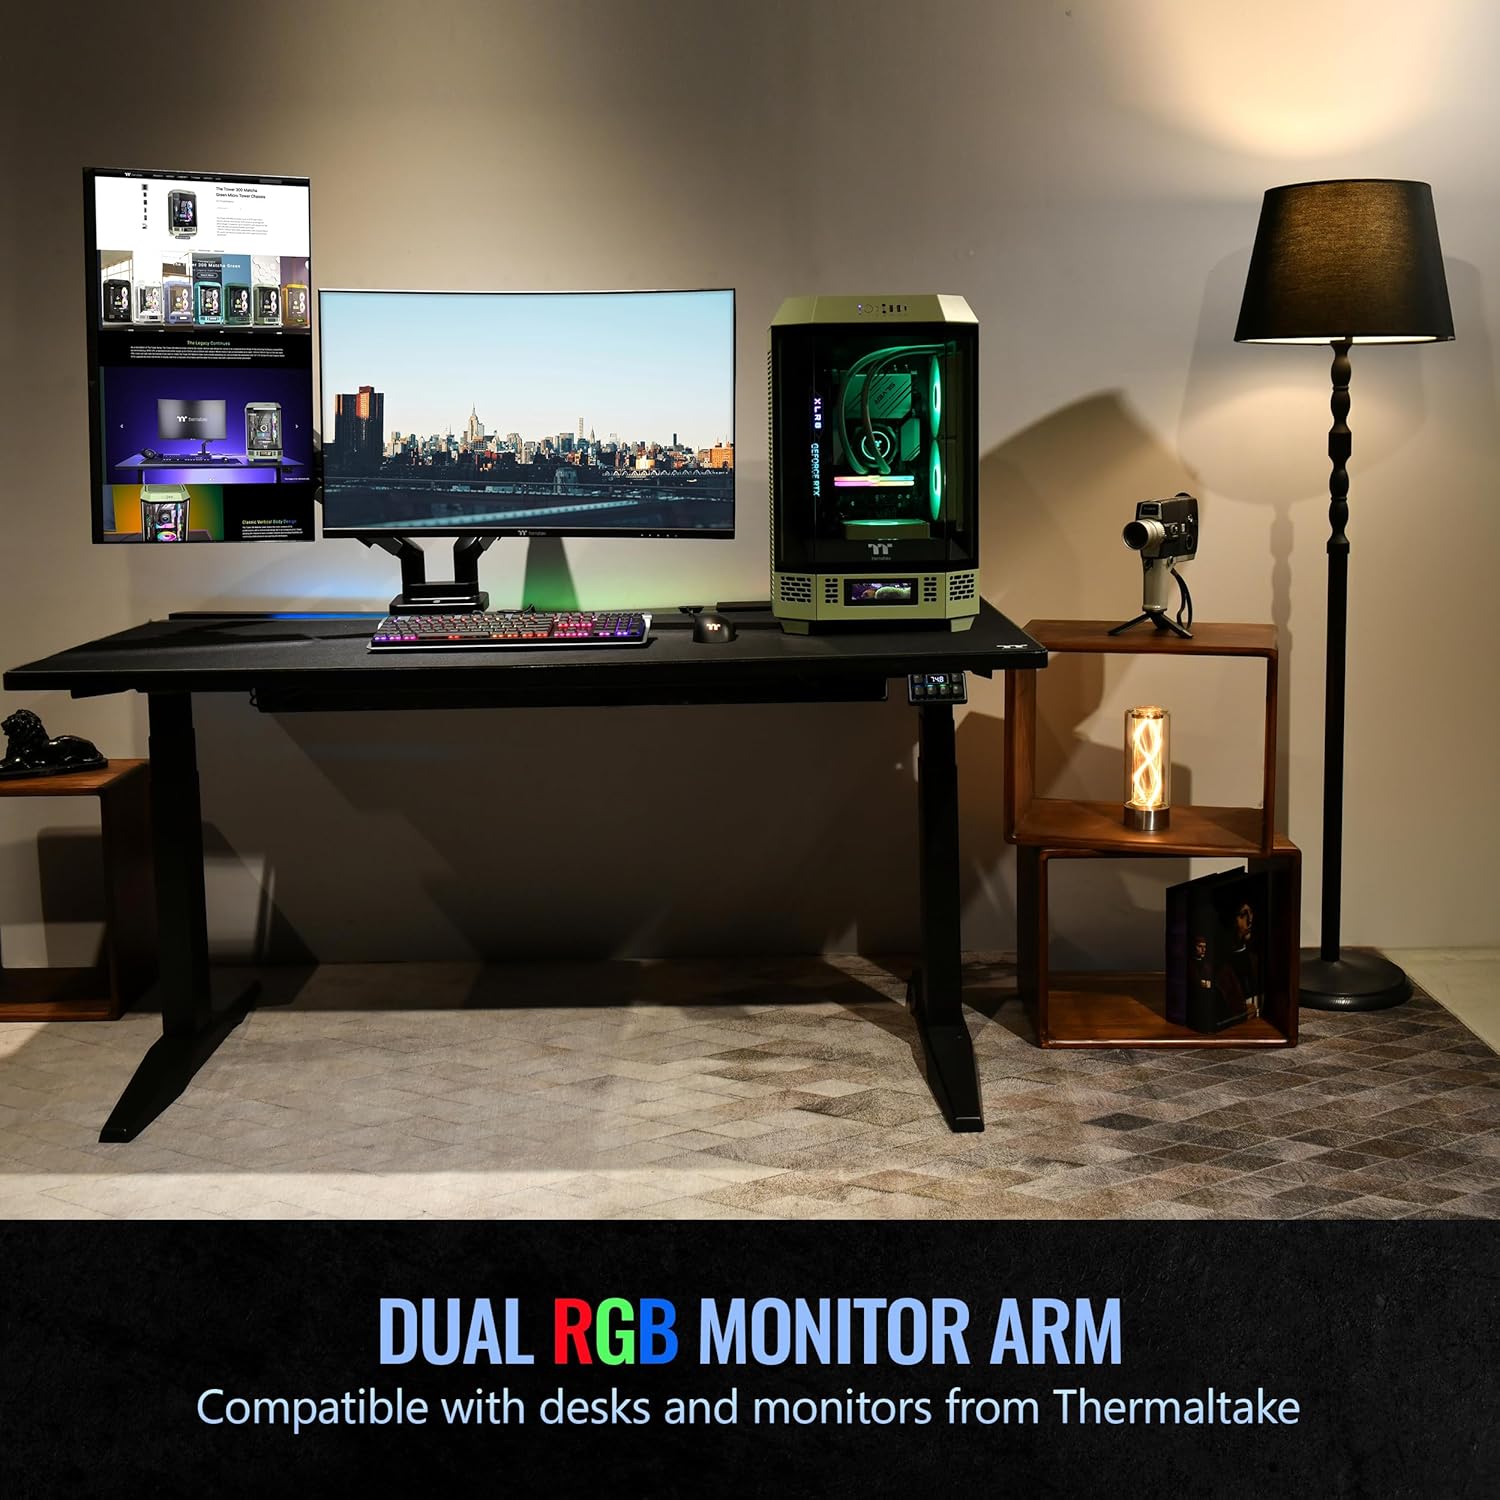
Image: An illustrative diagram detailing the dimensions of the monitor arm and the process of attaching VESA plates to monitors.
4. Cable Management
Route your monitor and power cables through the integrated cable management channels on the arms and main pole to maintain a tidy workspace.
Operation and Adjustments
The Thermaltake Dual RGB Monitor Arm offers extensive adjustability for optimal viewing comfort.
1. Gas Spring Tension Adjustment
The gas spring system allows for smooth height adjustment. If your monitor sags or springs up too easily, adjust the tension using the provided Allen wrench. Turn clockwise to increase tension (for heavier monitors) or counter-clockwise to decrease tension (for lighter monitors). Adjust gradually until the monitor stays in position when released.
2. Monitor Positioning
- Height Adjustment: Gently push or pull the monitor up or down to adjust its vertical position.
- Tilt: Tilt the monitor screen +50° upwards or -20° downwards to find your preferred viewing angle.
- Swivel: Swivel the monitor arm +90° to -90° horizontally.
- Rotation: Rotate the monitor screen +108° to -108° for landscape or portrait orientation.

Image: The monitor arm supporting two monitors, showcasing the range of motion for tilt and swivel adjustments.

Image: Two monitors mounted on the arm, one displayed in portrait orientation and the other in landscape, illustrating rotation capability.
3. RGB Lighting Control
The monitor arm features 16.8 million RGB colors with 20 lighting modes. A built-in switch button on the base allows for easy control and cycling through the lighting effects.
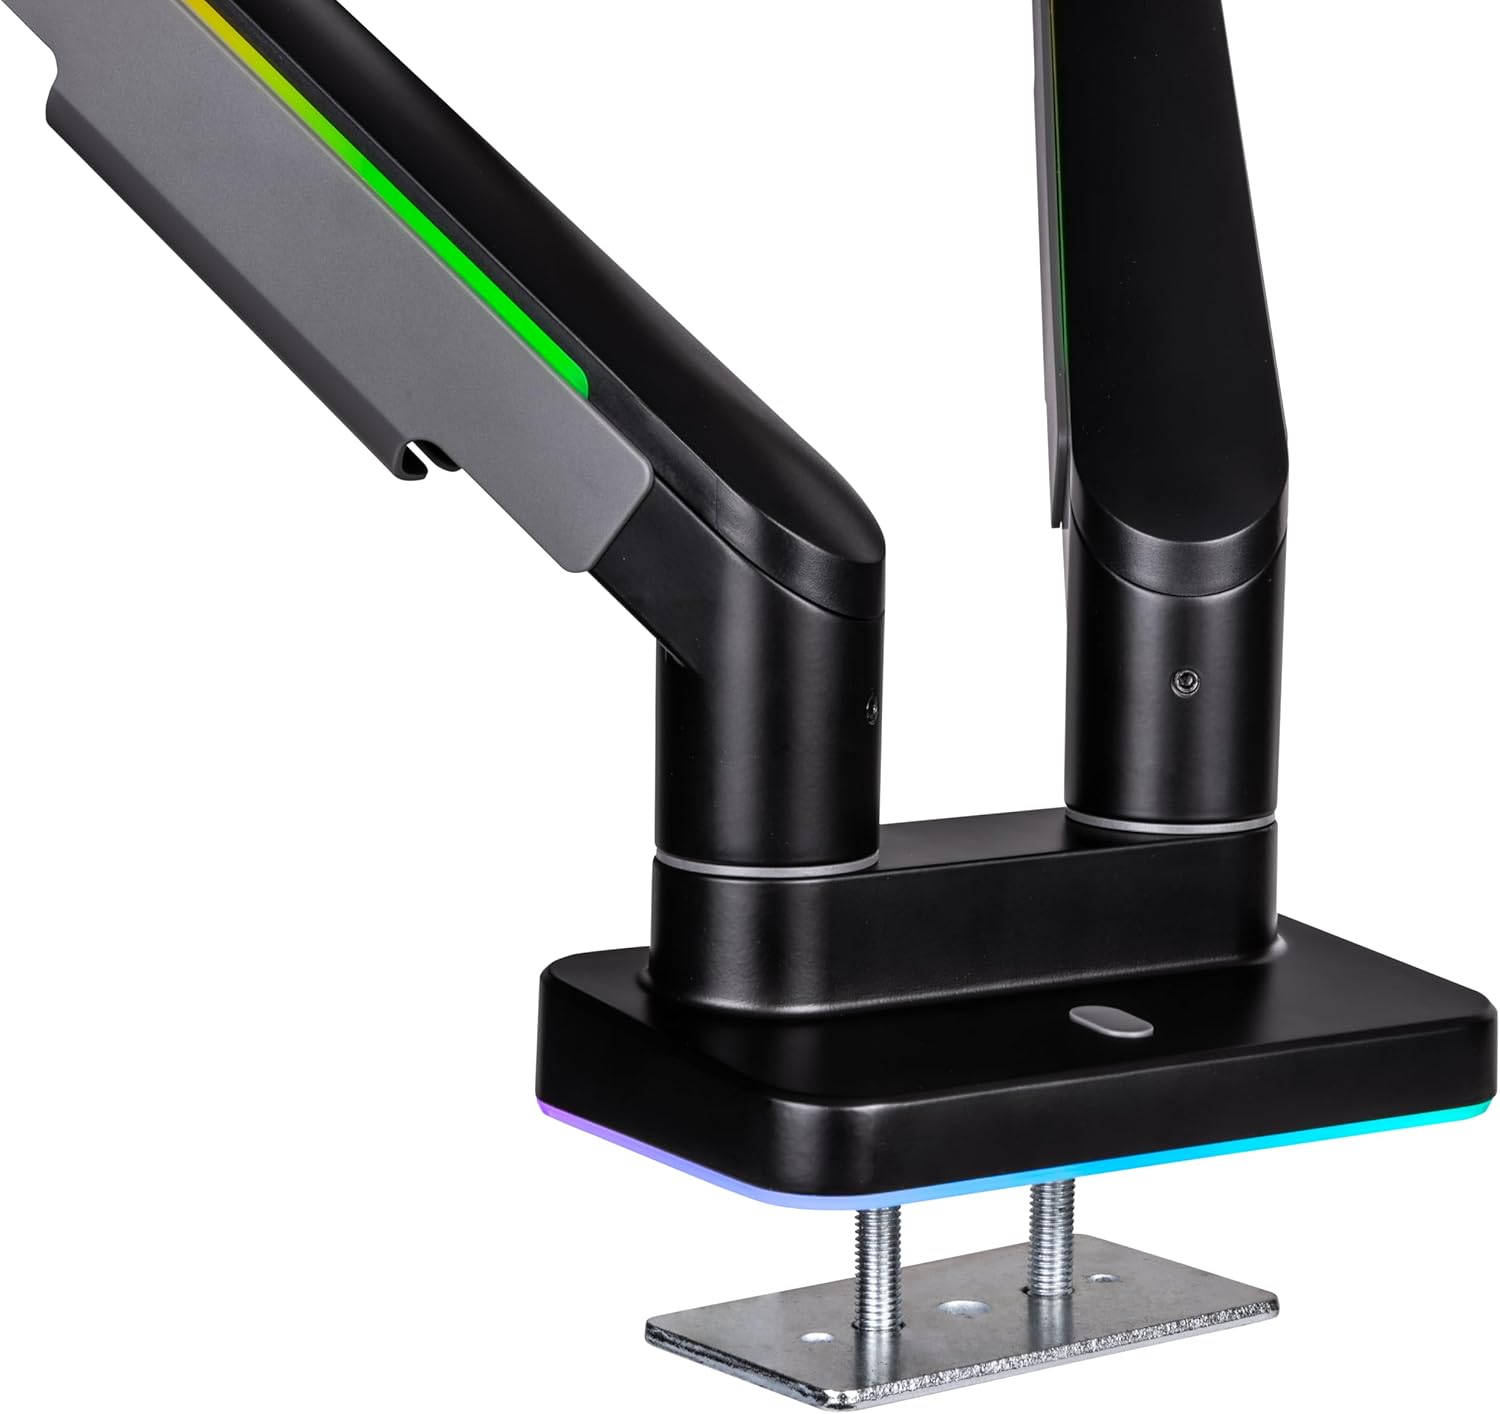
Image: A detailed view of the monitor arm's base, highlighting the integrated RGB lighting feature.
Maintenance
Regular maintenance ensures the longevity and optimal performance of your monitor arm.
- Cleaning: Wipe the arm surfaces with a soft, damp cloth. Avoid abrasive cleaners or solvents that could damage the finish or RGB components.
- Check Connections: Periodically check all screws and bolts, especially those securing the clamp/grommet mount and VESA plates, to ensure they remain tight.
- Gas Spring Adjustment: Re-adjust the gas spring tension if you change monitors or notice any sagging over time.
Troubleshooting
| Problem | Possible Cause | Solution |
|---|---|---|
| Monitor sags or drops | Gas spring tension is too low for monitor weight. | Increase gas spring tension using the Allen wrench (clockwise). |
| Monitor springs up too easily | Gas spring tension is too high for monitor weight. | Decrease gas spring tension using the Allen wrench (counter-clockwise). |
| Arm is unstable or wobbles | Desk clamp/grommet mount is not tightened sufficiently. | Ensure the desk clamp or grommet mount is securely fastened to the desk. Check all connection points. |
| Monitors are not level | Minor misalignment during VESA plate attachment or arm installation. | Adjust the tilt/rotation of the VESA plate or arm connection point. Some arms have a small leveling screw. |
| RGB lighting not working | Power connection issue or internal fault. | Ensure the USB power cable for the RGB lighting is properly connected. If the issue persists, contact support. |
Warranty and Support
Thermaltake products are manufactured to high-quality standards. For warranty information specific to your region and product, please refer to the warranty card included with your purchase or visit the official Thermaltake website.
For technical support, troubleshooting assistance, or to inquire about replacement parts, please visit the Thermaltake support page:
Related Documents - GEA-MSR-DMSBLK-01
 |
Thermaltake Gaming Desk Pegboard Medium Clamp-On Installation Manual Official instruction manual for the Thermaltake Gaming Desk Pegboard Medium (GEA-GDP-DPMBLK-01), detailing assembly, installation, and safety guidelines for this clamp-on desk accessory. |
 |
Thermaltake DAMYSUS Wireless RGB Ergonomic Gaming Mouse Quick Installation Guide Comprehensive quick installation guide for the Thermaltake DAMYSUS Wireless RGB Ergonomic Gaming Mouse, covering features, setup instructions for 2.4GHz and Bluetooth connectivity, specifications, LED indicator status, and comfort guidelines. |
 |
Thermaltake CTE T500 TG ARGB Full Tower PC Case User Manual Detailed user manual and installation guide for the Thermaltake CTE T500 TG ARGB Full Tower PC Case, covering specifications, accessories, and step-by-step installation instructions for PC builders. |
 |
Thermaltake CTE C750 TG ARGB Full Tower Chassis User Manual Comprehensive user manual for the Thermaltake CTE C750 TG ARGB Full Tower PC Chassis. This guide provides detailed specifications, accessory lists, important warnings, and step-by-step installation instructions for components such as power supplies, motherboards, graphics cards, storage drives, and various cooling systems (liquid, AIO, air). |
 |
Thermaltake Ceres 330 TG ARGB Mid Tower Chassis User Manual Detailed user manual and installation guide for the Thermaltake Ceres 330 TG ARGB Mid Tower PC case, covering specifications, components, and assembly instructions. |
 |
Thermaltake CTE T500 TG ARGB Full Tower PC Case User Manual Detailed user manual for the Thermaltake CTE T500 TG ARGB Full Tower PC Case, covering specifications, accessory list, installation guides, and features. |