1. Introduction
This manual provides detailed instructions for the setup, operation, and maintenance of your Phenyx Pro PTL-600 6-Channel Audio Mixer. Please read this manual thoroughly before using the product to ensure proper functionality and safety.
2. Important Safety Information
- Ensure the power adapter is correctly connected to a suitable AC outlet.
- Do not expose the unit to rain or moisture to prevent fire or electric shock.
- Avoid placing the unit near heat sources or in direct sunlight.
- Do not open the unit casing; refer all servicing to qualified personnel.
- Keep the unit away from children.
- Always turn off the unit and disconnect the power before cleaning or maintenance.
3. Package Contents
Verify that all items are present in the package:
- 1 x PTL-600 Mixing Console
- 1 x User Manual
- 1 x Power Adapter

Image: The package includes the PTL-600 Mixing Console, a user manual, and a power adapter.
4. Product Overview
The Phenyx Pro PTL-600 is a professional 6-channel audio mixer designed for versatile audio applications, from home studios to live stage performances. It features extensive connectivity, advanced routing capabilities, and high-quality digital effects.
4.1. Key Features
- Extensive Connectivity: 4 XLR/LINE inputs, L/R TRS inputs, Bluetooth, 2 AUX outputs, 1 BUS output, 2 stereo headphone outputs, and 3 XLR main outputs (L, R, SUB).
- Advanced Routing: Pre/post-fader sends for AUX, dedicated BUS auxiliary track, SUB output for low-frequency signals, and flexible FX routing.
- Versatile Sound-Shaping: 16 high-quality DSP effects, SEND/RETURN for external processors, individual +48V phantom power, and 3-band EQ.
- Wireless Streaming & USB Recording: Bluetooth for audio streaming and USB-B for PC recording and playback.
- Dual Monitoring: Two independent stereo headphone outputs with individual volume control.

Image: The Phenyx Pro PTL-600 mixer, showcasing its comprehensive layout of channels, controls, and digital effects section.
4.2. Input and Output Overview
- XLR Inputs (Channels 1-4): For microphones or line-level instruments. Each features individual +48V phantom power.
- TRS Inputs (Channels 1-4, 5/6): For line-level instruments. Channels 5/6 are stereo.
- Bluetooth/USB Player: For wireless audio streaming or USB-B for PC recording and playback.
- Main Outputs (XLR L/R, SUB): Balanced XLR outputs for main stereo mix and a dedicated subwoofer output.
- AUX Outputs (AUX1, AUX2): For monitor mixes or external effects.
- BUS Output: An additional auxiliary track for flexible signal routing.
- Headphone Outputs (Phones 1, Phones 2): Dual stereo outputs for monitoring.

Image: A diagram highlighting the various input and output ports on the PTL-600 mixer, including XLR, TRS, Main Outputs, Sub Out, and Phones 2 Input.
5. Setup
5.1. Initial Connection
- Connect the power adapter to the mixer's AC-IN port and then to a power outlet.
- Ensure the power switch on the PTL-600 mixer is in the OFF position before connecting any audio devices.
- Connect your microphones, instruments, or other audio sources to the appropriate input channels (XLR, LINE, TRS).
- Connect your main speakers to the XLR Main Outputs (L/R) and any subwoofers to the SUB output.
- Connect headphones to the PHONES outputs for monitoring.
5.2. Powering On
- Turn on any connected speakers or amplifiers first.
- Flip the power switch on the PTL-600 mixer to the ON position.
- Slowly raise the MAIN MIX fader to a comfortable listening level.
6. Operating Instructions
6.1. Channel Controls
- GAIN Knob: Adjusts the input sensitivity for each channel. Set it to achieve a strong signal without clipping (indicated by the CLIP LED).
- EQ (HIGH, MID, LOW): 3-band equalizer for tone shaping. Adjust HIGH for treble, MID for mid-range, and LOW for bass frequencies.
- AUX Knobs (AUX1, AUX2): Controls the amount of signal sent from the channel to the respective AUX send. Can be set to pre-fader (PRE) or post-fader.
- FX Knob: Controls the amount of signal sent from the channel to the internal DSP effects processor.
- PAN Knob: Adjusts the stereo position of the channel's signal (left to right).
- LEVEL Fader: Controls the output volume of the individual channel.
- MUTE Button: Mutes the channel's output.
- +48V Phantom Power: Individual switches for condenser microphones on XLR inputs.
6.2. Advanced Routing (BUS & SUB)

Image: Detailed view of the mixer's advanced routing section, illustrating PRE/post-fader options for AUX, and dedicated controls for BUS and SUB outputs.
- BUS Button: Routes the channel's signal to the dedicated BUS auxiliary track for additional output control.
- SUB Button: Directs the channel's low-frequency signals to the SUB output, ideal for subwoofers.
- AUX Sends: Use AUX1 and AUX2 for creating separate monitor mixes or sending signals to external effects processors. The PRE/post-fader option allows flexibility for monitoring (pre-fader) or effects (post-fader).
6.3. Digital Effects (DSP)

Image: The mixer's DSP section, showing the 16 available effects, along with indicators for 3-band EQ, Fx Send&Return, and +48V Phantom Power.
- PROGRAM Knob: Rotate to select one of the 16 built-in DSP effects. Press the knob to confirm your selection.
- FX Level: Adjusts the overall wet/dry mix of the selected effect.
- SEND/RETURN: Connect external effects processors using the dedicated SEND and RETURN jacks.
6.4. Bluetooth & USB Player
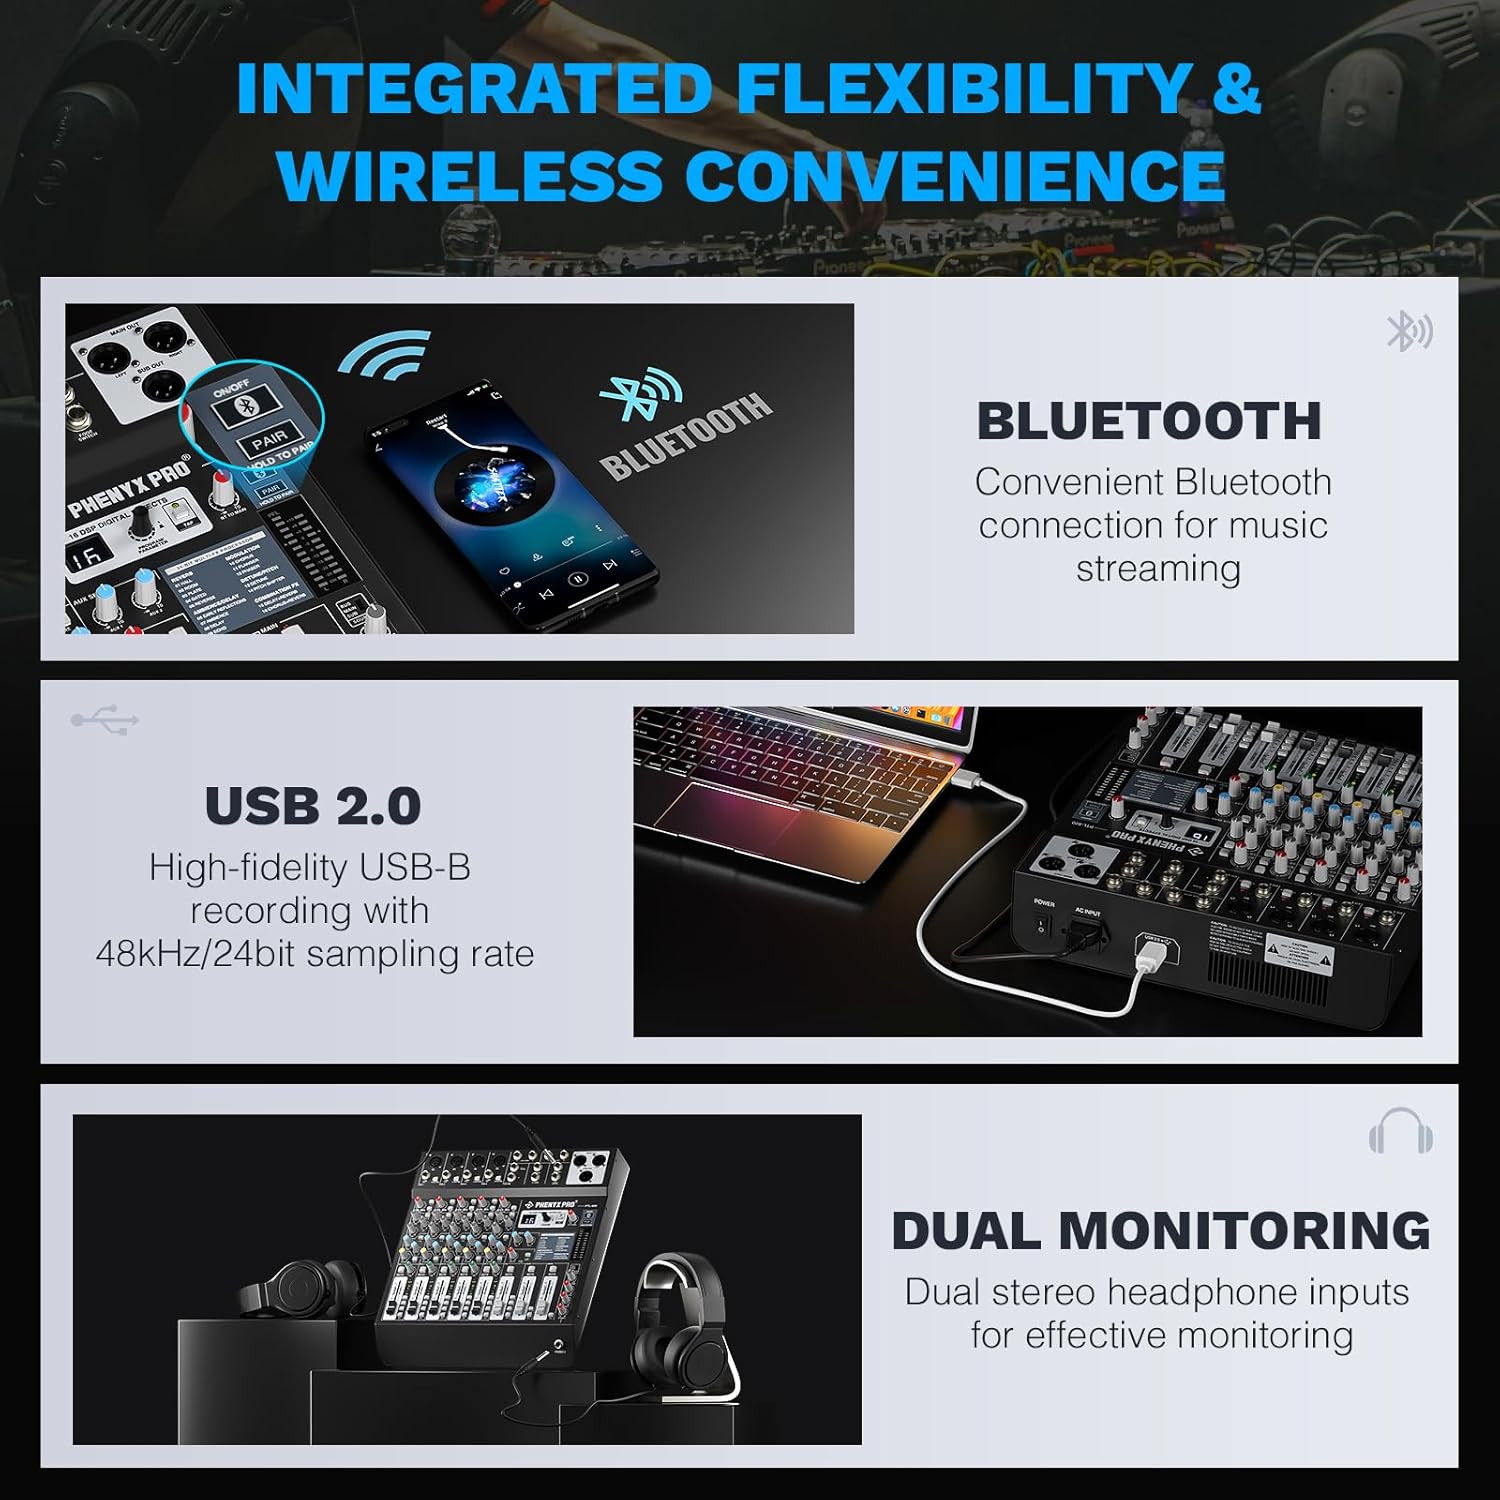
Image: The mixer's wireless and recording capabilities, including Bluetooth for streaming, USB-B for high-fidelity PC recording, and dual stereo headphone outputs for monitoring.
- Bluetooth Pairing: Activate Bluetooth on your device and search for "PTL-600". Pair to stream audio wirelessly.
- USB-B PC Recording: Connect the mixer to your computer via USB-B. The mixer acts as an audio interface for high-fidelity recording (48kHz/24bit).
- USB Playback: Play audio files directly from a USB drive inserted into the USB-A port. Use the control buttons (play/pause, skip) on the mixer.
6.5. Monitoring
- Dual Headphone Outputs: Use PHONES 1 and PHONES 2 for independent monitoring. Each has its own volume control.
- Main Mix Meter: The LED meter displays the overall output level of the main mix. Adjust the MAIN MIX fader to keep levels within the optimal range (avoiding red/clipping).
7. Maintenance
- Clean the unit with a soft, dry cloth. Do not use liquid cleaners or aerosols.
- Keep the mixer free from dust and debris.
- Store the unit in a cool, dry place when not in use.
- Regularly check all cable connections for wear and tear.
8. Troubleshooting
| Problem | Possible Cause | Solution |
|---|---|---|
| No power | Power adapter not connected or faulty. | Check power connections. Ensure outlet is functional. Try a different adapter if available. |
| No sound output | Incorrect cable connections, low volume levels, muted channels. | Verify all audio cables are securely connected. Check channel LEVEL faders, MAIN MIX fader, and speaker volume. Ensure channels are not muted. |
| Distorted sound | Input signal too high (clipping), faulty cables, speaker issues. | Reduce GAIN on input channels to prevent CLIP LED from lighting up. Check cables for damage. Test with different speakers. |
| Effects not working | FX knob turned down, incorrect program selection, FX level too low. | Ensure the FX knob on the desired channel is turned up. Select an effect program using the PROGRAM knob. Adjust the overall FX Level. |
| Bluetooth connection issues | Device not in pairing mode, interference, distance. | Ensure the mixer is in Bluetooth mode and your device is searching. Reduce distance between devices. Avoid sources of interference. |
9. Specifications
- Number of Channels: 6
- Connectivity Technology: Auxiliary, Bluetooth, USB
- Power Source: Corded Electric
- Item Weight: 9.39 pounds (4.27 Kilograms)
- Package Dimensions: 17 x 17 x 5 inches
- Item Model Number: 6 Channel
- Date First Available: June 13, 2024
10. Warranty and Support
Phenyx Pro products are crafted with premium components and precision engineering, ensuring trusted quality and lasting reliability. We stand firmly behind every product we make.
For warranty claims, technical support, or further assistance, please visit the official Phenyx Pro website or contact their customer service directly.
You may also refer to the Phenyx Pro Store on Amazon for additional product information and support resources.
11. Official Product Videos
Phenyx Pro DJ Sound Mixer Board
Description: An official video from Phenyx Pro Direct showcasing the features and functionality of the DJ Sound Mixer Board.
Professional 6-Channel Audio Mixer
Description: An official video from Phenyx Pro Direct providing an overview of the Professional 6-Channel Audio Mixer.


