
1. Introduction
Thank you for choosing the Aigostar Solar LED Floodlight. This manual provides essential information for the safe and efficient use of your product. Please read these instructions carefully before installation and operation, and retain them for future reference.
This solar floodlight features a 200W equivalent output, a 15000mAh high-capacity battery, IP65 water resistance, 6500K cool white light, and includes a remote control with a dusk-to-dawn sensor and timer functions. It is designed for outdoor use to illuminate areas such as gardens, paths, and garages.
2. Safety Information
- Ensure the solar panel is installed in a location that receives direct sunlight for optimal charging.
- Do not attempt to disassemble or modify the product. This may cause damage and void the warranty.
- Keep the product away from open flames or extreme heat sources.
- Clean the solar panel regularly to ensure maximum charging efficiency. Use a soft, damp cloth.
- This product is IP65 rated for water resistance; however, avoid submerging it in water.
- Handle the remote control with care.
3. Setup and Installation
The Aigostar Solar LED Floodlight is designed for easy installation. The package includes a 2-meter cable, screws, and mounting brackets for both the floodlight and the solar panel.
3.1 Components Overview
Before installation, familiarize yourself with the components:
- LED Floodlight (224 x 182 x 53mm)
- Solar Panel (390 x 235 x 17mm)
- Remote Control
- 2-meter Connection Cable
- Mounting Screws and Brackets
3.2 Installation Steps
- Mount the Wall Bracket: Securely fix the wall bracket to your desired installation surface using appropriate screws.
- Attach Solar Panel and Floodlight: Mount both the solar panel and the floodlight to the wall brackets. Ensure the solar panel is positioned to receive maximum direct sunlight throughout the day. The floodlight can be installed indoors if the solar panel remains outdoors.
- Connect the Cable: Connect the 2-meter cable from the solar panel to the floodlight. Ensure the waterproof connector is tightened properly to prevent water ingress.
- Adjust Position: Adjust the position of both the solar panel and the lamp. The solar panel should face south or southwest, with an inclination angle of 15-20° for optimal sun exposure. The floodlight can be angled up to 180° to direct light as needed.

Figure 3.2.1: Installation steps for the Aigostar Solar LED Floodlight.
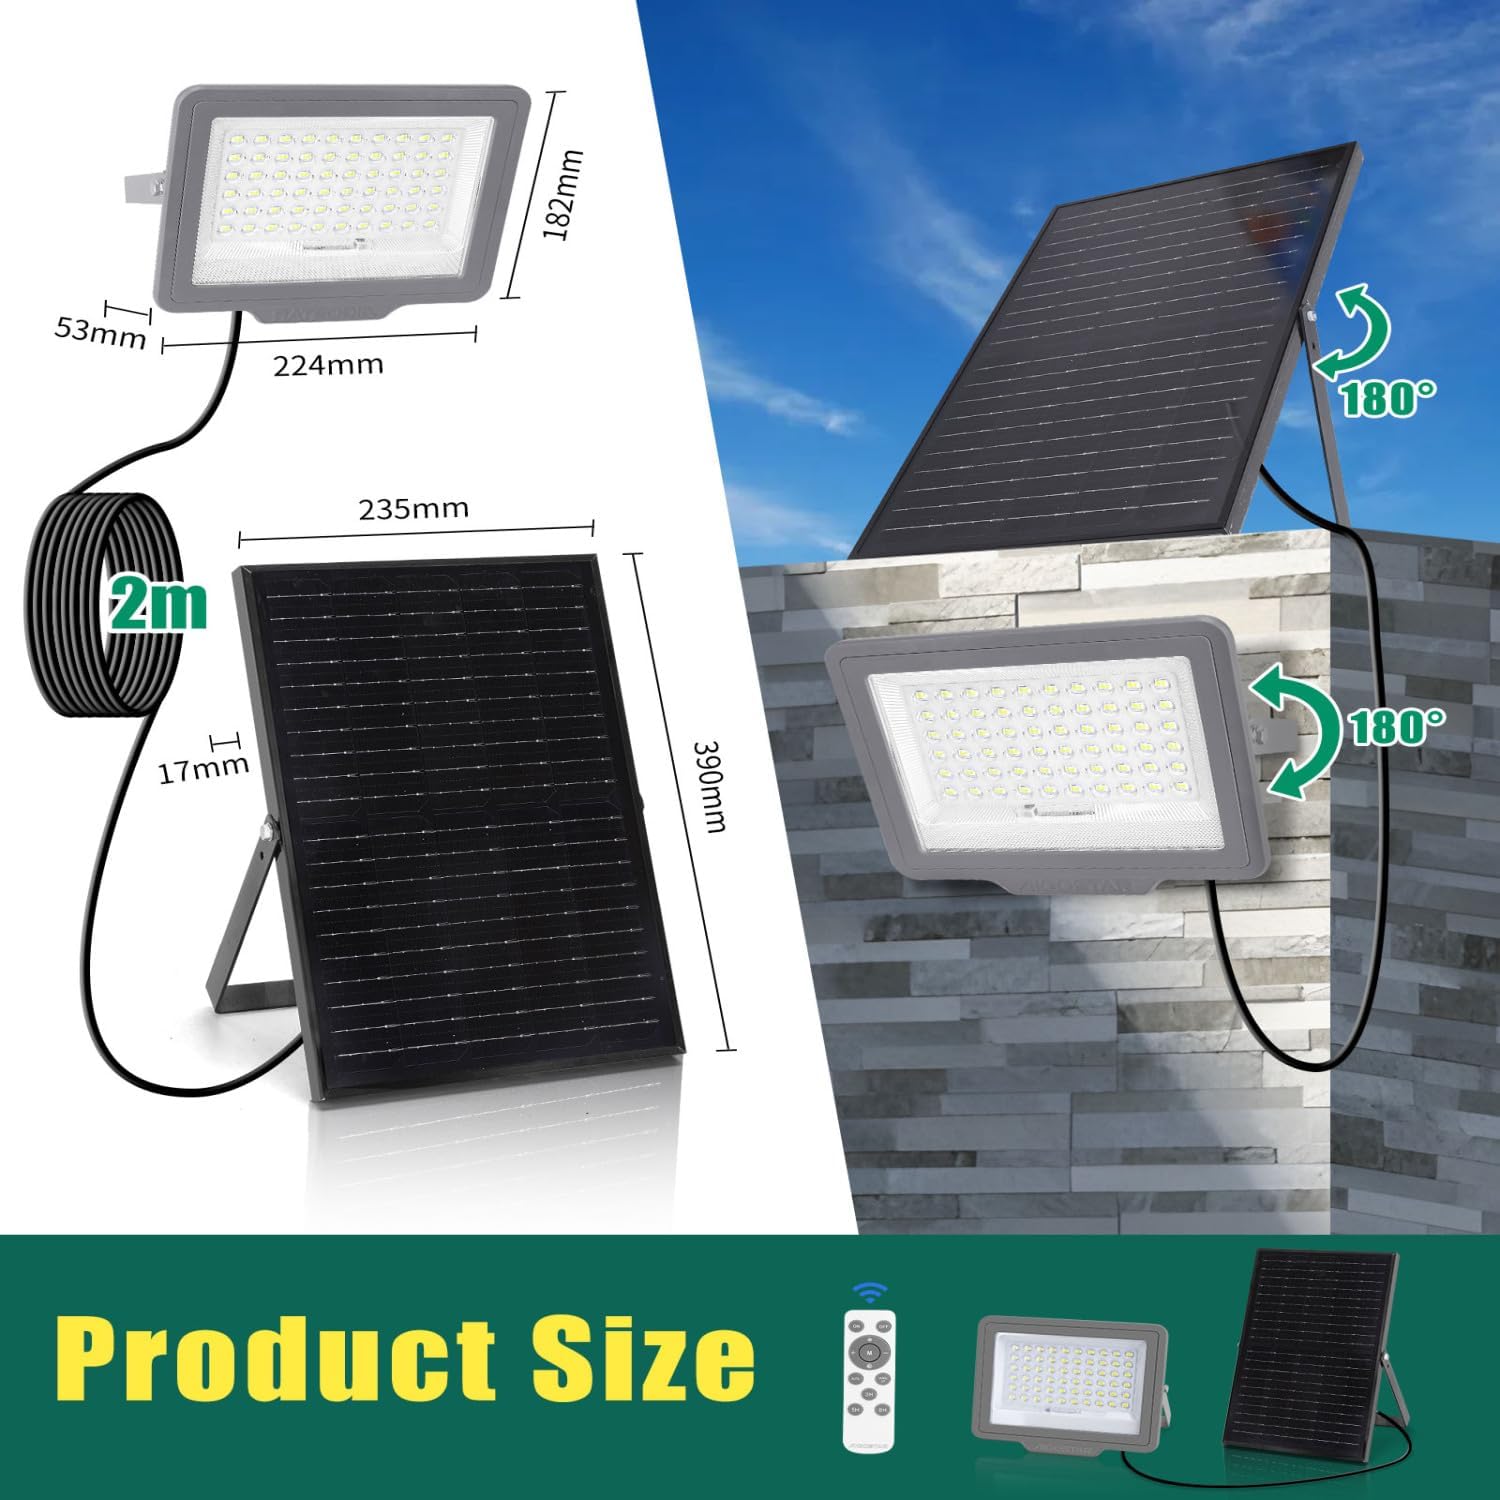
Figure 3.2.2: Product dimensions and adjustable mounting.
4. Operating Instructions
The Aigostar Solar LED Floodlight is designed for automatic operation with remote control functionality.
4.1 Initial Use
For the first use, press the "WAKE UP" button on the remote control to activate the floodlight system.
4.2 Automatic Dusk-to-Dawn Operation
The floodlight has a built-in dusk sensor. The solar panels will automatically charge during the day. The floodlight will turn on automatically at night when it detects low light conditions. This automatic function cannot be deactivated.

Figure 4.2.1: Solar panel charging during the day and automatic night illumination.
4.3 Remote Control Functions
The included remote control allows you to manage various settings:
- ON/OFF: Turn the light on or off manually.
- Brightness Adjustment: Adjust the brightness to 50% or 100%. Use the '+' and '-' buttons for fine-tuning.
- Timer Function: Set the light to turn off automatically after 3 hours (3H), 5 hours (5H), or 8 hours (8H).
- AUTO: Activates the automatic dusk-to-dawn mode.
- WAKE UP: Activates the system for first use.

Figure 4.3.1: Remote control functions for the Aigostar Solar LED Floodlight.
4.4 Charging Indication
When the red light on the floodlight is flashing, it indicates that the battery is currently charging. Note that charging efficiency may decrease in cloudy or rainy weather, especially during autumn and winter.
Video 4.4.1: Demonstration of the Aigostar Solar LED Floodlight's features, including dimensions, LED quality, automatic operation, remote control, and installation.
5. Maintenance
To ensure the longevity and optimal performance of your Aigostar Solar LED Floodlight, follow these maintenance guidelines:
- Clean Solar Panel: Regularly wipe the solar panel surface with a soft, damp cloth to remove dust, dirt, and debris. A clean panel ensures maximum sunlight absorption and charging efficiency.
- Inspect Connections: Periodically check the connection cable between the solar panel and the floodlight to ensure it remains securely tightened and free from damage.
- Environmental Resistance: The product is designed with IP65 water resistance, making it suitable for various weather conditions, including rain, heat, and cold. Its robust construction ensures durability.

Figure 5.1.1: IP65 water resistance and weather durability.
6. Troubleshooting
If you encounter issues with your Aigostar Solar LED Floodlight, refer to the following common problems and solutions:
- Light does not turn on at night:
- Ensure the solar panel is receiving sufficient direct sunlight during the day (at least 6-8 hours).
- Check if the connection cable between the solar panel and the floodlight is securely connected.
- Verify that the "WAKE UP" button on the remote control has been pressed for initial activation.
- Confirm that the remote control is not set to OFF or a timer setting that has already expired.
- Light is dim or does not last long:
- The solar panel may not be receiving enough sunlight. Relocate the panel or clear any obstructions.
- Clean the solar panel surface to remove any dirt or dust that might be hindering charging.
- Battery performance can be affected by prolonged cloudy weather or cold temperatures. Allow for several sunny days to fully recharge.
- Remote control not working:
- Ensure there are no obstructions between the remote control and the floodlight.
- Check the battery in the remote control and replace if necessary.
If these steps do not resolve the issue, please contact customer support.
7. Product Specifications

Figure 7.1.1: Aigostar Solar LED Floodlight 200W.
| Feature | Specification |
|---|---|
| Brand | Aigostar |
| Model Number | Solar007 |
| Power (Equivalent) | 200 Watts |
| Luminous Flux | 2000 Lumens |
| Light Color | Cool White (6500K) |
| Number of LEDs | 120 |
| Battery Capacity | 15000 mAh (LiFePO4 3.2V) |
| Solar Panel Type | Monocrystalline Silicon |
| Solar Panel Dimensions | 390mm x 235mm x 17mm |
| Floodlight Dimensions | 224mm x 182mm x 53mm |
| Material | Plastic (ABS Lampshade) |
| Water Resistance Rating | IP65 |
| Control Method | Remote Control |
| Features | Solar powered, large solar panel, large battery capacity, remote control, dusk sensor |
| Cable Length | 2 meters |
| Included Items | 2 meter cable, screws, brackets |
| Assembly Required | No |
| Country of Origin | China |
8. Warranty Information
Aigostar products come with a limited warranty against defects in materials and workmanship from the date of purchase. Please retain your proof of purchase for warranty claims. The warranty does not cover damage caused by improper installation, misuse, accidents, or unauthorized modifications. For specific warranty terms and conditions, please refer to the documentation included with your product or contact Aigostar customer support.
9. Customer Support
If you have any questions, require technical assistance, or need to make a warranty claim, please contact Aigostar customer support through the following channels:
- Website: Visit the official Aigostar website for FAQs and support contact information.
- Email: Refer to your product packaging or the Aigostar website for the appropriate support email address.
- Retailer: Contact the retailer from whom you purchased the product.
Please have your product model number (Solar007) and proof of purchase ready when contacting support.
