
1. Product Overview
The HABOTEST HT86A is a versatile smart automotive test light designed for electrical testing in vehicles. It features a wide DC voltage detection range, resistance and continuity testing capabilities, a backlit LCD display, and an integrated flashlight for convenience in various working conditions.

2. Key Features
- Wider Voltage Test Range: Detects DC voltage from 0.8V to 100V, suitable for various automotive electrical systems.
- Resistance & Continuity Measurements: Capable of measuring electrical wiring and circuit resistance, with a buzzer prompt for continuity below 50Ω.
- Safe & Backlit Digital Display: Features a high-definition LCD backlit screen for clear readings in any environment.
- Premium Probing End: Equipped with a sharp, high-quality copper probe for excellent electrical conductivity and easy access to wires or fuse panels.
- LED Lighting Function: Provides illumination in dark working conditions.
- Automatic Shutdown: The device automatically powers off after 15 minutes of inactivity to conserve battery life.
- Battery Undervoltage Indication: Alerts the user when the battery voltage is low, prompting replacement.

3. Components
The HABOTEST HT86A Smart Automotive Test Light consists of the following main components:
- Sharp Probe: For making contact with electrical points.
- LCD Display: Shows voltage, resistance, and other indicators.
- Power Key: To turn the device on/off.
- Hold Key: To freeze the current reading on the display.
- Backlight Key: To activate or deactivate the display backlight.
- Flashlight: Integrated LED light for illumination.
- Record Button: For data recording (functionality may vary by model).
- Negative Clamp: Connects to a ground point or negative terminal.
- Coiled Cable: Provides flexibility and extended reach.

4. Setup
4.1 Battery Installation
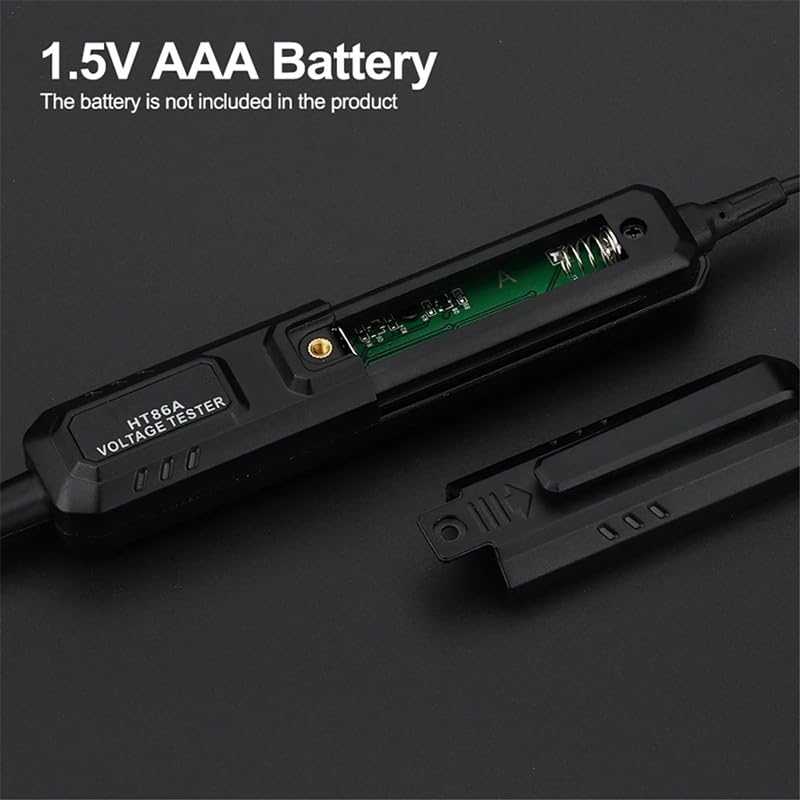
The HT86A requires one 1.5V AAA battery for operation. Ensure the battery is installed correctly according to the polarity markings inside the battery compartment.
- Locate the battery compartment cover on the back of the device.
- Slide or unclip the cover to open the compartment.
- Insert one 1.5V AAA battery, observing the correct polarity (+/-).
- Close the battery compartment cover securely.
Note: The battery is not included in the product package.
5. Operating Instructions
5.1 Power On/Off
Press the Power Key (red button with power symbol) to turn the device on. The LCD display will illuminate. To turn off, press and hold the Power Key until the display turns off. The device will also automatically shut down after 15 minutes of inactivity.
5.2 DC Voltage Detection
The HT86A automatically detects DC voltage within its specified range. No manual mode selection is required.
- Connect the negative clamp to a suitable ground point on the vehicle chassis or the negative terminal of the battery.
- Carefully touch the sharp probe to the point you wish to test for DC voltage.
- The detected voltage will be displayed on the LCD screen.
- If the voltage exceeds 110V, the display will show "OL" (Overload).
5.3 Resistance and Continuity Testing
The device can test resistance and continuity in circuits.
- Ensure the device is powered on.
- Connect the negative clamp to one end of the circuit or component to be tested.
- Touch the sharp probe to the other end.
- The resistance value will be displayed on the LCD screen.
- If the resistance is below 50Ω, the built-in buzzer will sound, indicating continuity.
5.4 Using the Flashlight
To illuminate dark work areas:
- Press and hold the Flashlight Key (button with light bulb symbol) to turn on the LED flashlight.
- Release the button to turn off the flashlight.

5.5 Data Hold Function
To freeze the current reading on the display:
- Press the Hold Key (button labeled "HOLD"). The current reading will remain on the screen.
- Press the Hold Key again to release the reading and resume live measurement.

5.6 Application Examples
The HT86A is suitable for testing various automotive electrical components and circuits, including:
- Headlights and taillights
- Faulty sockets
- Fuses
- Car horn
- Car navigation systems
- Air conditioning systems
- Cigar lighter
- Backup lamps
- Stereo systems
- Turn signal lamps

Official Product Video
Video 1: Demonstrates the features and usage of the HABOTEST HT86A Smart Automotive Test Light, including voltage detection, resistance testing, and the built-in flashlight. This video is provided by the HABOTEST Official Store.
6. Maintenance
6.1 General Care
- Keep the device clean and dry. Wipe with a soft, damp cloth if necessary.
- Avoid exposing the device to extreme temperatures, humidity, or direct sunlight.
- Store the device in a safe place to prevent physical damage to the probe or casing.
6.2 Battery Replacement
When the battery undervoltage indicator appears on the display, replace the AAA battery promptly to ensure accurate readings and proper device function. Refer to Section 4.1 for battery installation instructions.
7. Troubleshooting
- Device does not power on: Check if the battery is installed correctly and has sufficient charge. Replace the battery if necessary.
- Inaccurate readings: Ensure the probe and clamp connections are secure and clean. Verify the battery level.
- No display/faint display: Replace the battery. If the issue persists, contact customer support.
- Buzzer not sounding during continuity test: Check if the resistance is truly below 50Ω. Ensure proper contact with the circuit.
8. Specifications
| Specification | Value |
|---|---|
| Model | HT86A |
| Display | LCD display |
| Voltage Detection Range | DC 0.8V ~ 100V |
| Power Supply | 1 x 1.5V AAA battery (not included) |
| On/Off Detection (Continuity) | 2000Ω / less than 50Ω (buzzer prompt) |
| Automatic Shutdown | Yes (after 15 minutes of no operation) |
| Undervoltage Indication | Yes |
| Buzzer Prompt | Yes |
| Backlight | Yes |
| Flashlight | Yes |
| Resistance Test Ranges | 2000Ω / 20.00KΩ / 200.0KΩ / 2.000MΩ / 20.00MΩ |
| Item Weight | 75 Grams (approx. 2.65 ounces) |
| Color | Black |
9. Safety Information
- Always wear appropriate personal protective equipment (PPE) when working with electrical systems.
- Do not attempt to measure voltages exceeding the specified maximum range (100V DC).
- Ensure the negative clamp has a good connection to a ground point before probing live circuits.
- Avoid touching the metal probe tip with bare hands when testing live circuits.
- Do not use the device if it appears damaged or is not functioning correctly.
- Keep the device out of reach of children.
10. Warranty and Support
For warranty information, technical support, or service inquiries, please refer to the contact information provided with your purchase or visit the official GZLMMY/HABOTEST website. Keep your purchase receipt as proof of purchase for warranty claims.