1. Introduction
This manual provides comprehensive instructions for the installation, operation, and maintenance of the ASUS Prime B650M-R Micro-ATX Motherboard. This motherboard is designed to support AMD Ryzen desktop processors with an AM5 socket, featuring DDR5 memory, PCIe 4.0 support, Realtek 2.5Gb Ethernet, HDMI output, SATA 6 Gbps ports, and a front USB 5Gbps Type-C connector. Key features include BIOS FlashBack, Two-Way AI Noise Cancelation, and Aura Sync RGB lighting capabilities.

Figure 1.1: ASUS Prime B650M-R Motherboard and its retail packaging.
2. Safety Information
Always observe the following safety precautions when handling or installing the motherboard:
- Disconnect the power cord from the wall outlet before touching any components.
- Wear an anti-static wrist strap or frequently touch a grounded metal object to prevent electrostatic discharge (ESD) damage.
- Handle the motherboard by its edges to avoid touching sensitive components.
- Ensure proper ventilation within the computer case to prevent overheating.
- Do not expose the motherboard to moisture or extreme temperatures.
3. Package Contents
Verify that all items are present in the package:
- ASUS Prime B650M-R Motherboard
- User Manual
- SATA Data Cables (typically two)
- M.2 Anchor/Screws (for M.2 SSD installation)
- I/O Shield (if not pre-attached)
- Support DVD/USB drive (for drivers and utilities)
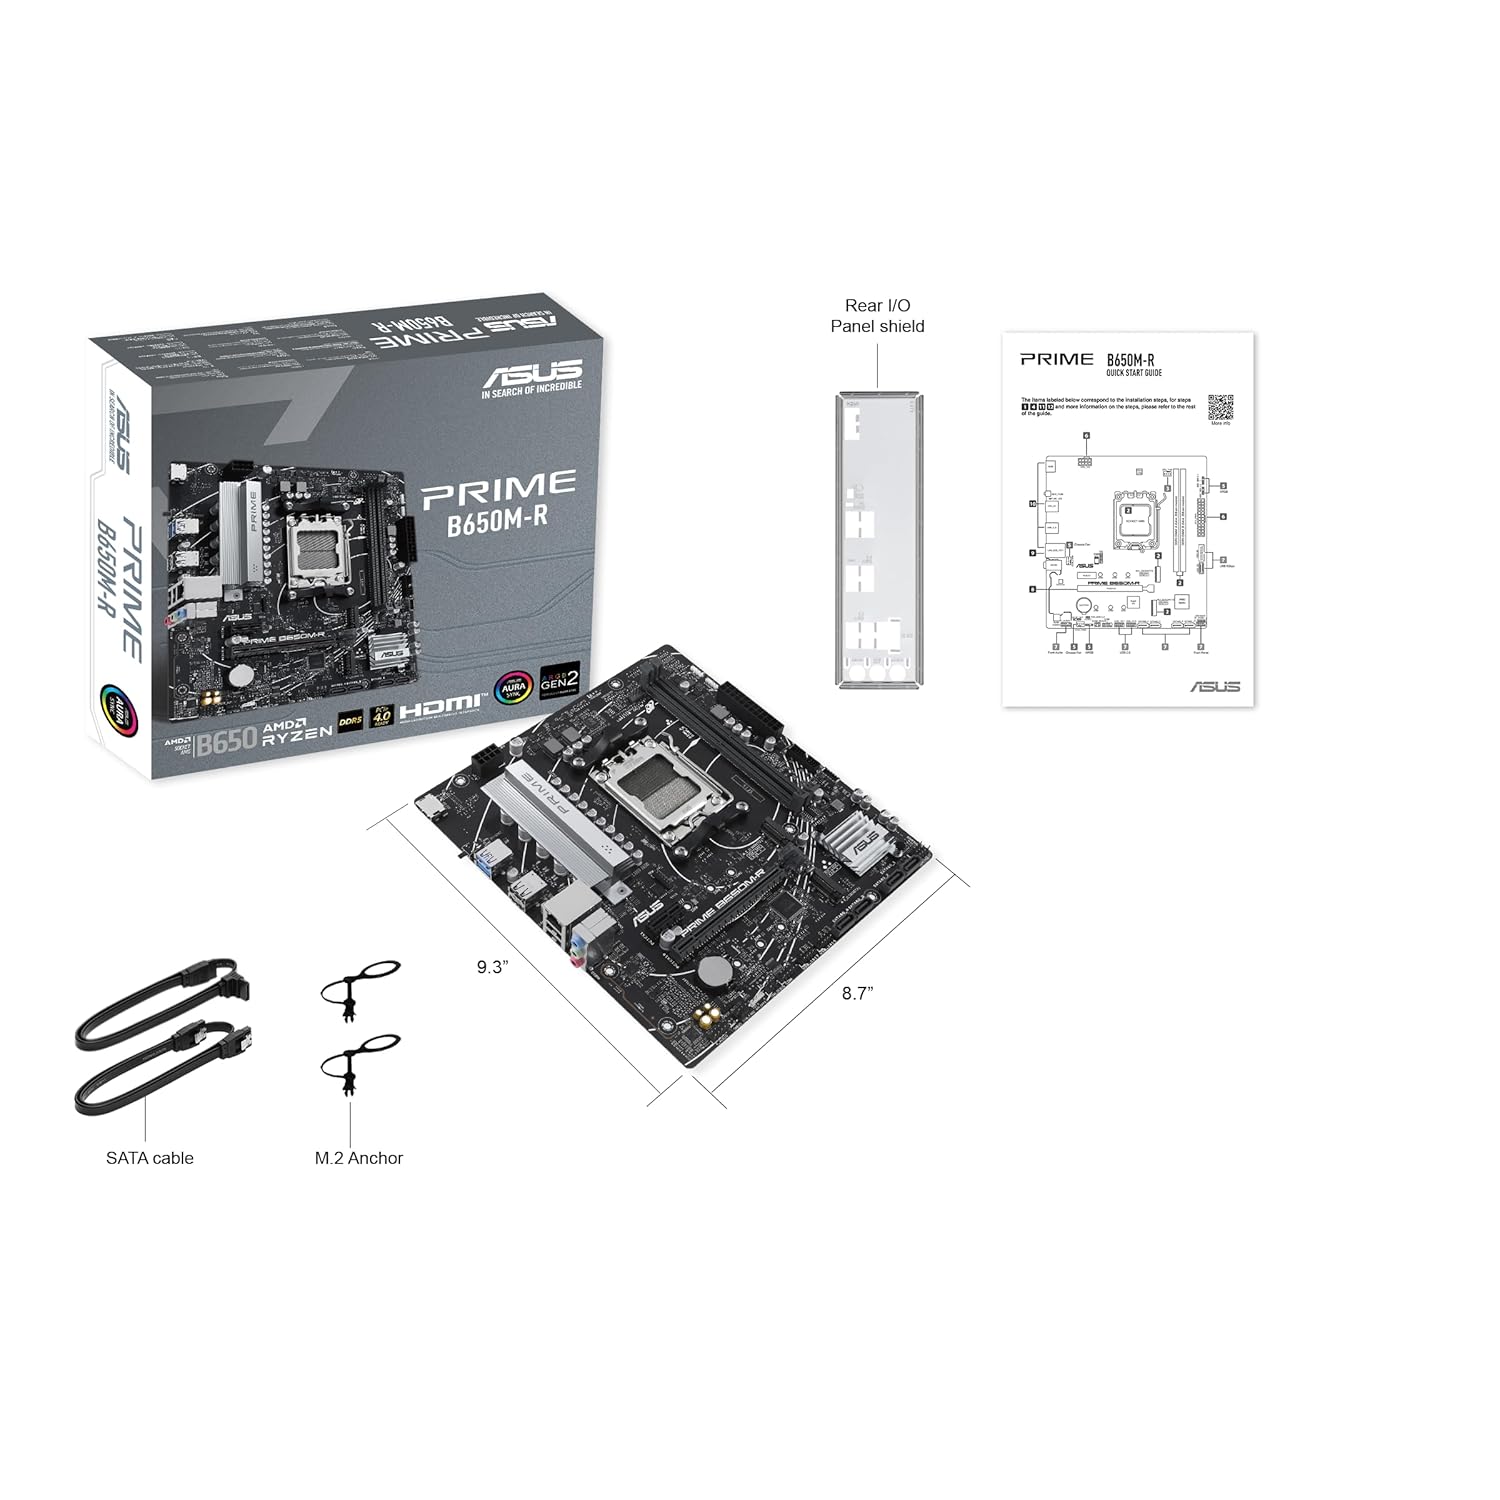
Figure 3.1: Motherboard with typical accessories such as SATA cables and M.2 anchors.
4. Setup and Installation
4.1 Motherboard Layout
Familiarize yourself with the key components and connectors on the motherboard before installation.

Figure 4.1: Top-down view highlighting the CPU socket, DIMM slots, PCIe slots, and M.2 slots.

Figure 4.2: Angled view showing the rear I/O panel, CPU socket, and VRM heatsink.
4.2 CPU Installation (AM5 Socket)
- Locate the AM5 socket on the motherboard.
- Push down the socket lever and pull it to the side to open the retention frame.
- Carefully align the triangular mark on the CPU with the mark on the socket.
- Gently place the CPU into the socket. Do not force it.
- Close the retention frame and push the lever back into its locked position.
- Install the CPU cooler according to its manufacturer's instructions.
4.3 Memory (DDR5) Installation
- Locate the DDR5 DIMM slots. Refer to the motherboard manual for recommended slot population for optimal performance (e.g., A2/B2 for dual channel).
- Open the clips at both ends of the DIMM slot.
- Align the notch on the DDR5 memory module with the key in the DIMM slot.
- Press down firmly on both ends of the memory module until the clips snap into place.
4.4 Storage Installation (M.2 and SATA)
M.2 SSD Installation:
- Identify the M.2 slots (this motherboard has two).
- Remove the M.2 heatsink (if present) and the M.2 screw/standoff from the desired slot.
- Insert the M.2 SSD into the slot at a 30-degree angle.
- Gently push down the SSD and secure it with the M.2 screw or anchor.
- Reinstall the M.2 heatsink if applicable.
SATA Device Installation:
- Connect one end of the SATA data cable to a SATA 6 Gbps port on the motherboard.
- Connect the other end of the SATA data cable to your SATA HDD/SSD.
- Connect a SATA power cable from your power supply unit (PSU) to the SATA device.
4.5 PCIe Card Installation
This motherboard supports PCIe 4.0. For graphics cards, use the primary PCIe x16 slot.
- Open the retention clip at the end of the desired PCIe slot.
- Align your PCIe expansion card (e.g., graphics card) with the slot.
- Press down firmly until the card is fully seated and the retention clip snaps into place.
- Secure the card to the computer case with a screw.
4.6 Power Connections
- Connect the 24-pin ATX power connector from your PSU to the motherboard's 24-pin power socket.
- Connect the 8-pin (or 4+4 pin) CPU power connector from your PSU to the motherboard's 8-pin CPU power socket (usually near the CPU).
4.7 Front Panel and USB Connections
Connect the cables from your computer case's front panel to the corresponding headers on the motherboard. Refer to the motherboard manual for exact pin layouts.
- Front Panel Headers: Power button, Reset button, HDD LED, Power LED.
- USB Headers: USB 2.0, USB 3.2 Gen 1 (5Gbps) Type-A, and Front USB 5Gbps Type-C.
- Audio Header: For front panel audio jacks.
4.8 Rear I/O Connections
Connect your peripherals to the ports on the rear I/O panel.
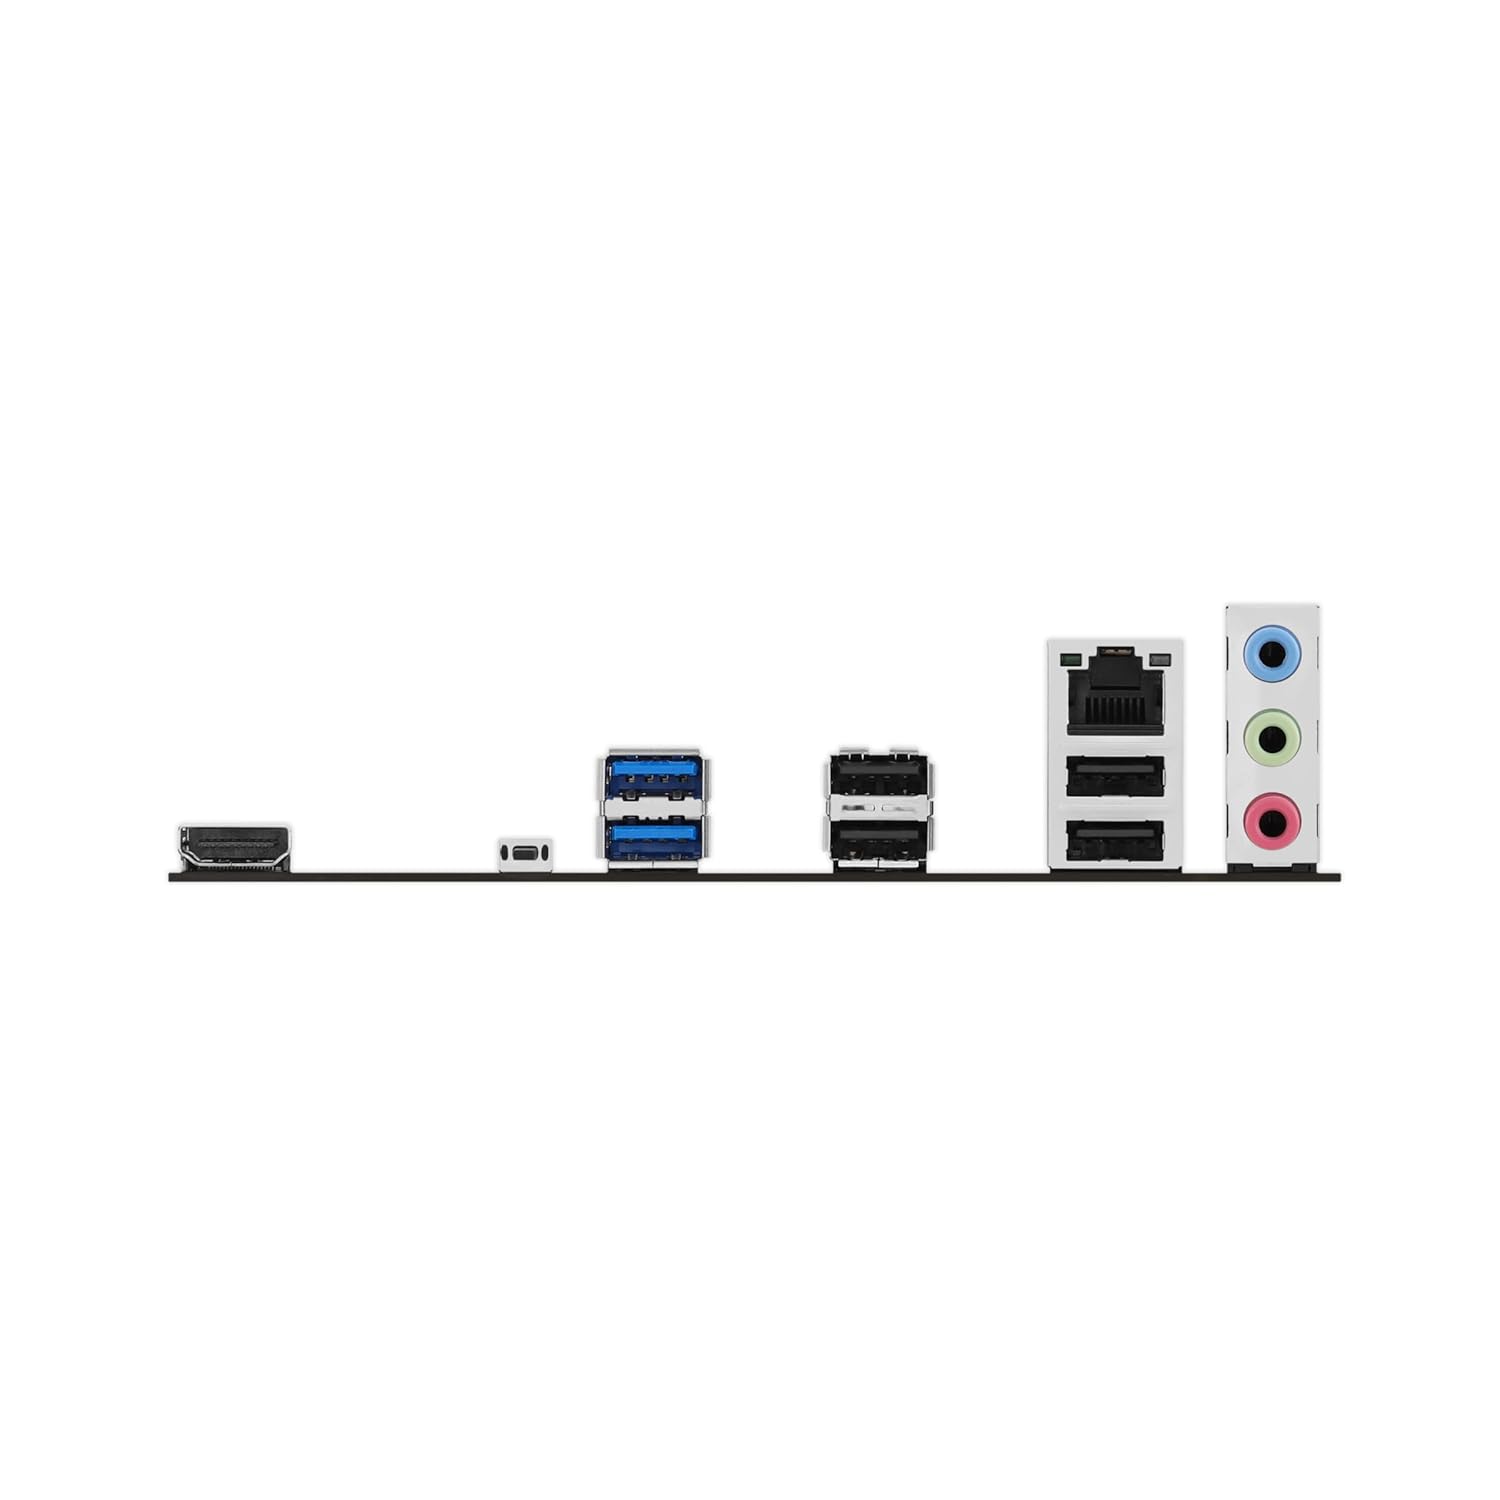
Figure 4.3: Rear I/O panel showing various ports including HDMI, USB, and Ethernet.
- USB Ports: For keyboard, mouse, and other USB devices.
- HDMI Port: For display output (requires a compatible AMD Ryzen CPU with integrated graphics).
- Realtek 2.5Gb Ethernet Port: For network connection.
- Audio Jacks: For speakers, headphones, and microphone.
- BIOS FlashBack Button: For updating BIOS without a CPU or RAM installed.
5. Operating Instructions
5.1 Initial Boot and BIOS/UEFI Setup
- After assembling your system, connect a monitor, keyboard, and mouse.
- Power on the system. Press the DEL or F2 key during startup to enter the BIOS/UEFI setup utility.
- Configure boot order, date/time, and other system settings as needed.
- Save changes and exit BIOS to boot into your operating system installer.
5.2 Driver Installation
After installing your operating system, install the necessary drivers for optimal performance and functionality.
- Use the provided support DVD/USB drive, or download the latest drivers from the official ASUS support website.
- Install chipset drivers, LAN drivers, audio drivers, and any other relevant device drivers.
- For graphics cards, download and install the latest drivers from the GPU manufacturer's website (AMD or NVIDIA).
5.3 Software Utilities
ASUS provides several utilities to enhance your experience:
- Armoury Crate: Centralized software for system monitoring, driver updates, and Aura Sync control.
- Fan Xpert 2+: For advanced fan control and system cooling optimization.
- Two-Way AI Noise Cancelation: Reduces background noise for clear communication during gaming or video conferences.
- Aura Sync: Synchronize RGB lighting effects across compatible components.
6. Maintenance
6.1 Cleaning
- Regularly clean dust from inside your computer case using compressed air.
- Ensure fans (CPU cooler, case fans) are free of dust buildup to maintain optimal airflow and cooling.
- Do not use liquid cleaners directly on motherboard components.
6.2 BIOS Updates
Updating the BIOS can improve system stability, compatibility, and performance. Always follow the official ASUS instructions carefully.
- Download the latest BIOS version from the ASUS support website for your specific motherboard model.
- Use the ASUS EZ Flash utility within the BIOS, or the BIOS FlashBack feature for convenient updates.
- Caution: Do not interrupt the BIOS update process, as this can render the motherboard inoperable.
6.3 Driver and Software Updates
Keep your drivers and ASUS utilities updated to ensure compatibility and access to the latest features and bug fixes.
- Check the ASUS support website periodically for updated drivers and software.
- Use Armoury Crate to manage and update ASUS-specific drivers and utilities.
7. Troubleshooting
This section provides solutions to common issues you might encounter.
7.1 No Power / No Boot
- Ensure the PSU is connected correctly to the motherboard (24-pin ATX and 8-pin CPU power).
- Check that the power button cable from the case is correctly connected to the front panel header.
- Verify the PSU switch is in the 'ON' position.
- Test the PSU with another system or a PSU tester if possible.
7.2 No Display Output
- Ensure the monitor is connected to the graphics card (if installed) or the motherboard's HDMI port (if using integrated graphics).
- Reseat the graphics card and memory modules.
- Try booting with only one RAM stick installed.
- Clear CMOS: Turn off the PC, unplug the power cord, remove the CMOS battery for 5-10 minutes, then reinsert it.
7.3 System Instability / Crashes
- Check CPU and GPU temperatures. Ensure adequate cooling.
- Run memory diagnostic tools (e.g., Windows Memory Diagnostic, MemTest86) to check for RAM errors.
- Ensure all drivers are up to date.
- Verify PSU wattage is sufficient for all components.
7.4 BIOS FlashBack Feature
The BIOS FlashBack feature allows you to update the BIOS without a CPU, memory, or graphics card installed. This is useful for supporting newer CPUs that might not be recognized by an older BIOS version.
- Download the latest BIOS version from the ASUS support site and rename it according to the instructions (usually
MB.CAP). - Copy the renamed BIOS file to the root directory of a FAT32 formatted USB flash drive.
- Insert the USB drive into the designated BIOS FlashBack USB port on the rear I/O panel.
- Ensure the motherboard has power (PSU connected, but system off).
- Press and hold the BIOS FlashBack button for three seconds until the LED starts blinking.
- Release the button. The LED will continue to blink and then turn off when the update is complete.
8. Specifications
| Feature | Specification |
|---|---|
| Brand | ASUS |
| Model | B650M-R |
| Form Factor | Micro-ATX |
| CPU Socket | AMD AM5 Socket (Supports AMD Ryzen 7000 series processors) |
| Chipset | AMD B650 |
| Memory | DDR5 (4400 MHz and higher via OC) |
| PCIe Slots | PCIe 4.0 x16, additional PCIe slots |
| Storage | 2 x M.2 slots, 4 x SATA 6Gbps ports |
| Ethernet | Realtek 2.5Gb Ethernet |
| Video Output | 1 x HDMI (requires CPU with integrated graphics) |
| USB Ports | Various USB 5Gbps ports (Type-A and Front Type-C) |
| Audio | High Definition Audio CODEC |
| Dimensions (LxWxH) | 26.5 x 6 x 27 cm |
| Item Weight | 1.3 kg |
9. Warranty and Support
9.1 Warranty Information
ASUS motherboards come with a limited warranty. The duration and terms of the warranty may vary by region and retailer. Please refer to the warranty card included with your product or visit the official ASUS website for detailed warranty information specific to your region.
Keep your proof of purchase (invoice or receipt) as it will be required for any warranty claims.
9.2 Technical Support
For technical assistance, driver downloads, BIOS updates, and FAQs, please visit the official ASUS support website:
When contacting support, please have your motherboard model (B650M-R) and serial number ready.