
1. Introduction
Thank you for choosing the Freeman LD40-C3 Cordless Concrete Nailer. This tool is specifically designed for fastening applications in concrete and steel, such as securing metal profiles for plasterboard walls. This manual provides essential information for the safe and efficient operation, maintenance, and troubleshooting of your new tool. Please read it thoroughly before use and keep it for future reference.
1.1 What's in the Box
Upon unpacking, ensure all items listed below are present and undamaged. If any parts are missing or damaged, please contact your retailer.
- 1 x Freeman LD40-C3 Cordless Concrete Nailer
- 1 x 4.0 Ah Lithium-Ion Battery
- 1 x Fast Charger
- 1 x Carrying Case
- Hex wrenches and various accessories (as pictured)
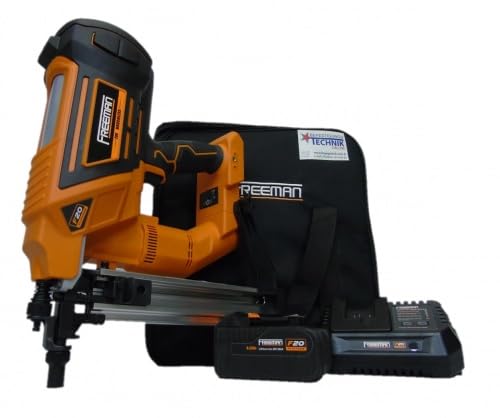
Figure 1: Complete Freeman LD40-C3 kit with nailer, battery, charger, and accessories.
2. Safety Instructions
Always follow basic safety precautions when using power tools to reduce the risk of fire, electric shock, and personal injury.
- Wear Eye Protection: Always wear safety glasses or goggles that comply with applicable standards.
- Wear Hearing Protection: Prolonged exposure to noise from power tools can cause hearing damage.
- Wear Hand Protection: Use appropriate gloves to protect your hands.
- Keep Work Area Clean: Cluttered areas invite accidents.
- Do Not Operate in Explosive Atmospheres: Do not use power tools in the presence of flammable liquids, gases, or dust.
- Keep Children Away: Do not let children or untrained persons operate this tool.
- Secure Workpiece: Always secure the workpiece before fastening.
- Avoid Accidental Firing: Keep fingers away from the trigger when not ready to fire.
- Disconnect Battery: Always remove the battery pack before making adjustments, changing accessories, or storing the tool.
- Use Correct Nails: Only use nails specified for this tool (15-40mm concrete nails).
- Inspect Tool: Before each use, check for damaged parts and ensure all guards and safety features are in place and functioning correctly.
3. Setup
3.1 Battery Charging and Installation
- Connect the fast charger to a standard power outlet.
- Insert the 4.0 Ah Lithium-Ion battery into the charger. The indicator light on the charger will show the charging status.
- Once fully charged, remove the battery from the charger.
- Align the charged battery with the battery slot on the nailer handle and slide it in until it clicks securely into place.

Figure 2: Freeman LD40-C3 with battery installed.
3.2 Loading Nails
The LD40-C3 uses concrete nails ranging from 15mm to 40mm in length.
- Ensure the battery is removed for safety.
- Locate the nail magazine release latch, typically at the bottom or side of the magazine.
- Open the magazine.
- Insert a strip of nails into the magazine with the nail heads facing upwards.
- Close the magazine securely until it latches.

Figure 3: Close-up of the nailer's nose and magazine.
3.3 Adjusting Depth of Drive
The nailer features an adjustable depth of drive to control how deep the nail is driven into the material.
- Locate the depth adjustment mechanism, usually a dial or lever near the nose of the tool.
- Rotate the dial or move the lever to increase or decrease the nail's penetration depth. Test on a scrap piece of material to achieve the desired depth.
4. Operating Instructions
4.1 General Operation
- Ensure the battery is fully charged and installed, and the magazine is loaded with appropriate nails.
- Hold the tool firmly with both hands, ensuring a stable grip on the rubberized handle.
- Place the nose of the nailer squarely against the workpiece where the nail is to be driven. The contact trip mechanism must be fully depressed against the surface.
- Press the trigger to fire a nail. The tool is designed for sequential firing.
- After firing, lift the tool from the workpiece to reset the contact trip for the next nail.

Figure 4: Freeman LD40-C3 ready for operation.
4.2 Using the Belt Hook
The integrated belt hook allows for convenient temporary storage of the tool when not in immediate use. Attach the hook to your belt or a sturdy edge.
5. Maintenance
Regular maintenance ensures optimal performance and extends the life of your tool.
5.1 Cleaning
- Always remove the battery before cleaning.
- Wipe the tool's exterior with a clean, damp cloth. Do not use harsh chemicals or abrasive cleaners.
- Periodically clean the nail magazine and nose area to remove any dust or debris that could cause jams.
5.2 Storage
- Store the tool and battery in a cool, dry place, away from direct sunlight and extreme temperatures.
- Ensure the battery is removed from the tool before storage.
- Store the tool in its original carrying case for protection.
5.3 Battery Care
- Do not store batteries in a discharged state for extended periods. Charge them periodically.
- Avoid exposing batteries to water or extreme heat.
6. Troubleshooting
This section addresses common issues you might encounter with your Freeman LD40-C3 nailer.
| Problem | Possible Cause | Solution |
|---|---|---|
| Nailer does not fire | Battery discharged Nail magazine empty Contact trip not fully depressed Tool malfunction | Charge battery Load nails Ensure nose is firmly against workpiece Contact service center |
| Nails jam in magazine/nose | Incorrect nail size/type Debris in magazine Damaged nails | Use specified 15-40mm concrete nails Clean magazine and nose area Use new, undamaged nails |
| Nails not driven to full depth | Depth adjustment too shallow Low battery charge Incorrect nail for material | Adjust depth setting Recharge battery Ensure nails are suitable for the material |
7. Specifications
Technical specifications for the Freeman LD40-C3 Cordless Concrete Nailer.
- Model: LD40-C3
- Manufacturer Reference: LD-38C3
- Nail Lengths: 15 - 40 mm
- Power Source: Cordless, 20V Lithium-Ion Battery (4.0 Ah)
- Product Dimensions (L x W x H): 42 x 32 x 12 cm
- Product Weight: 7.84 kg
- Brand: Freeman (Manufactured by BETEON24)
- ASIN: B0D6R33YJY
8. Warranty and Support
For warranty information or technical support, please refer to the warranty card included with your product or contact your point of purchase. Keep your purchase receipt as proof of purchase.
