
1. Introduction
This manual provides instructions for the assembly, operation, maintenance, and troubleshooting of your GDLF Outdoor Grill Table with Sink. This unit is designed to provide a functional outdoor workspace with a built-in sink, prep area, and storage for grilling and outdoor cooking activities.

Image 1.1: GDLF Outdoor Grill Table with Sink, featuring a stainless steel sink, countertop, and cabinet storage.
2. Safety Information
- Assembly: Ensure all parts are correctly assembled and fasteners are tightened securely before use.
- Placement: Position the grill table on a stable, level surface. Uneven surfaces can affect stability and door alignment.
- Weather Protection: While metal finishes are treated, for extended product lifespan, it is recommended to place the unit under a porch or shelter during heavy rain or extreme weather conditions.
- Water Connection: When connecting the sink to a water source, ensure all connections are watertight to prevent leaks. An adapter may be required for standard garden hoses.
- Weight Capacity: Do not overload the work surfaces or storage compartments.
- Children and Pets: Keep children and pets away from the unit during assembly and operation.
3. Package Contents
Verify that all components are present before beginning assembly. Refer to the assembly instructions for a detailed parts list. Typical components include:
- Main frame components
- Stainless steel sink basin
- Faucet
- Water hose (3/4" ends)
- Drain kit (strainer, drain, washers, drainage pipe)
- Stainless steel countertop sections
- Foldable work platform
- Cabinet doors and handles
- Internal shelves
- Paper towel holder
- Spice rack
- Casters (wheels)
- Assembly hardware (screws, nuts, etc.)

Image 3.1: Overview of multi-functional components including sink, storage, wheels, and prep space.
4. Setup and Assembly
Assembly is required for this product. Follow the detailed instructions provided in the packaging. The process typically takes a few hours. Ensure you have a Phillips screwdriver available, as the included tool may be basic.
4.1. Preparation
- Unpack all components and verify against the parts list.
- Clear a spacious, level area for assembly.
- Keep the packaging box nearby; it can be used as a stand during initial assembly to keep parts off the ground.
4.2. Removing Protective Film
Carefully remove the protective vinyl film from the stainless steel countertop sections. Note that some black marks may remain after removal, especially where the film extends under the sink rim. These marks can be gently wiped away with a damp cloth.

Image 4.1: Illustration of protective film removal from the countertop and potential residue.
4.3. Sink and Drain Assembly
Assemble the sink drain components as illustrated. Ensure all rubber washers are correctly seated and tightened to prevent leaks.

Image 4.2: Exploded view of the sink drain kit components, including water storage cover, strainer, drain, washers, and drainage pipe.
4.4. Water Supply Connection
Connect the provided water hose to the faucet. The 3/4" ends of the hose are designed to connect to a water supply source. An adapter may be necessary to connect to a standard garden hose or outdoor spigot.
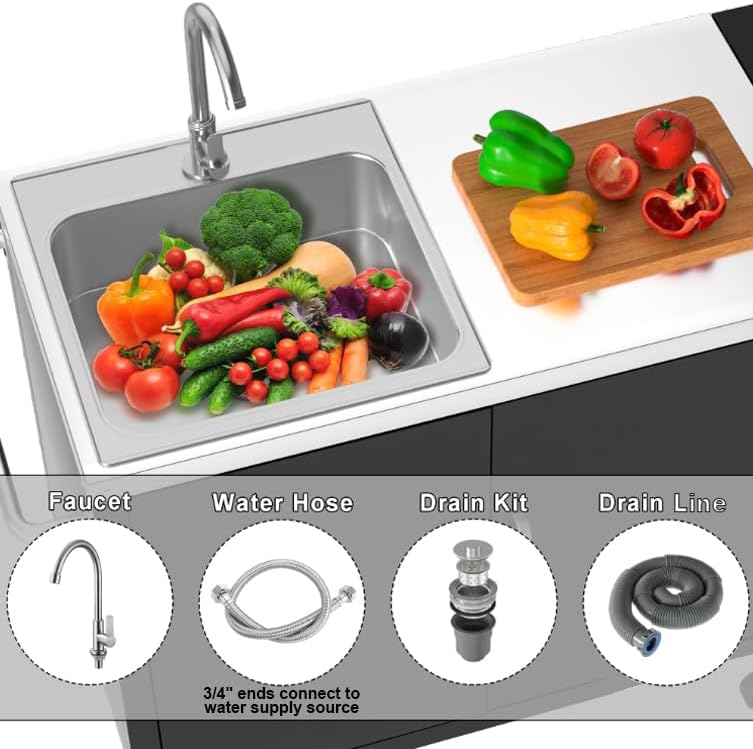
Image 4.3: Components for water connection: faucet, water hose, drain kit, and drain line.
4.5. Final Assembly and Leveling
Once the main structure is assembled, ensure the unit is placed on a level surface. This is crucial for the proper alignment and closing of the cabinet doors.
5. Operating Instructions
5.1. Using the Sink
The integrated stainless steel sink (16.1" x 14.2" x 5.9") allows for convenient washing of food items, utensils, or hands directly at your outdoor cooking station. Ensure the drain hose is directed into a suitable collection bucket or drainage system.
5.2. Work Surface and Foldable Platform
The main work surface provides ample space for food preparation. An additional detachable, foldable work platform can be extended to increase your prep area as needed. The overall dimensions are 57" x 21.65", with the primary work surface (excluding the sink area) measuring 33" x 21.65".

Image 5.1: The grill table in use, demonstrating the extended work surface and internal storage.

Image 5.2: The grill table providing a convenient prep and wash station adjacent to an outdoor grill.
5.3. Storage and Organization
The enclosed storage area, complete with internal shelves, a paper towel holder, and a spice rack, allows for organized storage of grilling tools, ingredients, and accessories.
5.4. Mobility
The unit is equipped with four swivel casters for easy movement. Lock the casters when the table is in its desired position to ensure stability.
6. Maintenance and Care
- Cleaning: Clean stainless steel surfaces with a mild detergent and a soft cloth. Avoid abrasive cleaners or scouring pads that can scratch the finish.
- Weather Protection: As noted in the safety section, store the unit under cover during prolonged periods of heavy rain or extreme weather to protect the metal components and extend product life.
- Fastener Check: Periodically inspect all screws and fasteners and re-tighten as necessary, especially after exposure to temperature fluctuations.
- Drainage: Ensure the sink drain is clear of debris to maintain proper water flow.
7. Troubleshooting
- Cabinet Doors Do Not Shut Properly: Ensure the grill table is placed on a completely level surface. Adjust the unit's position or use shims if necessary to achieve a level base.
- Water Supply Connection Issues: If the provided hose does not connect directly to your outdoor spigot, an adapter (not included) may be required to bridge the 3/4" NPT hose end to your specific water source.
- Black Marks on Countertop After Film Removal: These are typically residue from the protective film. Gently wipe them away with a damp cloth.
- Wobbly Unit: Check that all assembly screws are securely tightened. Ensure casters are locked when the unit is stationary.
8. Specifications
| Feature | Detail |
|---|---|
| Model Number | LNG807m |
| Product Dimensions (Overall) | 57" W x 21.65" D x 35.6" H |
| Work Surface Dimensions (excluding sink) | 33" W x 21.65" D |
| Sink Dimensions | 16.1" W x 14.2" D x 5.9" H |
| Materials | Metal frame, 18/8 Stainless Steel sink, Stainless Steel countertop |
| Color | Black |
| Item Weight | 80 pounds |
| Number of Shelves | 1 (internal) |
| Wheels | 4 Swivel Casters |
| Assembly Required | Yes |

Image 8.1: Diagram illustrating the key dimensions of the GDLF Outdoor Grill Table with Sink.
9. Warranty and Support
For product support, please contact GDLF customer service. Information regarding specific warranty terms may be included with your product packaging or available on the GDLF official website.
This product is typically eligible for a 30-day return policy from the date of purchase. Please refer to your retailer's return policy for specific details and conditions.
