
1. Important Safety Instructions
To ensure safe operation and prevent injury, please read all instructions carefully before using the Sperax Walking Pad P2-Y1. Keep this manual for future reference.
- User Weight Limit: Do not exceed the maximum weight capacity of 340 lbs (154 kg).
- Placement: Place the treadmill on a flat, stable surface. Ensure there is at least 2 meters (6.5 feet) of clear space behind the treadmill and 0.6 meters (2 feet) on each side.
- Power Source: Connect the treadmill to a properly grounded outlet. Do not use extension cords or adapters.
- Children and Pets: Keep children and pets away from the treadmill during operation.
- Footwear: Always wear appropriate athletic footwear when using the treadmill.
- Emergency Stop: Familiarize yourself with the remote control's stop function.
- Maintenance: Perform regular maintenance as described in this manual to ensure optimal performance and safety.
- Medical Conditions: Consult a physician before starting any exercise program, especially if you have pre-existing medical conditions.
- Unplug When Not in Use: Always unplug the treadmill from the power outlet when not in use or before cleaning and maintenance.
2. Product Overview
The Sperax Walking Pad P2-Y1 is a compact under-desk treadmill designed for home and office use, featuring an incline function and multiple operating modes.

Figure 2.1: Top-down view of the Sperax Walking Pad P2-Y1, showing the running belt, display panel, and side rails.
Components:
- Running Belt: Five-layer non-slip belt for shock absorption and durability.
- LED Display: Shows speed, time, distance, and calories burned.
- Motor: 2.5 horsepower motor for smooth and quiet operation.
- Remote Control: Used to control speed, incline, and switch modes.
- Transport Wheels: Located at the front for easy movement and storage.
- Incline Mechanism: Allows for adjustable incline up to 9%.
3. Setup
3.1 Unpacking
Carefully remove the treadmill from its packaging. The Sperax Walking Pad P2-Y1 requires no assembly and is ready for use upon receipt.
3.2 Placement
Place the treadmill on a firm, level surface. Ensure adequate clearance around the unit as specified in the safety instructions. The compact design allows for placement under a desk or in various home environments.
3.3 Power Connection
Locate the power input port on the treadmill. Connect the power cord securely to the treadmill and then plug it into a standard, grounded electrical outlet.
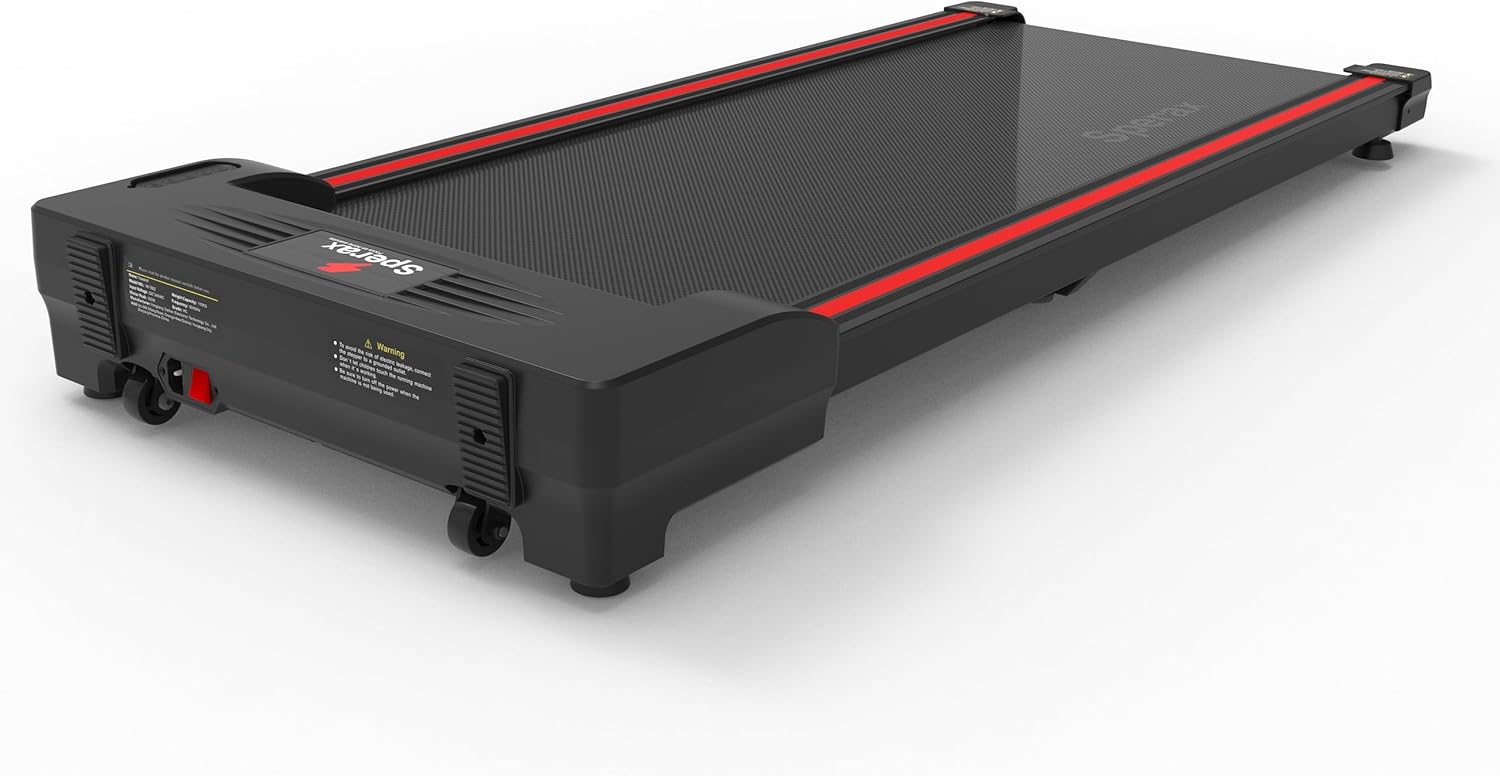
Figure 3.1: Side view of the Sperax Walking Pad P2-Y1, illustrating the compact profile and location of the power input.
4. Operating Instructions
The Sperax Walking Pad P2-Y1 is operated using the included remote control.
4.1 Remote Control Functions
The remote control allows you to power on/off, start/stop, adjust speed, and control the incline. Ensure the remote control has working batteries (typically a circular battery type).
4.2 Starting and Stopping
- To Start: Press the 'Start' button on the remote control. The treadmill will typically begin at a low speed.
- To Pause: Press the 'Start/Pause' button once during operation to temporarily stop the belt.
- To Stop: Press and hold the 'Stop' button on the remote control to end your session and bring the belt to a complete stop.
4.3 Adjusting Speed
Use the '+' and '-' buttons on the remote control to increase or decrease the walking speed. The speed can be adjusted in increments, typically from 0.6 MPH up to 4.0 MPH.
4.4 Adjusting Incline
The treadmill features an automatic incline function. Use the dedicated incline buttons on the remote control to adjust the incline level. The maximum incline angle is 9%.
4.5 Display Information
The integrated LED display provides real-time feedback on your workout. Information displayed includes:
- SPEED: Current walking speed.
- CALORIE: Estimated calories burned.
- TIME: Duration of your workout.
- DISTANCE: Total distance covered.

Figure 4.1: Front view of the Sperax Walking Pad P2-Y1, highlighting the LED display panel.
4.6 Exercise Modes
The treadmill offers various modes to suit different exercise needs, selectable via the remote control:
- Sports Mode: For general fitness walking.
- Walking Mode: Standard walking pace.
- Working Mode: Lower speeds suitable for use while working at a standing desk.
- Tilt Mode: Engages the incline feature for a more challenging workout.
5. Maintenance
Regular maintenance ensures the longevity and safe operation of your treadmill.
5.1 Cleaning
Wipe down the treadmill surfaces with a damp cloth after each use. Avoid using abrasive cleaners or solvents that could damage the finish or electronic components.
5.2 Lubrication
The running belt requires periodic lubrication to reduce friction and extend its lifespan. Refer to the specific lubrication instructions provided with your treadmill or contact customer support for guidance on the correct type and frequency of lubricant application.
5.3 Belt Adjustment
If the running belt starts to slip or drift to one side, it may require adjustment. Consult the detailed instructions in the full product manual or contact customer support for assistance with belt tensioning and centering.
5.4 Storage
The Sperax Walking Pad P2-Y1 features a compact design and transport wheels for easy storage. To move, lift the rear of the treadmill and roll it to your desired storage location. Ensure it is stored in a dry, safe place away from direct sunlight and extreme temperatures.

Figure 5.1: Back view of the Sperax Walking Pad P2-Y1, illustrating the transport wheels for easy mobility.
6. Troubleshooting
If you encounter issues with your Sperax Walking Pad P2-Y1, refer to the following common problems and solutions.
| Problem | Possible Cause | Solution |
|---|---|---|
| Treadmill does not power on. | Power cord not connected; outlet not functioning. | Ensure power cord is securely plugged into both the treadmill and a working electrical outlet. Check circuit breaker. |
| Belt does not move when 'Start' is pressed. | Remote control battery low or dead; safety key not engaged (if applicable). | Replace remote control batteries. Ensure any safety features are correctly engaged. |
| E05 Error displayed. | Motor or control board issue. | Turn off the treadmill, unplug it, wait 5 minutes, then plug it back in and restart. If the error persists, contact Sperax customer support. |
| Unusual noise during operation. | Belt misalignment; lack of lubrication; loose components. | Check belt alignment and adjust if necessary. Lubricate the belt if due. Inspect for any loose parts. If noise continues, contact support. |
For issues not listed here or if solutions do not resolve the problem, please contact Sperax customer support for further assistance.
7. Specifications
Detailed technical specifications for the Sperax Walking Pad P2-Y1.
| Feature | Specification |
|---|---|
| Model Number | P2-Y1 |
| Product Dimensions (L x W x H) | 123.44 x 54.86 x 14.48 cm (48.6 x 21.6 x 5.7 inches) |
| Item Weight | 22 kg (48.5 lbs) |
| Maximum Weight Capacity | 340 Pounds (154 kg) |
| Motor Horsepower | 2.5 HP |
| Speed Range | 0.6 - 4.0 Miles per Hour |
| Incline | Automatic Incline, up to 9% maximum angle |
| Display Type | LED (Speed, Calories Burned, Distance, Time) |
| Frame Material | Alloy Steel |
| Running Belt Material | Acrylonitrile Butadiene Styrene (ABS) |
| Control Method | Remote Control |
| Power Source | Corded Electric |
| Special Features | Auto Incline, Transport Wheels |
8. Warranty and Support
Sperax products are designed for quality and durability. For information regarding warranty coverage, product support, or to purchase replacement parts, please contact Sperax customer service. Details can typically be found on the official Sperax website or through your purchase documentation.
When contacting support, please have your product model number (P2-Y1) and purchase date available.


