
Introduction
This manual provides comprehensive instructions for the proper installation and maintenance of your Subaru Genuine Mud Flap Kit (Part Number J101SSL500). These splash guards are designed to fit 2025-2026 Subaru Forester models (non-Wilderness editions) and help protect your vehicle's paint finish from stones, road grime, and other debris.
Please read all instructions carefully before beginning the installation process. Ensure all components are present and undamaged.
Kit Contents
Verify that all items listed below are included in your kit. If any parts are missing or damaged, please contact your Subaru dealer or the seller.
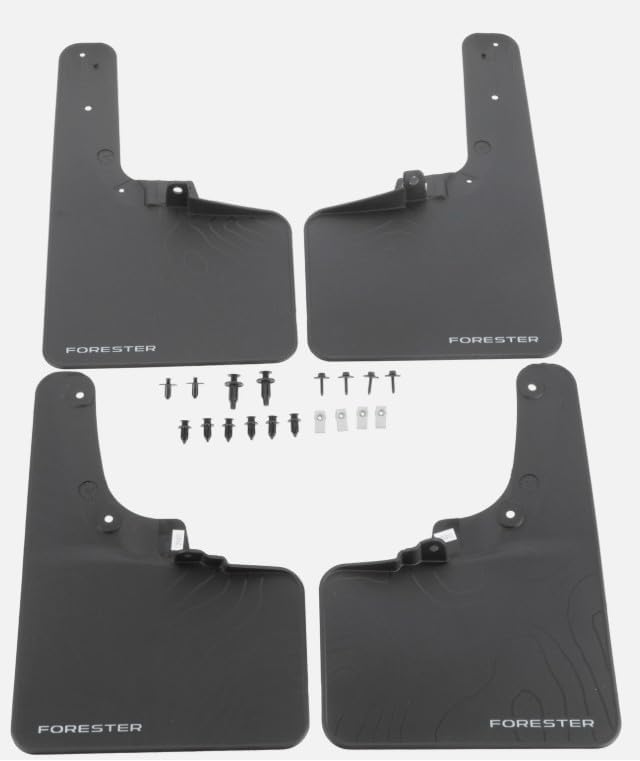
Image: The complete Subaru Mud Flap Kit, showing four mud flaps and all necessary mounting hardware.
- 4 x Mud Flaps (2 Front, 2 Rear)
- Mounting Hardware (Screws, Clips, etc.)

Image: Product identification label for the Subaru Mud Flap Kit, showing part number J101SSL500.
Installation Instructions
Tools Recommended: Phillips head screwdriver, flathead screwdriver (for prying clips), small wrench/socket set, drill (optional, if new holes are required).
Important Note: Installation is generally straightforward, utilizing existing factory mounting holes. However, some users have reported that rear flap mounting holes may not perfectly align with existing vehicle holes, potentially requiring minor adjustments or drilling new holes in the flap or vehicle body. Proceed with caution and ensure proper alignment before securing.
Step 1: Prepare the Vehicle
- Park the vehicle on a level surface and engage the parking brake.
- For easier access, it is recommended to turn the steering wheel fully to one side when installing front flaps, and remove the wheel for rear flaps if necessary, though often not required.
- Clean the area where the mud flaps will be installed, ensuring it is free of dirt and debris.
Step 2: Install Front Mud Flaps
- Identify the front mud flaps. They are typically marked or shaped to fit the front wheel wells.
- Position the front mud flap against the fender liner and body panel.
- Align the holes on the mud flap with the existing factory mounting holes on the vehicle.
- Secure the mud flap using the provided screws and clips. Do not overtighten.
- Repeat for the other front wheel.
Step 3: Install Rear Mud Flaps
- Identify the rear mud flaps.
- Position the rear mud flap against the fender liner and body panel.
- Carefully align the holes on the mud flap with the existing factory mounting holes on the vehicle.
- Attention: As noted by some users, the top two holes on the rear flaps may not perfectly align with existing body holes.
- If holes align, secure the mud flap using the provided screws and clips.
- If holes do not align, you may need to drill new holes in the mud flap to match existing body holes, or carefully drill new small pilot holes in the vehicle body if absolutely necessary and you are comfortable doing so. Ensure proper placement to avoid damage to vehicle components.
- Secure the mud flap using the provided screws and clips. Ensure a snug fit without deforming the flap.
- Repeat for the other rear wheel.
Step 4: Final Check
- Once all four mud flaps are installed, visually inspect each one to ensure they are securely attached and properly aligned.
- Confirm that there is no interference with tire movement or suspension components.
Operation and Benefits
Once installed, your Subaru Splash Guard Mud Flaps will immediately begin to protect your vehicle. They are designed to:
- Reduce the amount of mud, dirt, and road grime sprayed onto your vehicle's lower body panels.
- Minimize paint chipping and scratches caused by stones and debris kicked up by the tires.
- Help maintain the aesthetic appearance and resale value of your Forester.
Maintenance
To ensure the longevity and effectiveness of your mud flaps:
- Regularly clean the mud flaps with soap and water, especially after driving in muddy or snowy conditions.
- Inspect the mounting hardware periodically to ensure all screws and clips remain tight. Retighten if necessary.
- Check for any signs of damage or wear, and replace if severely cracked or broken to maintain optimal protection.
Troubleshooting
| Issue | Possible Cause | Solution |
|---|---|---|
| Mud flaps do not align with existing holes. | Minor manufacturing variations or specific vehicle trim differences. | Carefully mark and drill new holes in the mud flap to match existing vehicle holes. Avoid drilling into the vehicle body unless absolutely necessary and you are confident in doing so. |
| Missing hardware. | Packaging error. | Contact your Subaru dealer or the seller for replacement parts. |
| Mud flaps feel loose after installation. | Hardware not fully tightened or incorrect hardware used. | Ensure all screws and clips are securely fastened. Verify correct hardware is used for each mounting point. |
Product Specifications
- Model: Splash Guard Mud Flap
- Part Number: J101SSL500 (OEM)
- Compatible Vehicles: 2025-2026 Subaru Forester (non-Wilderness models)
- Material: Matte Black finish
- Item Weight: Approximately 3.3 pounds (total kit)
- Product Dimensions: Approximately 17 x 13 x 3 inches (packaging)
- Kit Contents: 4 Mud Flaps, all necessary mounting hardware
Warranty Information
This Subaru Genuine Mud Flap Kit is covered by Subaru's standard parts warranty. For specific details regarding warranty coverage, duration, and claims, please refer to your vehicle's owner's manual or contact an authorized Subaru dealership. Keep your purchase receipt as proof of purchase.
Customer Support
If you have any questions regarding the installation, operation, or maintenance of your Subaru Splash Guard Mud Flap Set, or if you require assistance with missing or damaged parts, please contact your authorized Subaru dealer or the retailer from whom you purchased the product. Provide them with the product part number (J101SSL500) and your vehicle information for efficient support.
You can also visit the official Subaru website for general support information.


