
1. Introduction
This manual provides detailed instructions for the safe and efficient operation of your WEST TUNE WTMS-380T Hotplate Magnetic Stirrer. This device is designed for laboratory use, primarily for stirring low-viscosity liquids and solid-liquid mixtures, with integrated heating capabilities.
Key features include:
- Touchable LCD screen for convenient and accurate setting of stirring speed, heating temperature, and stirring time.
- Real-time display of set and actual values.
- Program control function with 5 memory options and 5 program control settings for automated operation.
- Upgraded aluminum hot plate (5.5 inches diameter) for fast, uniform heat transfer, durability, and corrosion resistance.
- Internal and external temperature sensors for precise temperature control of the heating plate or sample.
- Speed range: 200-1500 rpm.
- Temperature range: RT+10-380℃/716℉.
- Timer range: 1s-99m59s.
- Maximum stirring volume: 3L.
- Ultra-temperature and over-speed alarm displays for safety.

Figure 1: WEST TUNE WTMS-380T Hotplate Magnetic Stirrer with accessories.
2. Safety Precautions
- WARNING: Do not touch the heating plate before it cools down completely to avoid burns.
- Ensure the device is placed on a stable, level surface.
- Always use appropriate personal protective equipment (PPE) such as gloves and eye protection when operating.
- Do not operate the device near flammable materials.
- Ensure proper ventilation in the work area.
- Disconnect power before cleaning or maintenance.
- The magnetic stirrer has ultra-temperature and over-speed alarm displays. Pay attention to these warnings.
- Only use the device for its intended purpose as described in this manual.
3. What's in the Box
Upon unpacking, verify that all components are present:
- WEST TUNE WTMS-380T Hotplate Magnetic Stirrer Unit
- Power cord
- Support rod
- Temperature sensor (external probe)
- Magnetic stir bar
- Fuse
4. Setup
- Placement: Place the stirrer on a stable, flat, and heat-resistant surface in a well-ventilated area.
- Install Support Rod: Insert the support rod into the designated hole at the rear of the unit and tighten the securing screw.
- Connect Temperature Sensor: If external temperature control is desired, connect the temperature probe to the port on the rear of the unit. Secure the probe to the support rod using the provided clamp, ensuring the probe tip is immersed in the liquid to be heated/stirred without touching the bottom or sides of the beaker.
- Power Connection: Connect the power cord to the unit and then to a grounded electrical outlet.
- Initial Check: Ensure the main power switch (located on the side/rear) is in the OFF position before connecting to power.

Figure 2: Key components and features of the stirrer.

Figure 3: Temperature probe and clamp assembly.
5. Operating Instructions
5.1 Power On/Off
Flip the main power switch (usually on the side or rear of the unit) to the "ON" position. The LCD screen will illuminate.
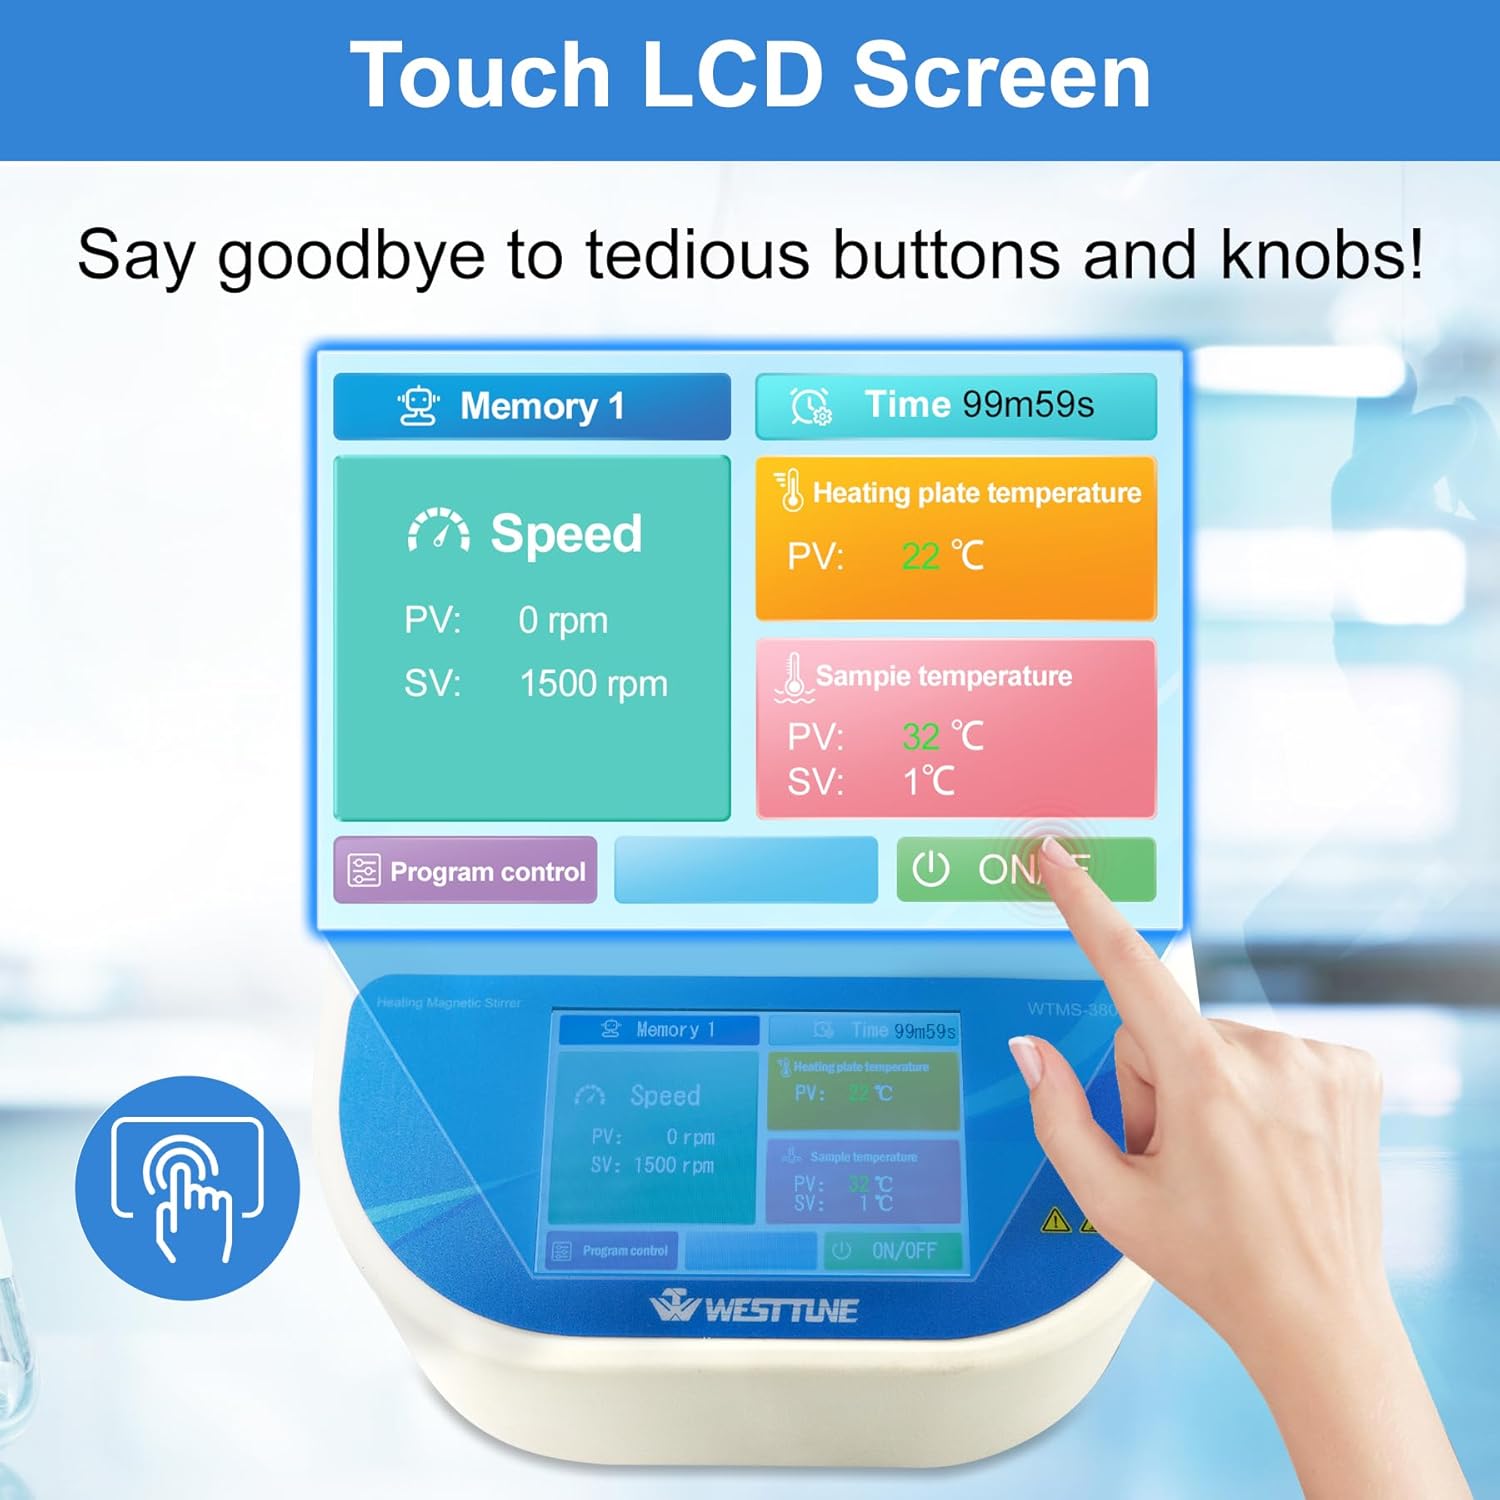
Figure 4: Touch LCD Screen Interface.
5.2 Setting Stirring Speed
- On the LCD screen, touch the "Speed" display area.
- Use the numeric keypad to enter the desired stirring speed in RPM (Revolutions Per Minute).
- Confirm the setting. The actual speed (PV) will adjust to the set value (SV).
5.3 Setting Heating Temperature
- Touch the "Heating plate temperature" or "Sample temperature" display area, depending on whether you are using the internal sensor or external probe.
- Enter the desired temperature in Celsius or Fahrenheit using the numeric keypad.
- Confirm the setting. The heating will begin, and the actual temperature (PV) will rise towards the set value (SV).
5.4 Setting Working Time
- Touch the "Time" display area.
- Enter the desired working duration in minutes and seconds.
- Confirm the setting. The timer will start once the stirring and/or heating functions are activated.
5.5 Program Control Function
The device supports 5 sets of memory options and 5 sets of program control operations for automated processes.
- Memory Options:
- Touch "Memory 1" (or Memory 2-5) to access saved settings.
- To save current settings, adjust speed, temperature, and time as desired, then long-press the desired "Memory" button until a save confirmation appears.
- Program Control Operations:
- Touch "Program control" to enter the program setting interface.
- Select "Program 1" (or Program 2-5) to configure a sequence of operations.
- For each step in the program, set parameters such as speed, temperature, and duration.
- Save the program. The device can automatically run up to 5 sets of programs simultaneously.

Figure 5: Program and Memory Settings Interface.
5.6 Video Tutorial: Operation Overview
Video 1: Introduction to the operation of the hotplate magnetic stirrer. This video demonstrates basic setting of speed, heating temperature, and working time using the touch screen interface.
6. Maintenance
- Cleaning: Always disconnect the power cord before cleaning. Use a soft, damp cloth with a mild detergent to clean the exterior surfaces. Do not use abrasive cleaners or solvents. Ensure no liquid enters the internal components.
- Hot Plate Care: Allow the hot plate to cool completely before cleaning. Wipe away any spills immediately.
- Storage: Store the device in a clean, dry environment when not in use.
- Fuse Replacement: If the unit fails to power on, check the fuse located near the power inlet. Replace with a fuse of the same type and rating as specified in the specifications.
7. Troubleshooting
| Problem | Possible Cause | Solution |
|---|---|---|
| Unit does not power on. | No power supply; Blown fuse; Power switch off. | Check power cord connection and outlet; Replace fuse; Ensure power switch is ON. |
| Stirring motor not working. | Speed setting too low; Stir bar not present or improperly placed; Motor malfunction. | Increase speed setting; Ensure stir bar is in the vessel and centered; Contact support if problem persists. |
| Heating plate not heating or inconsistent temperature. | Temperature setting too low; External probe not properly immersed or faulty; Internal sensor issue; Heating element malfunction. | Increase temperature setting; Ensure external probe is correctly positioned; Verify probe connection; Contact support if problem persists. |
| Display shows error message. | System error; Sensor fault; Over-temperature/over-speed alarm. | Refer to specific error codes in a more detailed technical manual (if available); Check sensor connections; Reduce speed/temperature settings if alarms are active. If error persists, contact support. |
8. Specifications
The following table outlines the technical specifications for the WEST TUNE WTMS-380T Hotplate Magnetic Stirrer:
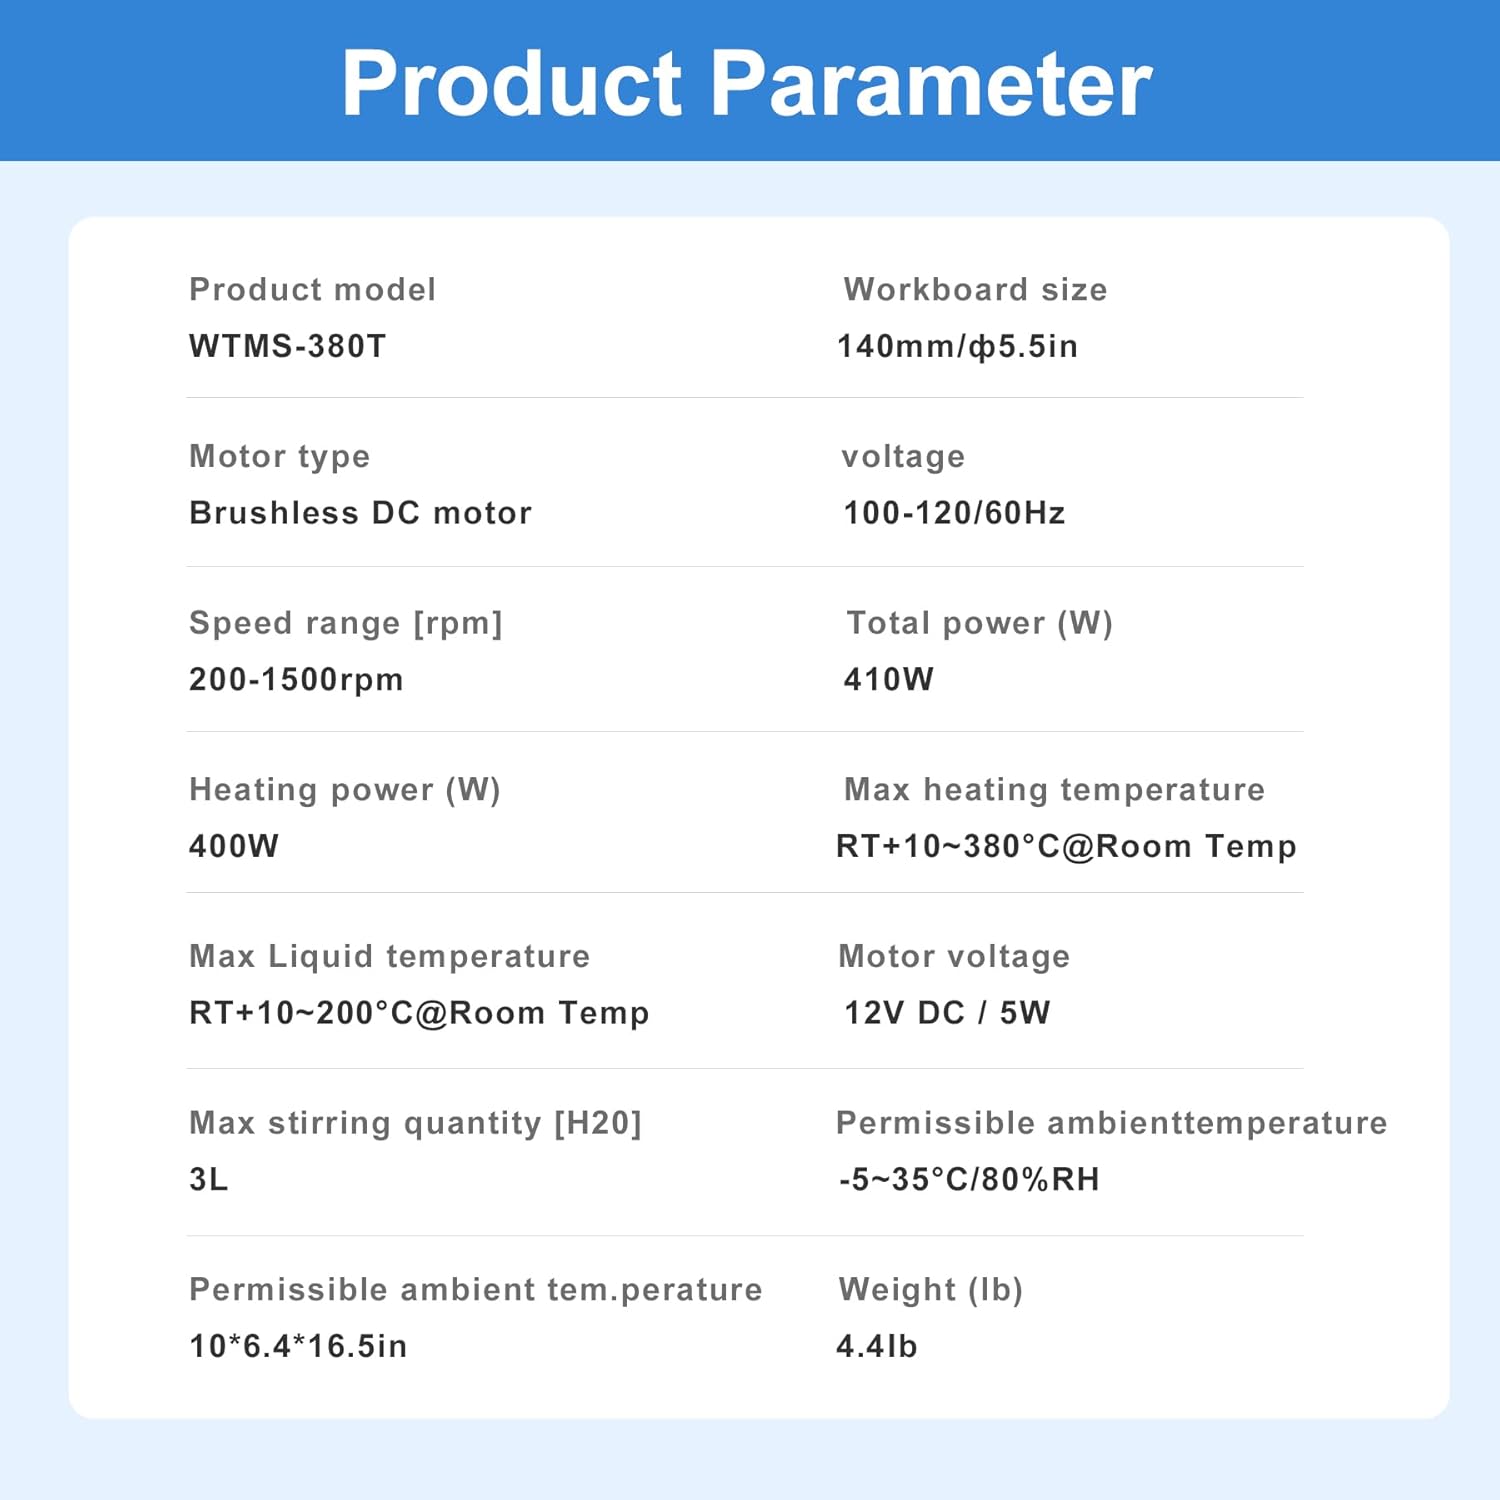
Figure 6: Detailed Product Parameters.
| Parameter | Value |
|---|---|
| Product Model | WTMS-380T |
| Workboard Size | 140mm / 5.5 inches |
| Motor Type | Brushless DC motor |
| Voltage | 100-120V / 60Hz |
| Speed Range | 200-1500 rpm |
| Total Power | 410W |
| Heating Power | 400W |
| Max Heating Temperature | RT+10-380℃ (716℉) @ Room Temp |
| Max Liquid Temperature | RT+10-200℃ @ Room Temp |
| Motor Voltage | 12V DC / 5W |
| Max Stirring Quantity [H2O] | 3L |
| Permissible Ambient Temperature | -5~35℃ / 80% RH |
| Product Dimensions | 10 x 6.4 x 4.7 inches |
| Weight | 4.4 lbs |
9. Warranty and Support
For warranty information, technical support, or service inquiries, please contact the WEST TUNE customer service team. Refer to your purchase documentation or the official WEST TUNE website for contact details.
If there is any problem with the product, please contact us for satisfactory service.