Introduction
This manual provides detailed instructions for the installation, operation, and troubleshooting of your Camgeet USB3.0 Dual Monitor KVM Switch Displayport 1.4. This device allows you to control two computers or laptops using a single set of keyboard and mouse, while sharing two DisplayPort monitors and four USB 3.0 devices. Please read this manual thoroughly before use to ensure proper functionality and optimal performance.
Package Contents
Please verify that all items listed below are included in your package:
- 1x Camgeet USB3.0 Dual Monitor KVM Switch
- 2x USB 3.0 Cables (1.5m)
- 2x DisplayPort 1.4 Cables (1.5m)
- 1x Wired Remote Control (1.5m)
- 1x Power Cable (1.0m)
- 1x User Manual

Image: The KVM switch and its included accessories, including cables and remote control, laid out on a white background.
Product Overview
The Camgeet KVM Switch is designed for efficient management of two computers with a dual monitor setup. Below is an overview of its ports and indicators.

Image: A detailed view of the KVM switch, showing all DisplayPort input/output ports, USB 3.0 ports, and the wired remote connection. The front panel features a switch button and LED indicators for active computers.
Front Panel:
- PC 1/PC 2 LED Indicators: Green LEDs illuminate to show which computer is currently active.
- Switch Button: Press to switch between connected computers.
Rear Panel:
- DP Monitor OUT A/B: Connect to your two DisplayPort monitors.
- PC 1/PC 2 DP INPUT A/B: Connect to the DisplayPort outputs of your two computers. Each computer requires two DisplayPort connections for dual monitor support.
- PC 1/PC 2 USB 3.0: Connect to the USB 3.0 ports of your two computers. These connections enable keyboard, mouse, and other USB device sharing.
- USB 3.0 Ports (4x): Connect your keyboard, mouse, printer, USB drives, and other USB 3.0 devices.
- SELECT Port: Connect the wired remote control for external switching.
- DC 5V Power Input: Connect the included power cable. Required for high-power USB devices.
Setup Instructions
Follow these steps to correctly set up your KVM switch:
- Power Off Devices: Ensure both computers and monitors are powered off before making any connections.
- Connect Monitors to KVM: Connect your two DisplayPort monitors to the "DP Monitor OUT A" and "DP Monitor OUT B" ports on the KVM switch using DisplayPort cables.
- Connect Computers to KVM (DisplayPort): For each computer (PC1 and PC2), connect its two DisplayPort outputs to the corresponding "DP INPUT A" and "DP INPUT B" ports on the KVM switch. Important: Each computer requires two DisplayPort outputs for dual monitor functionality. If your computer lacks dual DP outputs, use reliable adapters (e.g., powered HDMI to DP, Mini DP to DP, or USB-C to DP) or a USB-C docking station that supports extended display.
- Connect Computers to KVM (USB): For each computer (PC1 and PC2), connect a USB 3.0 cable from its USB port to the corresponding "USB 3.0" input port on the KVM switch. These cables enable the KVM to control your keyboard, mouse, and other USB device sharing.
- Connect USB Devices: Connect your keyboard, mouse, printer, USB drives, or other USB 3.0 devices to the four "USB 3.0" ports on the KVM switch.
- Connect Wired Remote (Optional): If desired, connect the wired remote control to the "SELECT" port on the KVM switch.
- Connect Power: Connect the included power cable to the "DC 5V" input on the KVM switch. While the KVM can be powered by USB cables, an external 5V adapter is required when using high-power USB devices (e.g., external HDDs, SSDs).
- Power On Devices: Power on your monitors, then your computers.

Image: A diagram illustrating the complete connection setup, showing two PCs connected to the KVM switch with DisplayPort and USB cables, and the KVM connected to two monitors and various USB peripherals.
Operating Instructions
Switching Between Computers:
You can switch between the connected computers using one of two methods:
- Front Panel Button: Press the "Switch" button on the front panel of the KVM switch. The LED indicator will change to show the active computer.
- Wired Remote Control: Press the button on the wired remote control. This provides convenient switching from your desktop.

Image: Demonstrates the two methods of switching between computers: pressing the button on the KVM switch itself and using the wired remote control.
USB Device Sharing:
All four USB 3.0 ports on the KVM switch are shared between the two connected computers. When you switch to a different computer, all connected USB devices (keyboard, mouse, printer, etc.) will automatically switch to that computer.

Image: Illustrates the high-speed data transfer capabilities of the USB 3.0 ports, showing a comparison with USB 2.0 speeds and various USB devices connected.
Display Modes
The KVM switch supports both Mirror Mode and Extended Mode for your dual monitor setup.
- Mirror Mode: Both monitors display the identical screen content from the active PC.
- Extended Mode: The two monitors output different screen content, extending your desktop across both displays.
To set the output modes on your computer (Windows OS):
- Press the "Windows key + P" simultaneously.
- A small window will appear, allowing you to choose between "Duplicate" (Mirror Mode) or "Extend" (Extended Mode).

Image: Visual representation of Mirror Mode, where both monitors show the same content, and Extended Mode, where the desktop is spread across two distinct monitors. Instructions for Windows key + P are also shown.
Note for Mac OS: While Windows systems can expand to two different screens, Mac OS typically only supports mirroring or extending to two identical screens. Please be aware of this limitation if your primary use is with Mac OS for extended dual-different-screen functionality.
Compatibility Notes
- Operating Systems: Driver-free for Windows, Mac OS, Vista, Chrome OS, and Linux. Plug and play functionality.
- Input Devices: Supports various input devices such as PCs, Laptops, Apple TV, PS3/PS4, Xbox.
- Resolution: Supports resolutions up to 8K@30Hz and 4K@144Hz. The KVM also supports connecting two computers with different resolutions (e.g., one at 4K@60Hz, the other at 1440P@60Hz). Note: Final resolution is dependent on your graphics cards, monitors, and the quality of your DisplayPort cables. For resolutions above 4K@60Hz, ensure you use high-quality DisplayPort 1.4 cables.
- EDID Emulation: This KVM switch does not support EDID emulation. Desktop locations may change upon switching and boot-up.

Image: A curved monitor displaying a high-resolution image, with "8K Ultra HD" and "support resolution up to 8K@30Hz 4K@144Hz" text overlay, emphasizing the KVM's high-resolution capabilities.
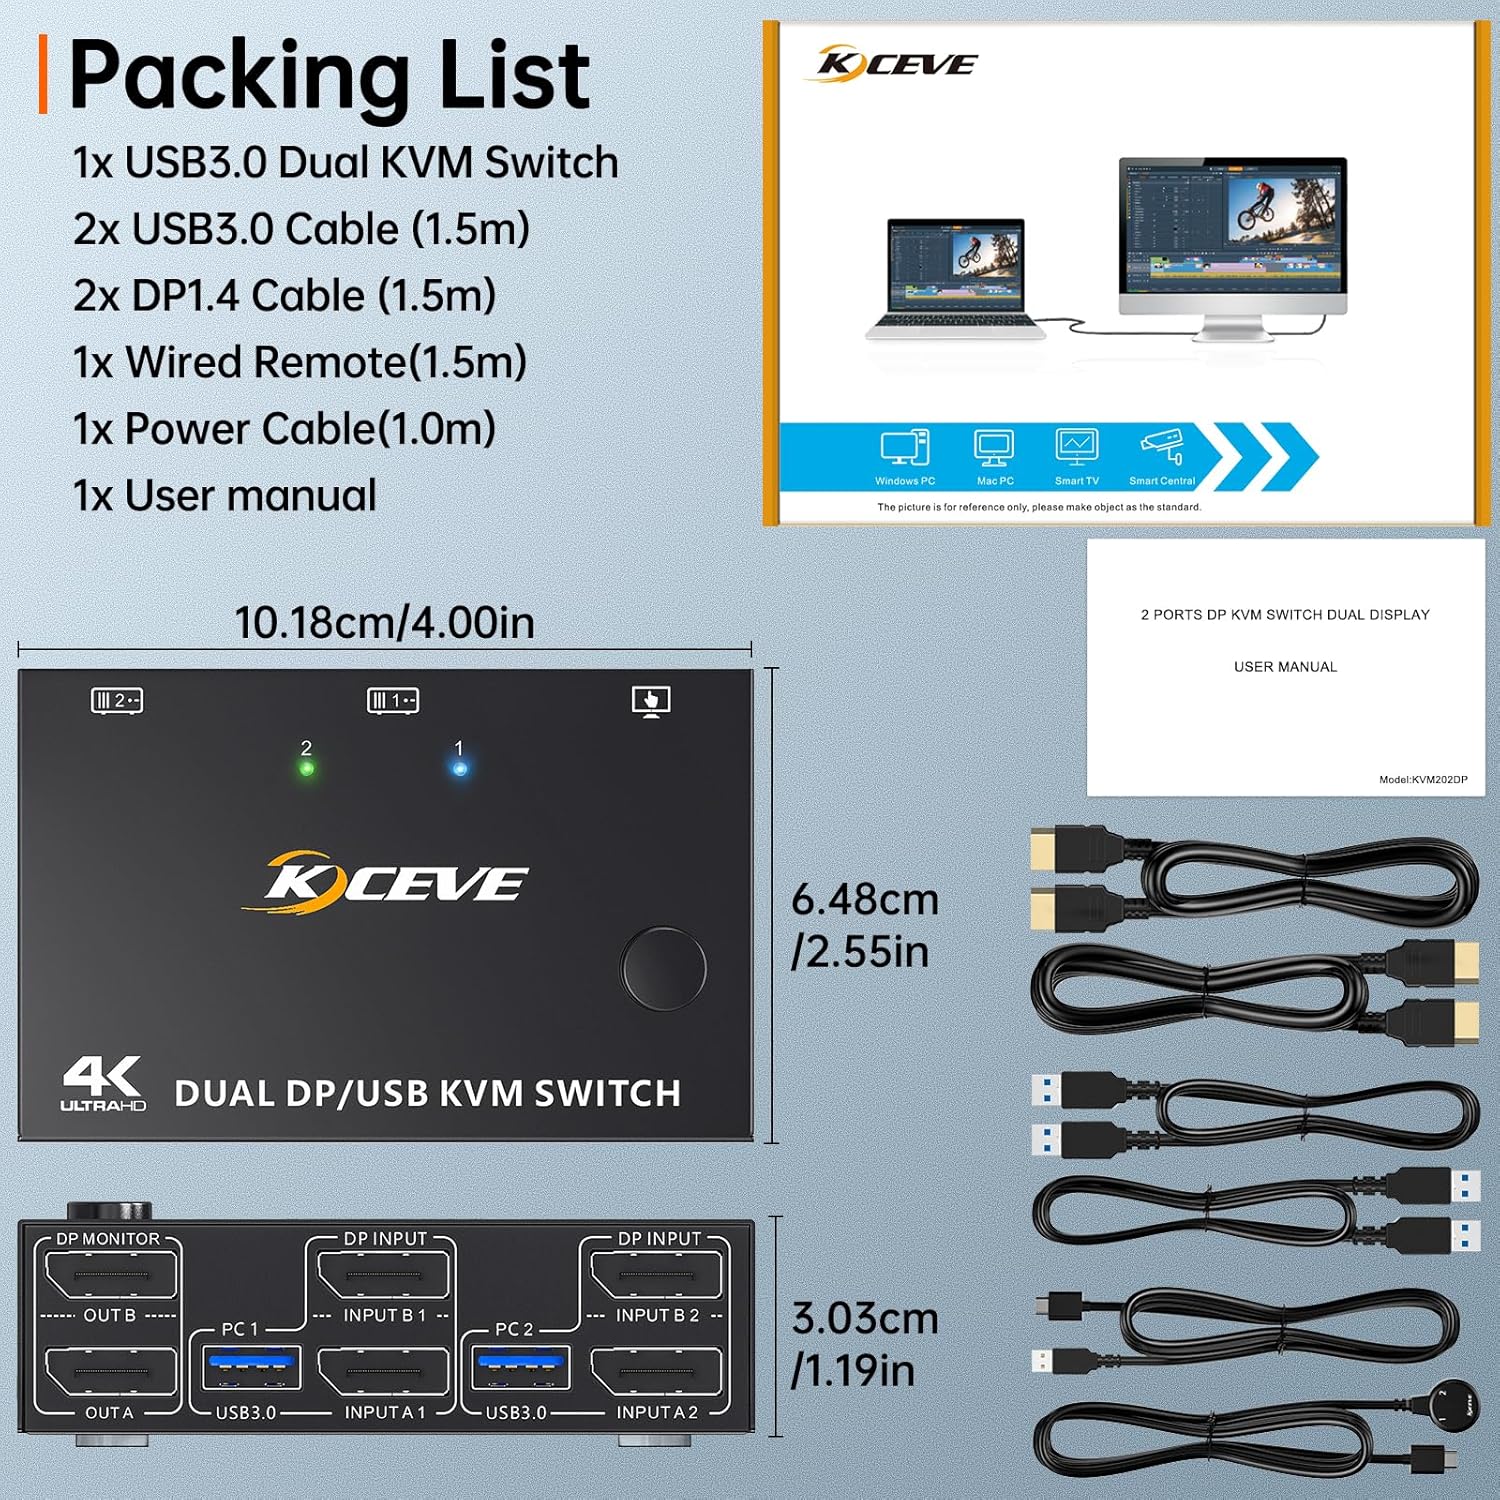
Image: Icons representing various operating systems including Windows, Mac OS, Vista, Chrome OS, and Linux, indicating broad compatibility.
Specifications
| Feature | Detail |
|---|---|
| Product Dimensions | 4.02 x 2.56 x 1.34 inches |
| Item Weight | 9.1 ounces |
| Model Number | KVM Switch 2 Monitors 2 Computers |
| Brand | Camgeet |
| Operation Mode | ON-OFF |
| Current Rating | 2 Amps |
| Operating Voltage | 5 Volts |
| Connector Type | Plug In (DisplayPort, USB 3.0) |
| Actuator Type | Push Button |
| Max Resolution Support | 8K@30Hz, 4K@144Hz |
| USB Data Transfer Speed | Up to 5Gbps (USB 3.0) |
Troubleshooting
- No Display on Monitor:
- Ensure all DisplayPort cables are securely connected to both the KVM switch and your computers/monitors.
- Verify that each computer has two DisplayPort outputs connected to the KVM.
- Check if the KVM switch is powered on and the correct computer is selected (indicated by the LED).
- Test monitors and cables directly with your computers to rule out individual component issues.
- Ensure you are using DisplayPort 1.4 cables, especially for high resolutions.
- Keyboard/Mouse Not Responding:
- Ensure the USB 3.0 cables from your computers are securely connected to the KVM switch.
- Verify that your keyboard and mouse are connected to the USB 3.0 ports on the KVM.
- Try connecting the keyboard/mouse directly to the computer to confirm they are functional.
- If using high-power USB devices, ensure the external 5V power adapter is connected to the KVM.
- Resolution Issues / Flickering:
- Ensure you are using high-quality DisplayPort 1.4 cables, especially for resolutions above 4K@60Hz. Lower quality cables may not support the required bandwidth.
- Check your computer's display settings to ensure the correct resolution and refresh rate are selected.
- Update your graphics card drivers on both computers.
- If using adapters (e.g., USB-C to DP), ensure they are powered and support the desired resolution and refresh rate.
- Desktop Layout Changes After Switching:
- This KVM switch does not support EDID emulation. It is normal for desktop icons and window positions to rearrange when switching between computers or when a computer wakes from sleep.
Maintenance
- Cleaning: Use a soft, dry cloth to clean the KVM switch. Avoid liquid cleaners or abrasive materials.
- Ventilation: Ensure the KVM switch is placed in a well-ventilated area to prevent overheating. Do not block any ventilation openings.
- Cable Management: Keep cables organized and free from kinks or excessive bends to prevent damage and ensure stable connections.
- Power Supply: Use only the provided power cable or a compatible 5V adapter.
Warranty and Support
For warranty information or technical support, please refer to the contact details provided with your purchase or visit the official Camgeet website. Keep your purchase receipt for warranty claims.


