1. Introduction
This manual provides essential instructions for the safe and efficient operation of your SolaMr CM120A MPPT Solar Charge Controller. Please read this manual thoroughly before installation and use to ensure proper functionality and longevity of the product. This controller is designed to optimize power harvesting from solar panels and manage battery charging for 12V, 24V, 36V, and 48V systems, supporting various battery types including Gel, Sealed, Flooded, and Lithium (LiFePO4).

Figure 1: SolaMr CM120A MPPT Solar Charge Controller.
2. Safety Instructions
Always observe the following safety precautions during installation and operation:
- Ensure all connections are correct and secure before applying power.
- Do not disassemble or attempt to repair the controller yourself. Contact qualified personnel for service.
- Install the controller in a well-ventilated area, away from flammable materials and direct sunlight.
- Wear appropriate personal protective equipment (PPE) such as gloves and eye protection during installation.
- Ensure the battery bank is properly fused and protected.
- High voltages can be present at the solar panel input terminals; exercise extreme caution.

Figure 2: The controller features an 8-in-1 protection system for enhanced safety.
3. Product Features
The SolaMr CM120A MPPT Solar Charge Controller offers advanced features for efficient solar power management:
- High Efficiency MPPT Tracking: Achieves up to 99.9% tracking efficiency, boosting energy utilization by 25%-30% compared to traditional PWM controllers.
- Automatic System Voltage Recognition: Automatically detects 12V, 24V, 36V, or 48V system voltage.
- Versatile Battery Compatibility: Supports 5 battery modes (USER, FLD, GEL, SLD, Li) for Gel, Sealed, Flooded, and Lithium (LiFePO4) batteries. Customizable charging parameters for USER/Li modes.
- Comprehensive Protection System: Includes 8 protection functions: Short Circuit, Over Discharge, Overcharge, Overcurrent, Open Circuit, Reverse Connection, Over Temperature, and TVS lightning protection.
- Rugged Design: Operates reliably in temperatures from -10℃ to +65℃, featuring a robust metal casing and dual high-speed fans for heat dissipation.
- Clear LCD Display: Provides real-time data, battery status, and fault alerts for easy monitoring and troubleshooting.
- Smart Load Management: Offers 3 working modes: Light Control (auto on/off), 24H Always-On, and Manual mode, with Low Voltage Disconnect protection.
- 0V Lithium Battery Activation: Supports activation of 0V lithium batteries.

Figure 3: Key features including 99% efficiency, IP21 waterproof rating, and low no-load loss.
4. Product Overview
The SolaMr CM120A controller is designed for ease of use and durability. Below are diagrams illustrating its physical dimensions and internal structure.
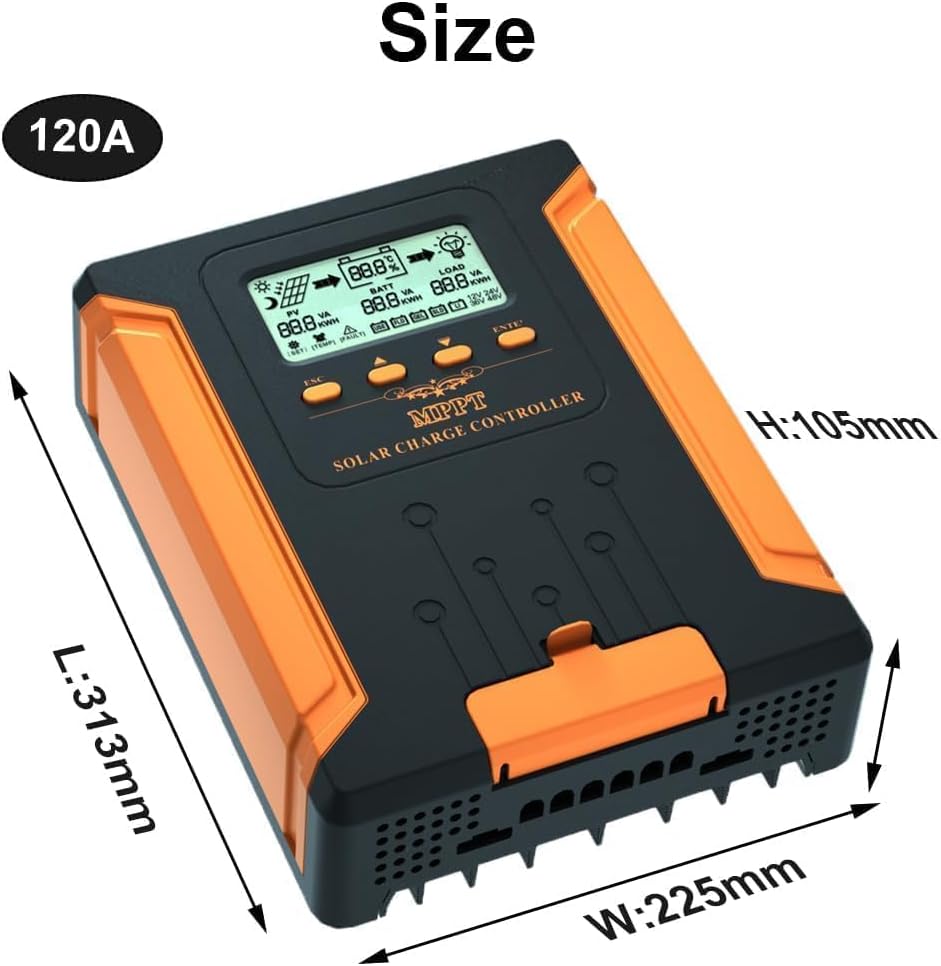
Figure 4: Dimensions of the CM120A controller (L: 313mm, W: 225mm, H: 105mm).

Figure 5: Exploded view showing the internal components and robust construction.
5. Setup and Installation
Follow these steps for proper installation of your SolaMr CM120A MPPT Solar Charge Controller:
- Mounting: Choose a suitable location for mounting the controller. Ensure it is a dry, well-ventilated area, protected from direct sunlight and moisture. Leave adequate space around the controller for air circulation and heat dissipation.
- Wiring the Battery: Connect the battery to the controller first. Ensure correct polarity (+ to + and - to -). This step is crucial for the controller to detect the system voltage.
- Wiring Solar Panels: Connect the solar panels to the controller. Ensure correct polarity. Do not exceed the maximum open circuit voltage (Voc) or maximum input power specified in the technical parameters.
- Connecting the Load: Connect your DC loads to the load terminals of the controller. Ensure correct polarity. The load output is protected by the controller's internal circuitry.
Always connect the battery first, then the solar panels, and finally the load. Disconnect in the reverse order.

Figure 6: Step-by-step wiring diagram for battery, solar panels, and load connections.
6. Operating Instructions
Once installed, the controller will automatically detect the system voltage and begin charging. The LCD screen provides real-time system status.
6.1 LCD Display Interface
The LCD displays various parameters including PV voltage, battery voltage, load current, charging status, and fault indicators.

Figure 7: Detailed view of the LCD main interface, showing icons for PV, battery, load, and various parameters.
6.2 Button Functions
The controller features four buttons for navigation and settings adjustment:
- ESC: Main interface page up parameters; parameters are added upwards in setup mode.
- Load Switch: Manual switch for load output; exits settings interface.
- Enter/Set: Main interface page look down parameters; setting up mode parameters.
- Confirm/Save: Enters settings/confirms/saves changes. Exits setup after 10 seconds of no key operation.

Figure 8: Illustration of the controller's buttons and their respective functions.
7. Battery Modes and Settings
The controller supports various battery types and allows for custom parameter settings.
7.1 Supported Battery Types
The CM120A automatically recognizes system voltage and supports the following battery types:
- FLD: Flooded batteries
- GEL: Gel batteries
- SLD: Sealed (AGM) batteries
- Li: Lithium (LiFePO4) batteries
- USER: User-defined settings for custom battery types.
In USER and Li modes, you can customize charging parameters such as Floating Voltage for optimal battery health. Refer to your battery manufacturer's specifications for recommended settings.

Figure 9: Supported battery types and the smart 4-stage charging process (Boost, Bulk, Floating, Equalize).
8. Load Management
The controller offers intelligent load management with three distinct working modes:
- Light Control (01H-23H): The load automatically turns on at dusk and off at dawn. The 'H' value sets the duration the load remains on after dusk.
- 24H Always-On: The load output is continuously active (24 hours).
- Manual Mode (0H): The load can be manually switched on or off using the Load Switch button on the controller.
The controller also includes Low Voltage Disconnect (LVD) protection to safeguard your battery from over-discharge when powering loads.
9. Maintenance
Regular maintenance ensures optimal performance and extends the lifespan of your solar charge controller:
- Inspect Connections: Periodically check all wiring connections for tightness and corrosion. Loose connections can cause overheating and damage.
- Clean the Controller: Keep the controller clean and free from dust and debris. Ensure the cooling fans and vents are unobstructed to maintain proper heat dissipation.
- Check for Damage: Inspect the controller for any physical damage, such as cracks or loose parts.
- Monitor Performance: Regularly check the LCD display for normal operation and any fault indicators.
- Battery Inspection: Ensure batteries are well-maintained according to their manufacturer's guidelines.
10. Troubleshooting
This section provides solutions to common issues you might encounter.
| Problem | Possible Cause | Solution |
|---|---|---|
| Controller not powering on | Battery not connected or low voltage; reverse polarity. | Ensure battery is connected first with correct polarity and sufficient voltage. |
| No charging current | Solar panels not connected; low sunlight; PV reverse polarity; PV voltage too low/high. | Check solar panel connections and polarity. Verify adequate sunlight. Ensure PV voltage is within controller's operating range. |
| Load not working | Load output disabled; battery low voltage disconnect (LVD); load reverse polarity. | Check load settings (manual/auto). Ensure battery voltage is above LVD. Verify load connections and polarity. |
| Over-temperature warning | Poor ventilation; overloaded controller. | Ensure adequate airflow around the controller. Reduce load or solar input if consistently overheating. |
11. Specifications
Technical specifications for the SolaMr CM120A MPPT Solar Charge Controller:
| Parameter | Value (CM120A) |
|---|---|
| System Voltage | 12V/24V/36V/48V Auto |
| Max. Solar Input Voltage | 180V (25℃), 150V (-25℃) |
| Battery Voltage Range | 9-64V |
| Max. Power Point Voltage Range | Battery voltage +2V ~ 150V |
| Rated Charging Current | 120A |
| Rated Load Current | 40A |
| Max. Photovoltaic System Input Power | 12V: 1440W; 24V: 2880W; 36V: 4320W; 48V: 5760W |
| Conversion Efficiency | ≤98% |
| MPPT Tracking Efficiency | >99% |
| Temperature Compensation Factor | -2mV/℃/2V (default) |
| Operating Temperature | -10℃ to +65℃ |
| Waterproof Level | IP21 |
| No-load Loss | ≤0.4W |
| Dimensions (L x W x H) | 313mm x 225mm x 105mm |
| Item Weight | 7 pounds |
12. Warranty and Support
SolaMr stands behind the quality of its products. For any questions regarding your charge controller, system sizing, wiring, or troubleshooting, please contact our professional after-sales support team. We are committed to providing prompt assistance and ensuring your satisfaction.
Please refer to your purchase documentation for specific warranty terms and conditions. For support, visit the official SolaMr store or contact customer service through your retailer.
Video 1: An overview of the SolaMr MPPT Solar Charge Controller, demonstrating its features and benefits.
Video 2: A demonstration of the controller's functionality and user interface.
Video 3: Detailed explanation of the installation process and wiring connections.