
Introduction
This manual provides detailed instructions for the assembly, setup, operation, and maintenance of your Aheaplus 67-inch Tall Bar Cabinet. Please read this manual thoroughly before assembly and use to ensure proper function and safety. Keep this manual for future reference.
Safety Information
WARNING:
- Ensure the cabinet is properly installed and secured to avoid tipping. Anti-toppling fittings are included and must be used.
- Do not exceed the weight capacity of the shelves. Refer to the specifications section for details.
- Keep electrical appliances away from water to prevent electric shock.
- Always unplug the power strip before cleaning or performing any maintenance.
- Do not allow children to climb on or play with the cabinet.
Package Contents
Before beginning assembly, verify that all parts listed below are present and undamaged. If any parts are missing or damaged, contact Aheaplus customer support.
- All cabinet panels (MDF board)
- Metal frame components
- Hardware kit (screws, dowels, cam locks, etc.)
- Power strip with 3 AC outlets and 2 USB ports
- LED light strip with remote control
- Wine glass holders
- Adjustable leg pads
- Anti-toppling fittings
- Assembly tools (e.g., Allen wrench)

Figure 1: Fully assembled Aheaplus Bar Cabinet, showcasing its design and features.
Assembly Instructions
Assembly typically requires two people and can take several hours. Follow the numbered steps carefully. Do not overtighten screws.
- Unpack and Identify Parts: Lay out all components on a clean, soft surface to prevent scratches. Identify each part using the provided labels and the parts list.
- Assemble Base Frame: Connect the metal frame components for the base cabinet using the designated screws. Ensure all connections are secure.
- Attach Side Panels: Secure the side panels of the lower cabinet to the assembled base frame.
- Install Back Panel: Fasten the back panel to the lower cabinet structure.
- Insert Adjustable Shelves: Place the adjustable shelves into the lower cabinet. Adjust their height as desired.
- Attach Doors: Mount the cabinet doors to the lower cabinet using the provided hinges. Ensure they open and close smoothly.
- Assemble Upper Hutch Frame: Construct the metal frame for the upper hutch, similar to the base frame.
- Attach Upper Hutch Panels: Secure the panels for the upper hutch to its frame.
- Install Upper Shelves: Place the open shelves in the upper hutch.
- Mount Wine Glass Holders: Attach the wine glass holders to the underside of the top shelf in the upper hutch.
- Connect Upper Hutch to Base: Carefully lift and secure the assembled upper hutch onto the lower cabinet. Use the specified connectors to ensure stability.
- Install Power Strip: Integrate the power strip into the designated slot on the countertop or shelf. Ensure the cable is routed safely.
- Attach LED Lights: Adhere the LED light strip to the desired location, typically under shelves or along the top frame.
- Install Adjustable Leg Pads: Screw the adjustable leg pads into the bottom of the cabinet legs. Adjust them to level the cabinet on uneven floors.
- Secure Anti-Toppling Fittings: Attach the anti-toppling hardware to the top rear of the cabinet and secure it to a wall stud using appropriate wall anchors. This step is critical for safety.

Figure 2: Illustration of the adjustable storage shelves, highlighting flexibility for various items.
Setup
- Placement: Choose a stable, level surface for the cabinet. Ensure it is not in a high-traffic area where it could be easily bumped.
- Leveling: Use the adjustable leg pads to ensure the cabinet is perfectly level. This prevents wobbling and ensures doors close properly.
- Power Connection: Plug the cabinet's power cord (6.56 ft long) into a standard wall outlet.
- Anti-Toppling Securement: Double-check that the anti-toppling fittings are securely anchored to the wall.
Operating Instructions
Power Outlets and USB Ports

Figure 3: Close-up view of the integrated power strip with AC outlets and USB ports.
- The cabinet is equipped with 3 AC outlets (120V/12A) and 2 USB ports (5V/2A).
- Plug in small kitchen appliances like coffee makers, juicers, or microwave ovens into the AC outlets.
- Use the USB ports to charge mobile devices or other USB-powered accessories.
- Do not overload the power strip. Refer to the maximum wattage rating if available.
LED Lights Operation

Figure 4: The bar cabinet illuminated by RGB LED lights, demonstrating various color and mode options.
- The built-in RGB LED lights offer over 60,000 colors and multiple flashing modes.
- Control the lights using the provided remote control or a compatible smartphone application (if applicable, check product packaging for app details).
- Music Sync Function: The LED lights can change color with the rhythm of sound and music. Activate this feature via the remote or app.
- Timing Function: Set timers for the lights to turn on or off automatically.
Maintenance
- Cleaning: Wipe surfaces with a soft, damp cloth. Avoid harsh chemicals or abrasive cleaners that could damage the finish.
- Dusting: Regularly dust the cabinet to prevent buildup.
- Hardware Check: Periodically check all screws and connections to ensure they remain tight. Retighten if necessary.
- Electrical Components: Ensure the power strip and LED lights are free from dust and debris. Do not attempt to repair electrical components yourself.
Troubleshooting
| Problem | Possible Cause | Solution |
|---|---|---|
| Cabinet is wobbly. | Uneven floor; loose leg pads or connections. | Adjust the leg pads until stable. Check and tighten all assembly screws. |
| LED lights not working. | Not plugged in; remote battery dead; loose connection. | Ensure the power cord is plugged in. Check remote battery. Verify LED strip connection to power source. |
| Power outlets not working. | Not plugged in; circuit breaker tripped; overloaded. | Ensure the main power cord is plugged in. Check your home's circuit breaker. Reduce the number of devices plugged in. |
| Doors do not close properly. | Cabinet is not level; hinges are misaligned. | Level the cabinet using adjustable leg pads. Adjust door hinges as needed. |
Specifications
- Brand: Aheaplus
- Model: AHEAPLUS-67-TALL-WINE-BAR-CAB-12e42a6c1c
- Color: Black
- Dimensions (L x W x H): 26.9"D x 15.7"W x 66.9"H
- Material: High-quality MDF board, rugged metal frame
- Number of Shelves: 4 (adjustable)
- Power Outlets: 3 AC Outlets (120V/12A)
- USB Ports: 2 USB Ports (5V/2A)
- Power Cord Length: 6.56 ft
- LED Lights: RGB, over 60,000 colors, multiple modes, music sync, timing function
- Special Features: Built-in USB Outlet, LED Light, Adjustable Feet, Wine Glass Holders, Anti-toppling fittings
- Assembly Required: Yes

Figure 5: Detailed product dimensions for the Aheaplus Bar Cabinet.
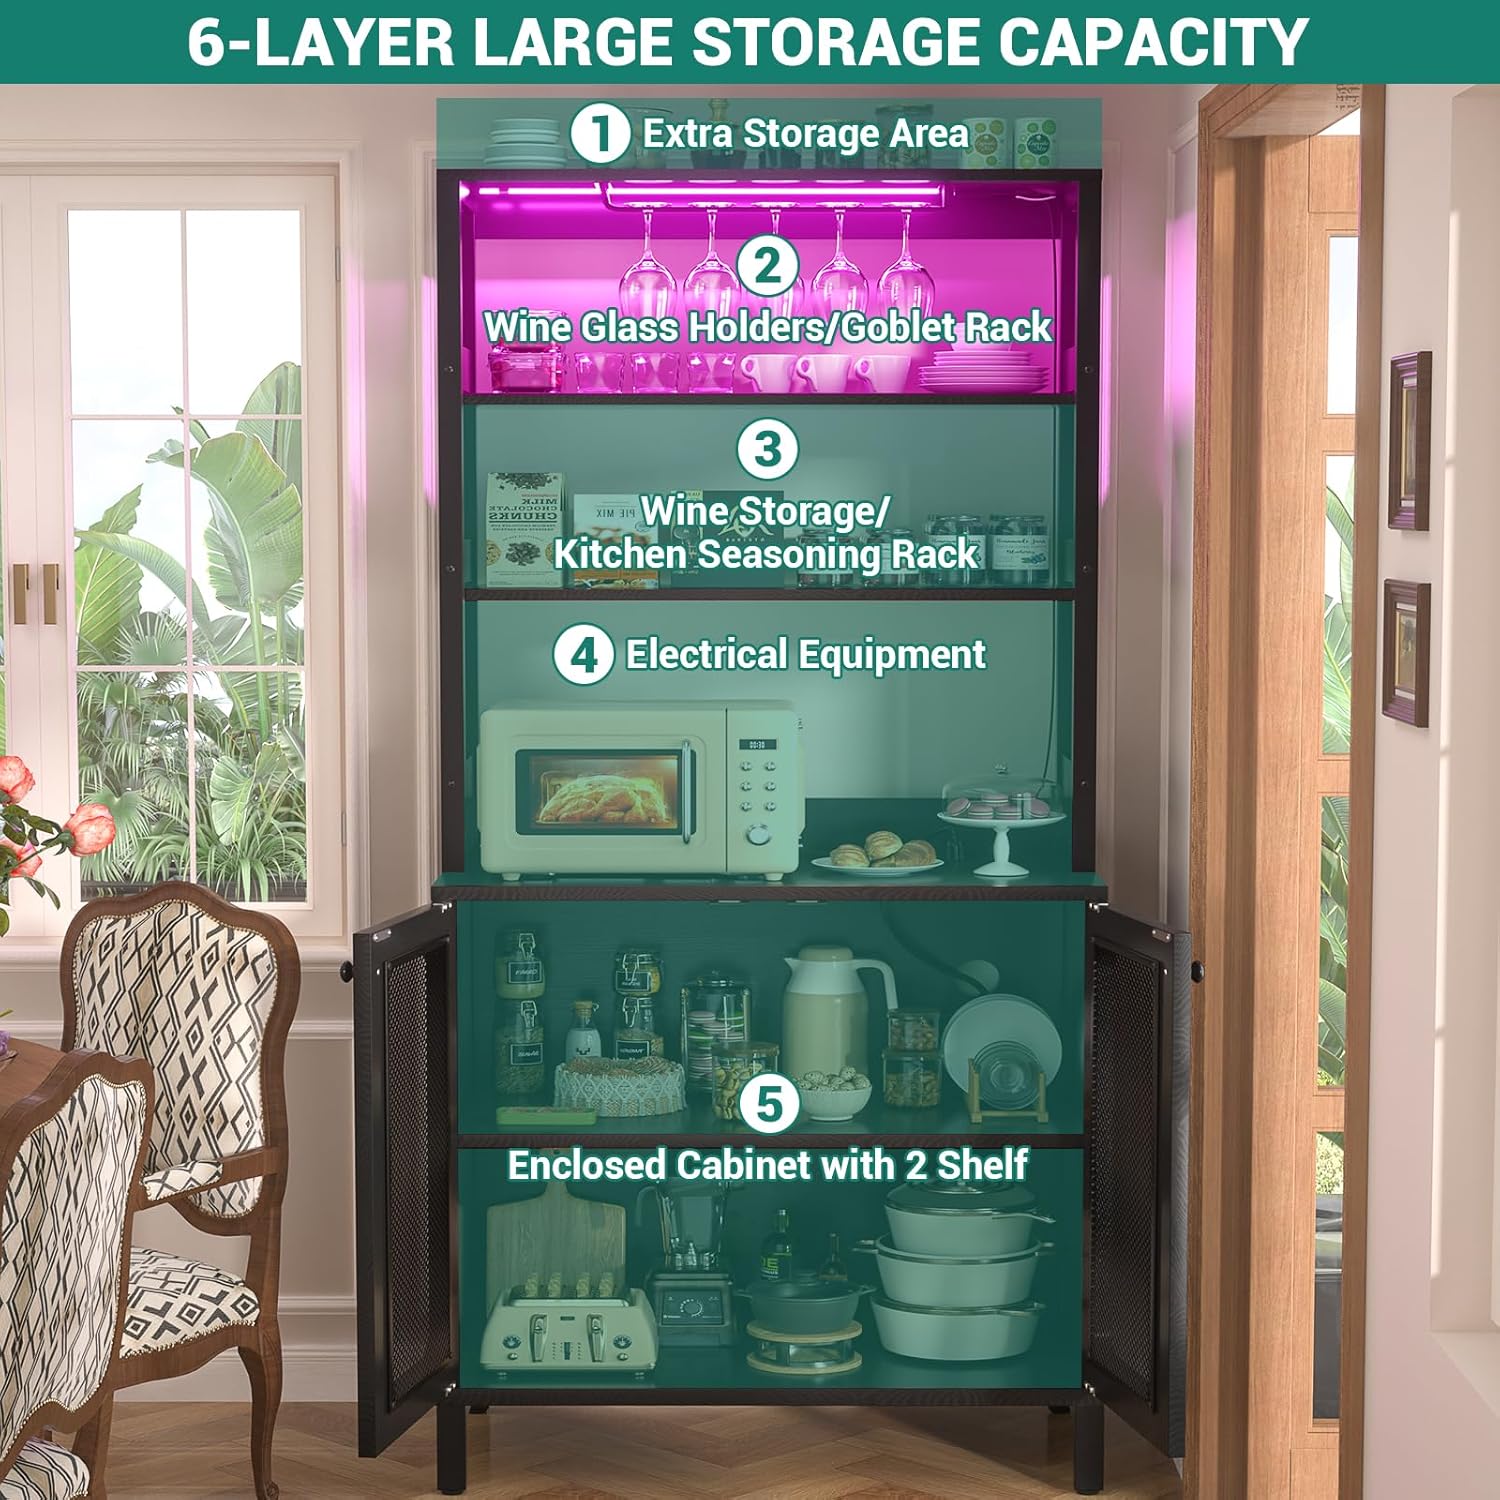
Figure 6: Diagram illustrating the 6-layer storage capacity and organization of the cabinet.
Warranty and Support
Aheaplus products are designed for quality and durability. For any questions, missing parts, or issues not covered in this manual, please contact Aheaplus customer support. Please have your model number and purchase information ready when contacting support.
For more information, visit the Aheaplus Store on Amazon.