
StarTech.com P2CDD143-KVM-SWITCH
Contents
StarTech 2-Port Dual DP 1.4 KVM Switch User Manual
Model: P2CDD143-KVM-SWITCH
1. Introduction
This manual provides instructions for the installation, operation, and maintenance of the StarTech 2-Port Dual DisplayPort 1.4 KVM Switch. This device allows users to control two USB and DisplayPort-enabled computers from a single console, sharing dual 8K 60Hz or 4K 144Hz DisplayPort monitors, a keyboard, mouse, and two USB 10Gbps devices. It is designed for environments requiring high-resolution graphics and efficient workstation management.
2. Product Overview
2.1 Package Contents
- 1 x KVM Switch
- 2 x USB-C to USB-A 10Gbps Cables
- 1 x Power Adapter
- 1 x Set of Rubber Feet
- 1 x Instruction Manual

Figure 1: KVM Switch and included accessories, including power adapter, USB-C to USB-A cables, and rubber feet.
2.2 KVM Switch Features
- Dual 8K 60Hz DisplayPort 1.4 Support: Connect two DisplayPort 1.4 monitors with resolutions up to 8K (7680x4320) at 60Hz, or 4K (3840x2160) at 144Hz/120Hz. Supports HDR (up to 10-bit YCbCr 4:4:4). DSC (Display Stream Compression) may be required for maximum performance.
- USB 3.2 Gen 2 (10Gbps) Ports: Two USB 3.2 Gen 2 hub ports enable fast data transfer for external storage devices, ideal for large files or high-resolution media editing.
- USB Emulation Technology: Ensures fast and compatible switching of up to four USB HID devices (keyboard, mouse, and two additional USB peripherals) between connected computers.
- Multiple Switching Options: Switch between computers using front panel push-buttons or hotkeys.
- Independent Audio Switching: Hotkeys allow for independent switching of audio, enabling audio playback from one computer while controlling the other.
- Durable Design: Features a steel housing to prevent Electro-Magnetic Interference (EMI) and enhance stability. Includes 8kV Air/6kV Contact ESD protection.
2.3 KVM Switch Layout

Figure 2: Front and rear view of the KVM Switch, showing all ports and controls.
Front Panel

Figure 3: Front panel with PC selection buttons, status LEDs, HID port, and USB-A 10Gbps port.
- PC 1 / PC 2 Buttons: Press to switch control to the corresponding computer.
- PC 1 / PC 2 LEDs: Indicate the currently selected computer.
- HID Port: Connect your keyboard or mouse.
- USB-A 10Gbps Port: Connect high-speed USB peripherals.
Rear Panel
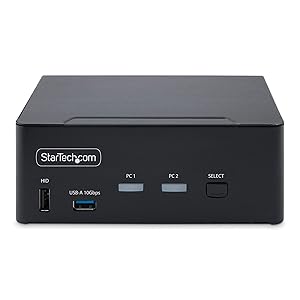
Figure 4: Rear panel with power input, console ports, PC input ports, and USB-C 10Gbps ports.
- DC 9-12V Power Input: Connect the included power adapter.
- Console DisplayPort (A/B): Connect your primary and secondary DisplayPort monitors.
- Console USB HID Ports: Connect your keyboard and mouse.
- Console Audio Ports (Headphone/Microphone): Connect your audio devices.
- PC 1 / PC 2 DisplayPort (A/B): Connect DisplayPort outputs from your computers.
- PC 1 / PC 2 USB-C 10Gbps Ports: Connect to your computers' USB-C or USB-A ports using the provided cables for USB and audio signals.
- PC 1 / PC 2 Audio Ports (Headphone/Microphone): Connect to your computers' audio outputs/inputs.
3. Setup Instructions
Follow these steps to set up your KVM switch:
- Power Off Devices: Ensure all computers and monitors are powered off before making any connections.
- Connect Monitors to KVM Console: Connect your two DisplayPort monitors to the KVM's "CONSOLE MONITOR A" and "CONSOLE MONITOR B" ports.
- Connect Keyboard and Mouse: Connect your keyboard and mouse to the KVM's "CONSOLE HID" USB ports.
- Connect Audio Devices (Optional): If using external speakers or a microphone, connect them to the KVM's "CONSOLE" audio ports.
- Connect Computers to KVM:
- For PC 1: Connect its DisplayPort outputs to the KVM's "PC 1 MONITOR A" and "PC 1 MONITOR B" ports. Connect a USB-C to USB-A 10Gbps cable from PC 1's USB port to the KVM's "PC 1 USB-C 10Gbps" port. If using audio, connect PC 1's audio output/input to the KVM's "PC 1" audio ports.
- For PC 2: Repeat the above steps, connecting its DisplayPort outputs to "PC 2 MONITOR A" and "PC 2 MONITOR B", its USB port to "PC 2 USB-C 10Gbps", and its audio ports to "PC 2" audio ports.
- Connect USB Peripherals (Optional): Connect any additional USB 3.2 Gen 2 devices (e.g., external hard drives) to the KVM's front panel "USB-A 10Gbps" port.
- Connect Power Adapter: Connect the included power adapter to the KVM's "DC 9-12V" input and then to a power outlet.
- Power On: Power on the KVM switch, then your monitors, and finally your computers.
4. Operating Instructions
4.1 Switching Between Computers
You can switch between connected computers using either the front panel push-buttons or hotkey commands.
Front Panel Switching
Press the PC 1 or PC 2 button on the front panel of the KVM switch to select the desired computer. The corresponding LED will illuminate to indicate the active computer.
Hotkey Switching
Hotkey commands allow for quick switching without reaching for the KVM. All hotkey sequences begin with two presses of the Scroll Lock key.
| Hotkey Command | Function |
|---|---|
| Scroll Lock, Scroll Lock, 1 | Switch to PC 1 |
| Scroll Lock, Scroll Lock, 2 | Switch to PC 2 |
| Scroll Lock, Scroll Lock, A | Toggle audio independently (if supported) |
| Scroll Lock, Scroll Lock, B | Enable/Disable audible buzzer confirmation |
An audible buzzer confirms hotkey input. LEDs on the front panel provide visual status of the selected host.
5. Maintenance
To ensure optimal performance and longevity of your KVM switch, follow these maintenance guidelines:
- Cleaning: Use a soft, dry cloth to clean the exterior of the device. Avoid using liquid cleaners or solvents, as they may damage the finish or internal components.
- Ventilation: Ensure the KVM switch is placed in a well-ventilated area to prevent overheating. Do not block any ventilation openings.
- Cable Management: Keep cables organized and free from kinks or excessive bends to prevent signal degradation or damage.
- Environmental Conditions: Operate the device within the specified temperature and humidity ranges (refer to Specifications section).
6. Troubleshooting
If you encounter issues with your KVM switch, refer to the following common problems and solutions:
| Problem | Possible Solution |
|---|---|
| No video output on monitors. |
|
| Keyboard or mouse not responding. |
|
| USB 3.2 devices not detected or slow. |
|
| Audio issues (no sound, distorted audio). |
|
7. Specifications
| Feature | Detail |
|---|---|
| Model | P2CDD143-KVM-SWITCH |
| Brand | StarTech.com |
| Video Interface | DisplayPort 1.4 |
| Max Resolution (Dual) | 8K (7680x4320) @ 60Hz, 4K (3840x2160) @ 144Hz/120Hz |
| USB Hub Ports | 2 x USB 3.2 Gen 2 (10Gbps) |
| USB HID Ports | 4 (for keyboard, mouse, and 2 additional USB peripherals) |
| Audio | 3.5mm Headphone/Microphone |
| Switching Methods | Push-button, Hotkeys |
| Material | Steel |
| Dimensions (L x W x H) | 6.3 x 3.9 x 2.4 inches (16 x 9.9 x 6.1 cm) |
| Item Weight | 1.7 pounds (0.77 kg) |
| Operating Voltage | 12 volts |
| Upper Temperature Rating | 40 °C (104 °F) |
| ESD Protection | 8kV Air / 6kV Contact |
| Compliance | TAA Compliant, RoHS |
| UPC | 065030907712 |
8. Warranty and Support
This StarTech.com product is backed by a 2-year warranty. Additionally, free lifetime 24/5 multi-lingual technical assistance is available to support you with any questions or issues you may encounter.
For further assistance, please visit the official StarTech.com support website or contact their technical support team.
Ask a question about this manual
Ask about setup, troubleshooting, compatibility, parts, safety, or missing instructions. Manuals+ will review the question and use this page’s manual context to help answer it.