1. Introduction
This manual provides detailed instructions for the safe and effective use of your FIRElood LH55-3-3 Wood Burner Kit. Please read all instructions carefully before operation and retain this manual for future reference.
2. Product Components
The FIRElood LH55-3-3 Wood Burner Kit includes the following items:
- Wood burning machine (main engine)
- Three wood burning pens with different functional characteristics:
- One pen with 30 wire nibs (quick heating in 3 seconds)
- One fine wood burning pen with 3 solid copper nibs (quick heating in 1 minute)
- One traditional wood burning pen with 4 solid copper nibs (heating in 3-5 minutes)
- 37 pyrography pen heads (various tips)
- Pen holder
- Screwdriver
- Stainless steel tweezers
- Sponge (for cleaning pen heads, must be soaked in water before use)
- Small wooden board (for practice)
- Carving pen (for scraping dark parts or increasing brightness)

Figure 1: Overview of the FIRElood LH55-3-3 Wood Burner Kit components.
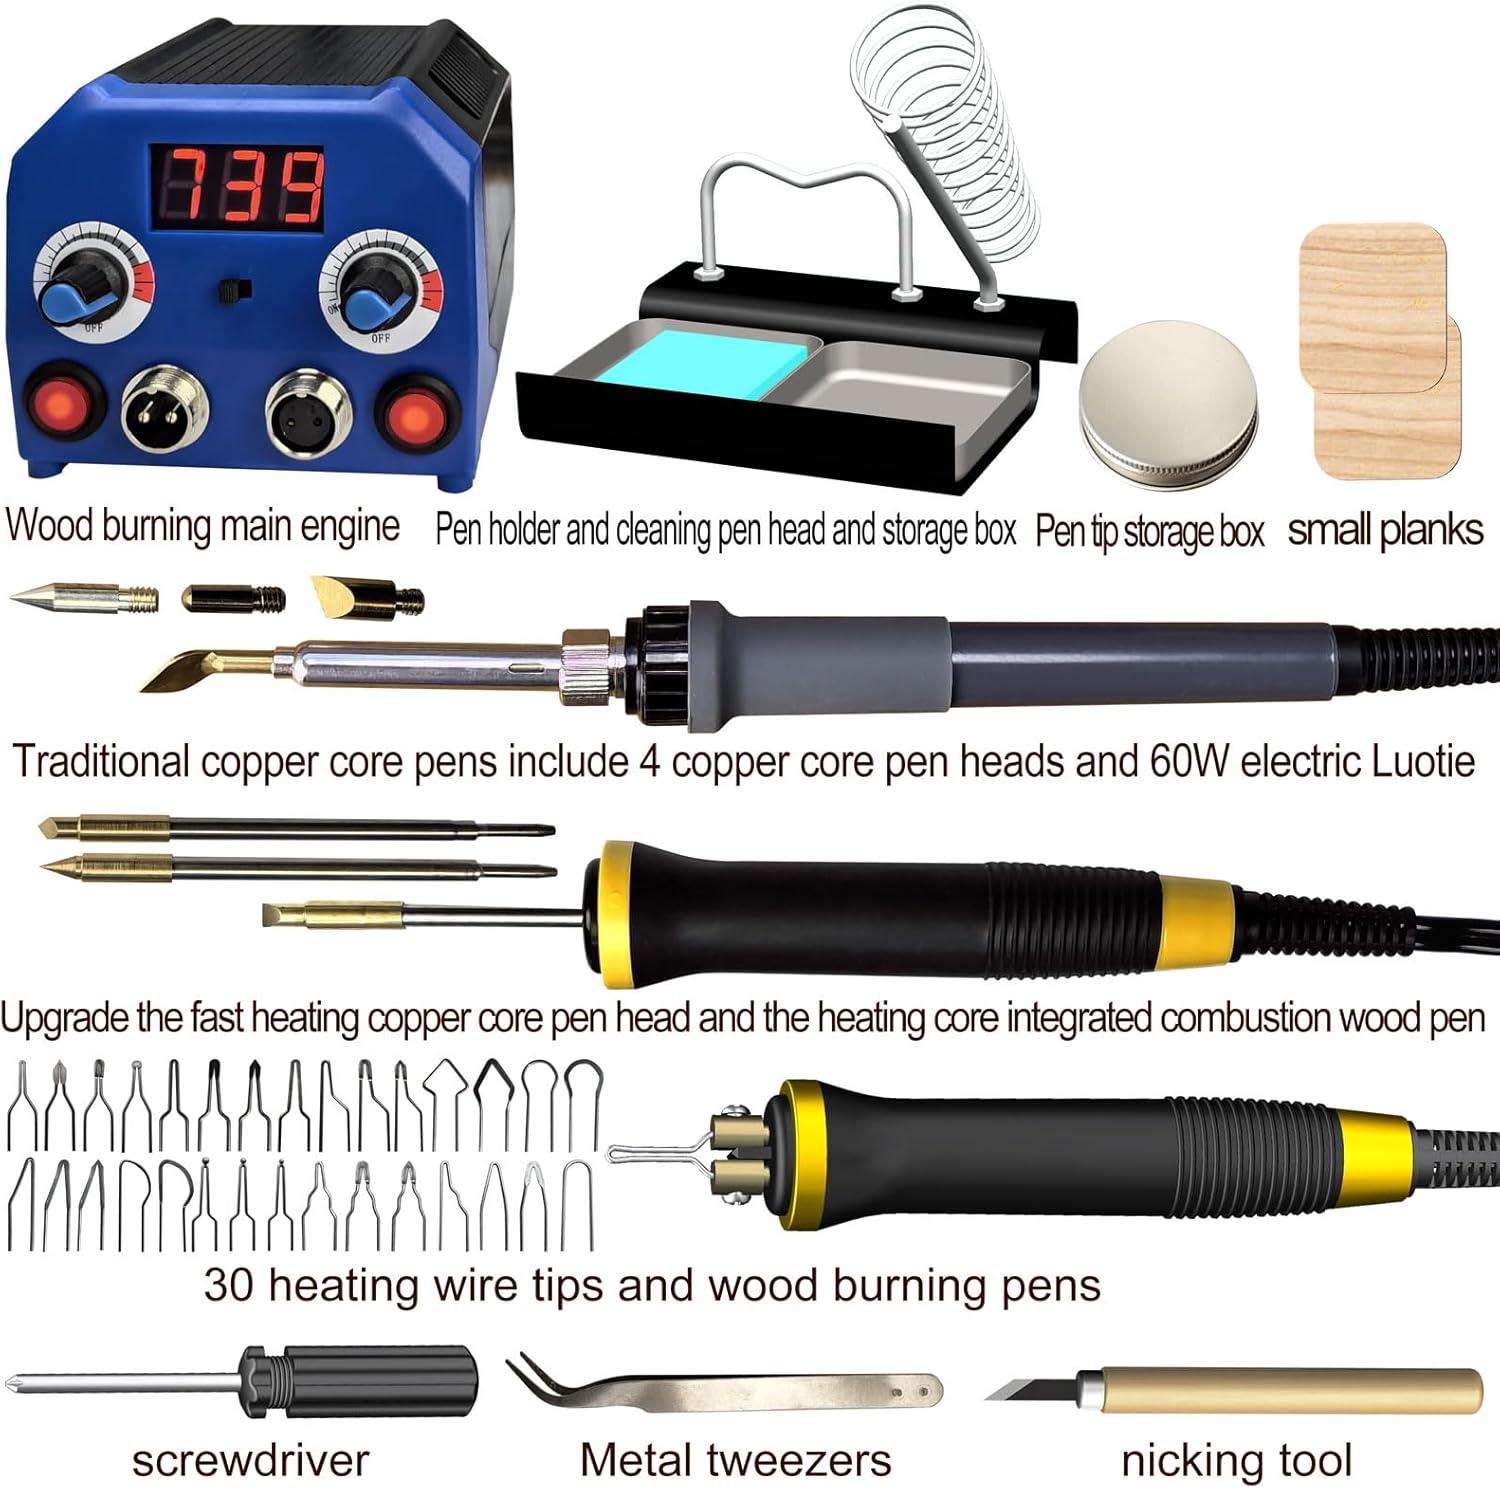
Figure 2: Detailed view of the wood burning machine, pen holder, and different types of pen tips included in the kit.
3. Setup Instructions
- Unpack Components: Carefully remove all items from the packaging and verify against the component list above.
- Place the Machine: Position the wood burning machine on a stable, heat-resistant surface. Ensure adequate ventilation.
- Assemble Pen Holder: Assemble the pen holder as shown in the diagram. The pen holder provides a safe place to rest hot pens.
- Connect Pens: The machine features dual output ports (A and B) for independent pen control. Connect your desired wood burning pens to the corresponding ports.

Figure 3: The pyrography machine's dual output ports (A and B) for connecting pens.
- Insert Pen Tips: Select the appropriate pen tip for your project and carefully insert it into the pen. Use the provided screwdriver for wire nibs if necessary. Ensure tips are securely fastened.
- Power Connection: Plug the power cord into a standard 110V AC outlet.
4. Operating Instructions
- Power On: Turn on the main power switch. The digital display will show the current temperature.
- Temperature Adjustment: Use the independent temperature adjustment knobs for parts A and B to set the desired temperature. The temperature range is 200-750°C.
- Lower temperatures (200-400°C) are suitable for lighter shades and fine lines.
- Higher temperatures (400-750°C) are for darker shades and broader strokes.
- Using Multiple Pens: The machine supports simultaneous use of two pens. You can switch between pens or turn off unused pens using the independent toggle switches for parts A and B.
- Practice: Before working on your final project, practice on the provided small wooden board or scrap material to familiarize yourself with different tips and temperature settings.
- Pyrography Techniques:
- Adjust temperature and pressure for varying effects. Slower movement and higher pressure create darker burns.
- Use the carving pen to scrape away burnt areas for highlights or to correct mistakes.
- The 30 wire nibs heat up quickly for fast strokes, while solid copper tips offer more control for detailed shading.
Video 1: Demonstration of the FIRElood LH55-3-3 Wood Burner Kit in use, showcasing various pyrography techniques and tip changes.

Figure 4: Example of intricate pyrography artwork, demonstrating the capabilities of the wood burner kit.
5. Maintenance
- Cleaning Pen Tips: Regularly clean pen tips using the provided sponge. Ensure the sponge is soaked in water before use to prevent damage and effectively remove carbon buildup.
- Storage: Store the wood burner kit and accessories in a dry, safe place when not in use.
- Tip Replacement: When replacing pen tips, use the tweezers to carefully remove and insert new tips. Ensure the machine is off and cooled down before changing tips.
6. Troubleshooting
- Pen not heating: Check if the pen is securely plugged into the correct port (A or B) and if the corresponding switch is turned on. Verify the temperature setting.
- Uneven burning: Ensure the pen tip is clean. Adjust temperature and pressure evenly across the material. Practice on scrap material to refine technique.
- Machine not powering on: Check the power cord connection and ensure the outlet is functional.
7. Specifications
| Feature | Detail |
|---|---|
| Model Number | LH55-3-3 |
| Brand | FIRElood |
| Voltage | 110 Volts |
| Wattage | 100 Watt-hours |
| Temperature Range | 200-750 °C |
| Display Type | Digital |
| Material | ABS |
| Item Weight | 3.3 pounds |
| Product Dimensions | 4.33 x 3.94 x 3.3 inches |
8. Warranty and Support
The host machine comes with a one-year warranty. For any issues or support, please contact the manufacturer or your retailer.
9. Important Safeguards
- Always operate the wood burner in a well-ventilated area to avoid inhaling smoke.
- The pen tips become extremely hot. Avoid direct contact with skin or flammable materials.
- Always place hot pens in the designated pen holder.
- Unplug the machine when changing tips, cleaning, or not in use.
- Keep out of reach of children.
- Do not use the machine in a humid environment or near water.
- Ensure the power supply voltage matches the machine's requirements (110V).