1. Introduction
Thank you for choosing the Delta Stryke Mid-Height Matte Black Bathroom Faucet. This manual provides detailed instructions for the proper installation, operation, and maintenance of your new faucet. Please read all instructions carefully before beginning installation to ensure safe and correct operation.
The Delta Stryke Bath Collection radiates confidence and composure with its subtly upturned spout and handles. Featuring DIAMOND Seal Technology, this faucet is designed to perform like new for life by reducing leak points and lasting twice as long as the industry standard. WaterSense labeled, it uses at least 20% less water without compromising performance.
2. Safety Information
- Always turn off the water supply to the faucet before beginning any work.
- Wear safety glasses during installation to protect your eyes.
- Ensure all connections are secure to prevent leaks.
- If you are unsure about any part of the installation, consult a qualified plumber.
- This product complies with "lead-free" legislation and meets or exceeds applicable product performance and U.S. safety industry standards.
3. What's Included
Your Delta Stryke Faucet package includes the following components:
- Faucet assembly with integrated InnoFlex PEX supply lines
- Mounting hardware (bracket, nut)
- Plastic gasket
- Aerator wrench
- Installation instructions
Note: Drain assembly is not included. Purchase push pop drain assembly model RP101630 in the coordinating finish if needed.
4. Tools Required for Installation
Before you begin, ensure you have the following tools and supplies:
- Adjustable Wrench (2 recommended)
- Safety Glasses
- Towel (for cleanup)
- Pot or Bucket (for flushing lines)
- Flashlight (if working in a dark area)
- Plumber's Tape (if replacing the drain)
- Silicone Sealant (for uneven sink surfaces)
5. Installation Instructions
5.1. Prepare for Installation
- Turn off the water supply to the sink.
- Clear the area under the sink.
- Remove your old faucet if applicable.
5.2. Mounting the Faucet
The Delta Stryke Faucet is designed for a single-hole configuration. This model is designed for a single hole installation and does not require an escutcheon plate.
- Ensure the plastic gasket (smooth side down, ridge up) is properly positioned on the faucet's base, feeding the PEX supply lines through its center.
- Carefully feed the PEX supply lines and the mounting stud down through the center hole of your sink. Ensure the tag on the supply lines remains intact as it contains important product information.
- If your sink surface is rough or tiled, apply a thin ring of silicone sealant around the hole before placing the faucet to ensure a watertight seal.
- From underneath the sink, hand-tighten the mounting nut onto the mounting stud to hold the faucet upright.
- From above the sink, ensure the faucet is straight and centered. Once aligned, fully tighten the mounting nut from underneath the sink.
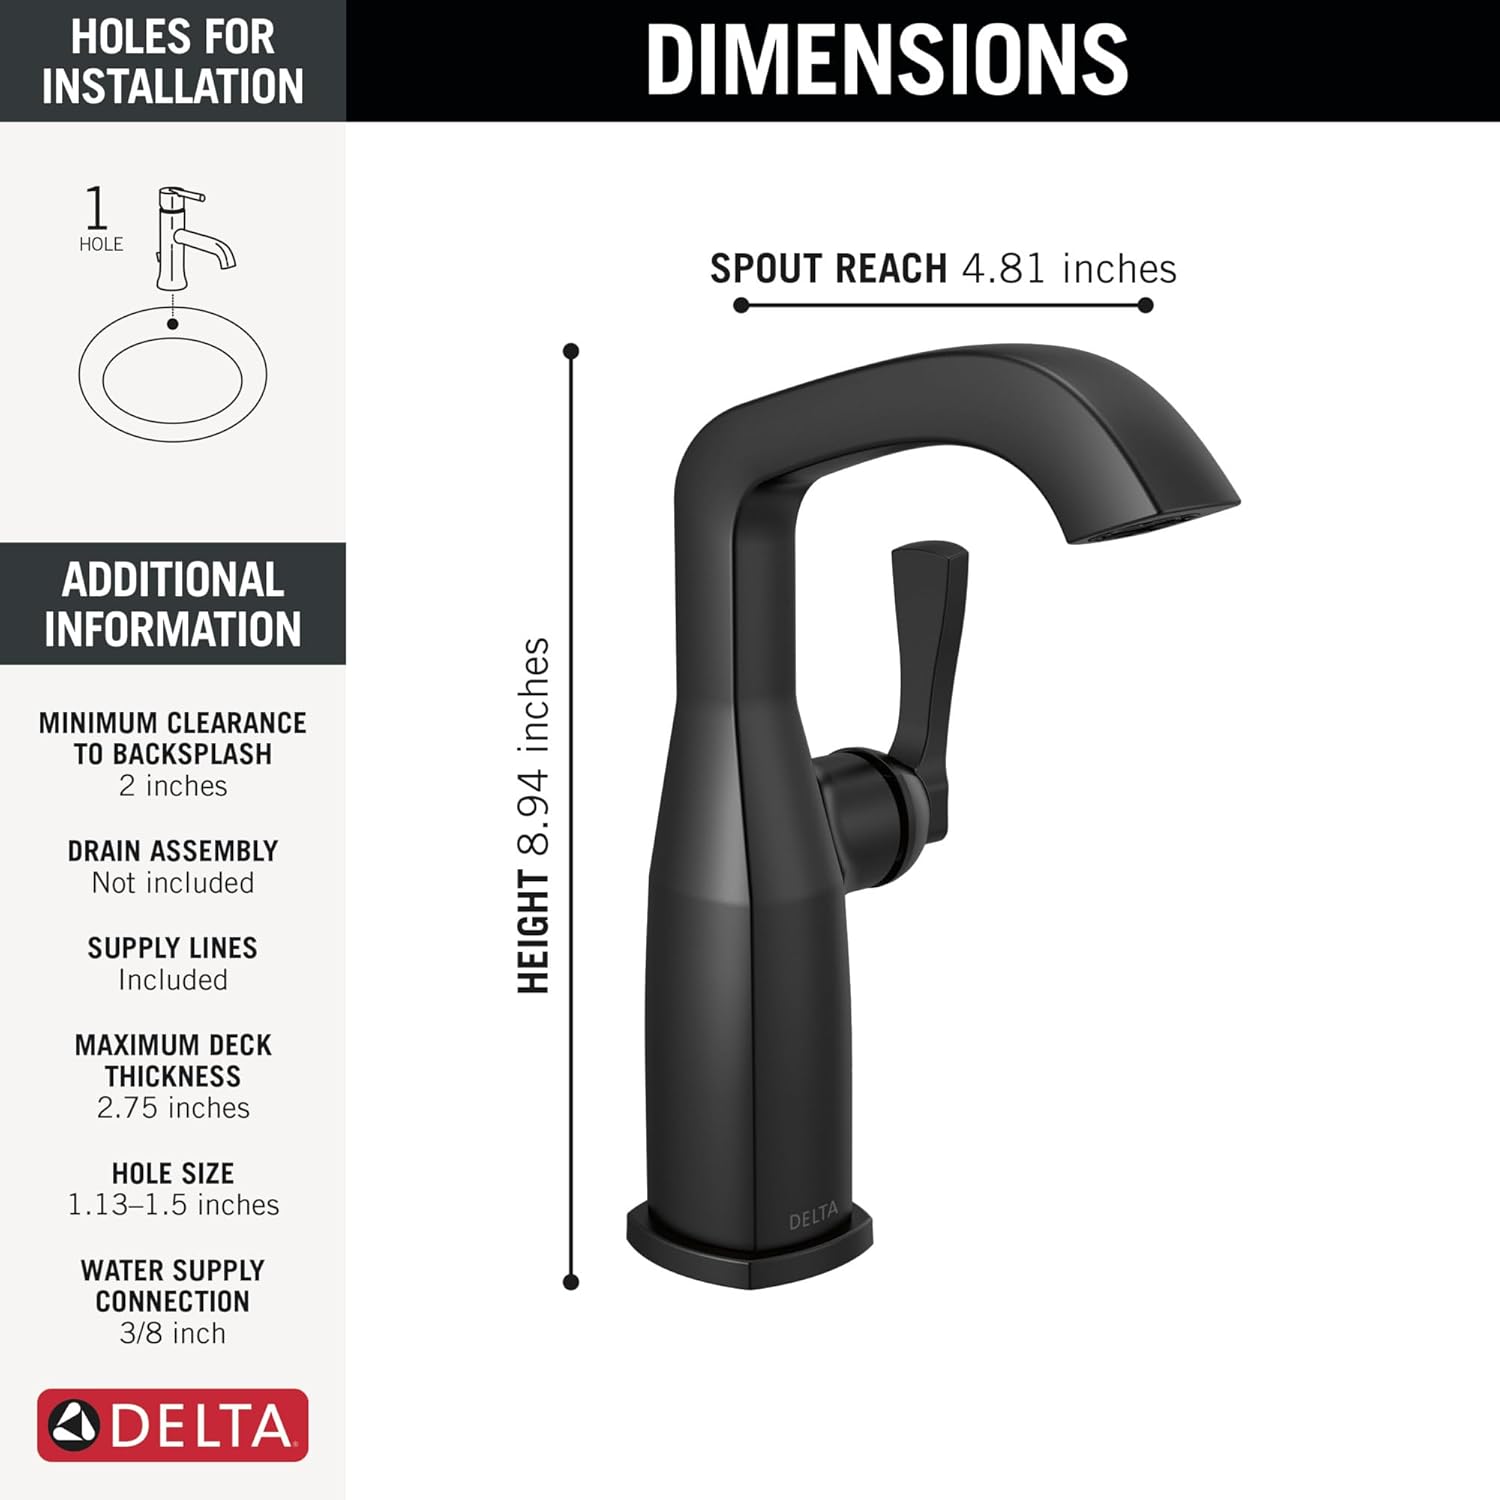
Figure 1: Faucet Dimensions and Installation Requirements. This image illustrates the faucet's height (8.94 inches) and spout reach (4.81 inches), along with installation details such as 1-hole requirement, minimum clearance to backsplash (2 inches), maximum deck thickness (2.75 inches), hole size (1.13-1.5 inches), and water supply connection (3/8 inch).

Figure 2: InnoFlex PEX Supply Lines. This image highlights the integrated InnoFlex PEX supply lines, designed to resist cracks, kinks, and corrosion, simplifying installation.
Video 1: How To Install Delta 1-Handle Bath Faucet. This video provides a step-by-step guide on installing a single-handle Delta bathroom faucet, covering mounting, connecting supply lines, and flushing the system.
5.3. Connecting Supply Lines
Delta has color-coded the supply lines for easy identification: red for hot water, blue for cold water.
- Connect the red-coded supply line to the hot water stub-out and the blue-coded supply line to the cold water stub-out.
- Hand-tighten the connections first.
- Use an adjustable wrench to tighten the connections. Turn the nut one full 360-degree rotation after hand-tightening to ensure a secure, leak-free connection.
- If supply lines are too long, loop them to prevent kinks, ensuring the loop is not tighter than 8 inches.
5.4. Flushing the Faucet
Flushing the lines removes any debris that may have entered during installation, which could otherwise restrict water flow.
- Locate the aerator wrench (included in your packaging).
- Use the aerator wrench to unscrew and remove the aerator cartridge from the underside of the faucet spout. Set it aside carefully.
- Place a washcloth over the end of the spout to minimize splashing.
- Turn the faucet handle to the full mixed position (equally hot and cold, typically directly in the middle and all the way up) to ensure water flows from both lines.
- Run water for approximately 30 seconds to flush out any debris.
- Turn off the water, then re-install the aerator cartridge using the aerator wrench. Ensure it is snug but do not overtighten.
- Check for any leaks around the faucet base and handle.
6. Operation
The Delta Stryke Faucet features a single handle for easy control of water temperature and flow.
- Water Flow: Lift the handle to increase water flow. Push down to decrease flow and turn off.
- Temperature Control: Move the handle to the left for hot water and to the right for cold water. The middle position provides a mix of hot and cold water.
Video 2: Delta Stryke 1-Handle Bathroom Faucet Overview. This video showcases the features and operation of the Delta Stryke single-handle bathroom faucet, including its design and water flow.
7. Maintenance
7.1. Cleaning the Faucet
The Delta Stryke Faucet features a durable finish designed to resist corrosion, tarnishing, and discoloration. For best results, clean regularly with a soft, damp cloth. Avoid abrasive cleaners, harsh chemicals, or polishes as these can damage the finish.
The Lumicoat finish repels liquids and resists water spots, making it easy to wipe clean without chemicals or cleaners.
7.2. Aerator Cleaning
If water flow becomes restricted, the aerator may need cleaning. Use the aerator wrench to remove the aerator, rinse any debris, and re-install.
8. Troubleshooting
| Problem | Possible Cause | Solution |
|---|---|---|
| Low water flow | Clogged aerator; debris in supply lines. | Clean or replace aerator. Flush supply lines as per installation instructions. |
| Leaks from faucet base | Loose mounting nut; improper gasket seating. | Tighten mounting nut. Ensure gasket is correctly seated. Apply silicone if necessary. |
| Leaks from supply line connections | Loose connections. | Tighten supply line connections with an adjustable wrench. |
| Water temperature issues | Incorrect hot/cold line connection; water heater issues. | Verify hot and cold lines are connected correctly. Check water heater settings. |
9. Specifications
| Feature | Detail |
|---|---|
| Model Number | 676-BL-DST |
| Brand | DELTA |
| Color | Matte Black |
| Material | Zinc (Metal) |
| Mounting Type | Deck Mount |
| Hole Count | 1 |
| Number of Handles | 1 |
| Maximum Flow Rate | 1.2 Gallons Per Minute |
| Product Dimensions | 4.38"D x 6.56"W x 8.94"H |
| Item Weight | 3.69 pounds |
| Special Feature | Lead Free, WaterSense Labeled |
10. Warranty Information
Delta Faucets are backed by a Lifetime Limited Warranty on both the faucet and its finish. This warranty ensures that your faucet will perform like new for life, thanks to the patented DIAMOND Seal Technology that reduces leak points and lasts twice as long as the industry standard.

Figure 3: Lifetime Limited Warranty Icon. This icon signifies the comprehensive lifetime limited warranty provided by Delta for their faucets and finishes.

Figure 4: DIAMOND Valve Technology. This diagram illustrates how the DIAMOND Valve eliminates wear on seals, ensuring leak-free operation for the life of the faucet, lasting 2x longer than the industry standard.
11. Customer Support
For any questions, assistance, or warranty claims, please contact Delta Customer Service.
Phone: 1-800-345-DELTA (3358)
Delta Faucet Company has been recognized by J.D. Power for providing "An Outstanding Customer Service Experience" for phone support for multiple years.

Figure 5: Delta Customer Service. This image provides the customer service phone number and highlights Delta's recognition for outstanding customer service by J.D. Power.