1. Introduction
This manual provides essential information for the assembly, setup, and maintenance of your iFlight Nazgul Evoque F5D V2 FPV Frame Kit. This frame is designed for 5-inch propellers and features a DeadCat geometry, optimized for FPV freestyle flying and compatibility with the DJI O3 HD Air Unit. Please read these instructions carefully before proceeding with assembly.
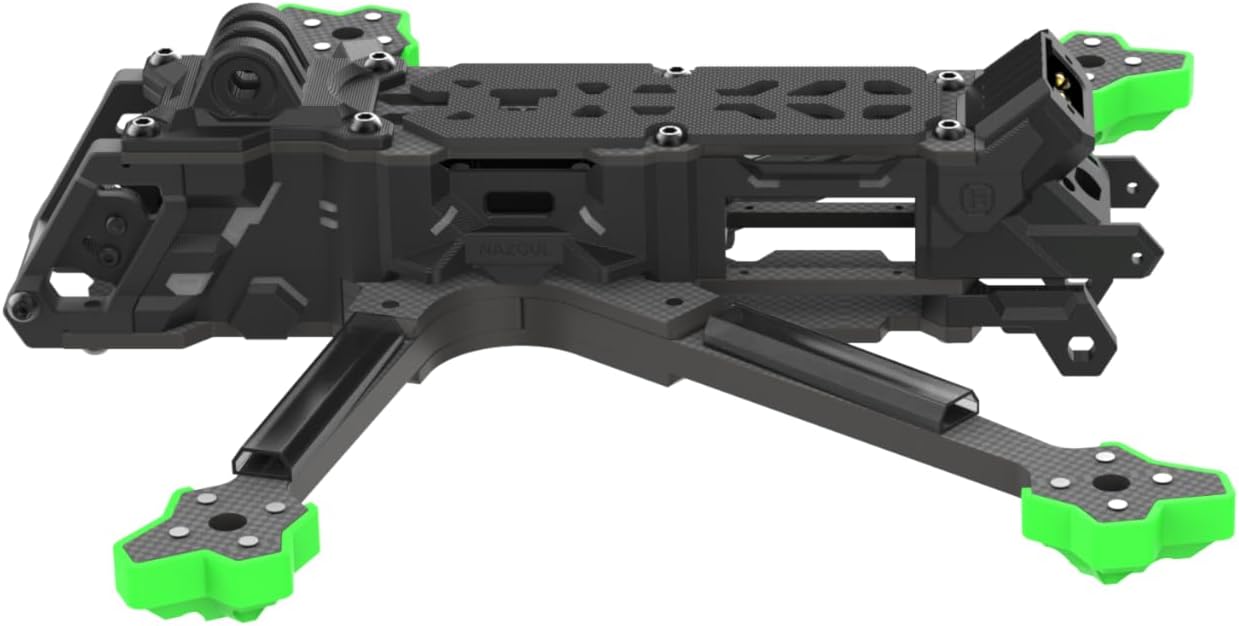
2. Key Features
- Optimized for DJI O3 HD Air Unit: Features a specially designed heatsink and new side panels for seamless integration.
- Enhanced Camera Mount: Provides a wider camera field of view (FOV) with TPU damping inserts for vibration reduction.
- Dual 5.8G VTX Antenna Mount: Includes a new TPU mount for dual antenna setups.
- Robust Carbon Fiber Construction: 6mm arm thickness for durability and protection.
- DeadCat Geometry: Frame wheelbase of 223mm, designed for stable freestyle performance.
3. Package Contents
Verify that all items listed below are present in your package. If any components are missing or damaged, please contact iFlight support.
- 1 x Evoque F5D V2 Frame Kit
- 1 x O3 Air Unit Heatsink
- 2 x O3 IPEX to RP-SMA Antenna Pigtails
- 1 x O3 Dual Antenna TPU
- 1 x GoPro TPU Base Mount
- 1 x Screw Bag
- 4 x TPU Armguard
- 1 x Front Bumper TPU
- 1 x Rear Bumper TPU
- 2 x Anti-slip Battery Pad
- 2 x Battery Strap (20*250mm)
4. Specifications
| Parameter | Value |
|---|---|
| Product Name | Evoque F5D V2 Frame Kit |
| Frame Wheelbase | 223 mm (DeadCat) |
| Frame Dimension | L190*W136*H36 mm (DeadCat) |
| Frame Body Dimension | 36mm |
| Arm Thickness | 6mm |
| Bottom Plate Thickness | 3mm |
| Top Plate Thickness | 2mm |
| Upper Plate Thickness | 3mm |
| Camera Plate Thickness | 3mm |
| Max Flight Stack Height | 22mm |
| Max VTX Height | 23mm |
| Motor Mounting | 16x16mm |
| Flight Stack Mounting | 20*20/Φ3mm |
| VTX Mounting | 25.5*25.5/Φ1.6mm |
| Weight | 240 grams |
5. Assembly and Setup
The Nazgul Evoque F5D V2 frame kit requires assembly and integration with your FPV drone components. Follow these general guidelines for proper setup.
5.1 General Assembly Steps
- Arm Installation: Secure the 6mm carbon fiber arms to the main frame body using the provided screws. Ensure all screws are tightened appropriately to prevent vibration.
- Bottom and Top Plate Attachment: Mount the bottom and top plates, ensuring proper alignment with the standoffs.
- Flight Stack Mounting: Install your flight controller and ESC stack onto the designated 20x20mm mounting holes. Ensure adequate clearance for wiring.
- VTX and Camera Installation: Integrate your DJI O3 HD Air Unit, utilizing the dedicated heatsink and side panels. Mount your FPV camera using the new camera mount with TPU damping inserts.
- Antenna Setup: Install the O3 IPEX to RP-SMA antenna pigtails and secure the O3 Dual Antenna TPU mount. Ensure antennas are positioned for optimal signal reception.
- Motor Mounting: Attach your motors to the 16x16mm motor mounting points on the arms.
- TPU Accessories: Install the TPU armguards, front bumper, rear bumper, and GoPro TPU base mount as desired for protection and functionality.
- Battery Security: Apply the anti-slip battery pads and use the battery straps to secure your battery firmly to the frame.
5.2 Compatibility and Upgrade Considerations (V1 to V2)
If you are upgrading from a Nazgul Evoque F5 V1 frame to the F5D V2, note the following differences:
- FC to O3 VTX Connector: The connector for the DJI O3 VTX differs from older Caddx Vista/Polar plugs. Custom wiring may be required.
- Receiver (RX) Position: The RX position has changed. V1 antenna length was 75mm, V2 requires 220mm. Adjustments or new antennas may be necessary.
- XT60 Plug: The XT60 plug has been updated. You may need to de-solder the V1 plug and install the V2 plug (included in the frame kit).
- Motor Wire Extension (F5X V1 to F5D V2): If transitioning from F5X V1 to F5D V2 (DeadCat geometry), the back motor wires may need to be extended due to the change in frame layout.
- Antenna TPU: The kit includes a dual antenna TPU for 2x 5.8G LHCP antennas. Ensure proper installation.
- Anti-Spark Filter: The Nazgul Evoque F5 V2 BNF (Bind-N-Fly) versions come with a pre-installed anti-spark filter. This filter is not included in the frame kit and must be purchased separately if desired.


6. Operating Guidelines
As a frame kit, the Nazgul Evoque F5D V2 does not have operational functions on its own. It serves as the structural foundation for a complete FPV drone. Once assembled with all necessary electronic components (flight controller, ESCs, motors, FPV system, receiver, battery), refer to the instruction manuals for those individual components for specific operating procedures.
Always ensure all components are securely mounted and wired correctly before powering on your FPV drone. Perform pre-flight checks, including propeller direction, motor spin, and control surface responses, according to your flight controller's guidelines.
7. Maintenance
Regular maintenance is crucial for the longevity and safe operation of your FPV drone.
- Visual Inspection: Before and after each flight, visually inspect the carbon fiber frame for any cracks, delamination, or signs of stress. Check TPU parts for tears or damage.
- Screw Tightness: Periodically check all screws for tightness. Vibrations during flight can cause screws to loosen over time. Apply thread-locker if necessary, especially on motor screws.
- Cleaning: Clean the frame regularly to remove dirt, dust, and debris. Use a soft brush or compressed air. Avoid harsh chemicals that could damage carbon fiber or TPU.
- Component Check: Ensure all electronic components (flight controller, VTX, camera) remain securely mounted within the frame.
- Arm Replacement: In case of a crash, inspect arms for damage. The 6mm arms are designed for durability, but replacement may be necessary if severe damage occurs.
8. Troubleshooting
This section addresses common issues related to the frame kit itself. For issues related to electronic components, refer to their respective manuals.
- Excessive Vibrations:
- Check all frame screws for tightness.
- Ensure motors are securely mounted and not bent.
- Inspect arms for cracks or damage.
- Verify TPU damping inserts for the camera are correctly installed.
- Loose Components:
- Re-tighten any loose screws on the frame, standoffs, or component mounts.
- Ensure battery straps are secure and anti-slip pads are effective.
- Damaged Carbon Fiber or TPU Parts:
- Replace any cracked carbon fiber plates or arms immediately to maintain structural integrity.
- Replace torn or damaged TPU parts to ensure proper component protection and camera damping.
9. Warranty and Support
For warranty information and technical support regarding your iFlight Nazgul Evoque F5D V2 FPV Frame Kit, please refer to the official iFlight website or contact their customer service directly. Keep your proof of purchase for any warranty claims.


