
1. Introduction
Thank you for choosing the Arcmira 8-in-1 Nut Milk Maker. This versatile appliance is designed to simplify the process of creating fresh, homemade plant-based milks and beverages from a variety of nuts, seeds, grains, and beans. With its multi-functional capabilities, including options for hot and cold preparations, delay start, and self-cleaning, it offers a convenient and healthy alternative to store-bought options. Please read this manual thoroughly before first use to ensure safe and optimal operation.

Figure 1.1: Arcmira 8-in-1 Nut Milk Maker with included accessories: measuring spoon, measuring cup, two cleaning brushes, nut milk bag, and recipe book.
2. Important Safety Instructions
When using electrical appliances, basic safety precautions should always be followed to reduce the risk of fire, electric shock, and/or injury to persons, including the following:
- Read all instructions before using the appliance.
- Do not touch hot surfaces. Use handles or knobs.
- To protect against electrical shock, do not immerse cord, plugs, or the appliance base in water or other liquid.
- Close supervision is necessary when any appliance is used by or near children.
- Unplug from outlet when not in use and before cleaning. Allow to cool before putting on or taking off parts, and before cleaning the appliance.
- Do not operate any appliance with a damaged cord or plug, or after the appliance malfunctions or has been damaged in any manner. Contact the manufacturer for examination, repair, or adjustment.
- The use of accessory attachments not recommended by the appliance manufacturer may cause injuries.
- Do not use outdoors.
- Do not let cord hang over edge of table or counter, or touch hot surfaces.
- Do not place on or near a hot gas or electric burner, or in a heated oven.
- Extreme caution must be used when moving an appliance containing hot oil or other hot liquids.
- Always attach plug to appliance first, then plug cord into the wall outlet. To disconnect, turn any control to "off", then remove plug from wall outlet.
- Do not use appliance for other than intended use.
- Ensure the lid is properly aligned and locked before operation to prevent the E2 error and ensure safety.
3. Product Overview
3.1 Components
The Arcmira Nut Milk Maker comes with the following components:
- Milk Maker Machine (Main Unit)
- Lid with integrated motor and blades
- Measuring Spoon
- Measuring Cup
- Two Cleaning Brushes
- Nut Milk Bag
- Recipe Book
- Instruction Manual (this document)
3.2 Key Features
This appliance is designed with several features to enhance your milk-making experience:
- 8-in-1 Versatility: Capable of making various plant-based milks (almond, oat, soy, coconut, rice, cashew) and other beverages.
- No Soaking Required: Powerful 8-blade stainless steel system allows for direct processing of ingredients without pre-soaking.
- Multiple Temperature Settings: Includes Room Temperature, Warm (140℉), and Hot (212℉) options.
- Boil Water Function: Dedicated setting for boiling water.
- Keep Warm Function: Maintains beverage temperature for up to 6 hours.
- Delay Start: Program your milk making up to 18 hours in advance.
- Self-Cleaning Function: Simplifies cleanup after use.
- LED Screen Display: Provides clear timing and temperature information.
- Safety Features: Overheating prevention and automatic shut-off.

Figure 3.1: The intuitive LED control panel displays various functions including Room Temp, Warm, Hot, Boil Water, Keep Warm, Delay Start, and Self Clean.

Figure 3.2: The 35oz capacity allows for making various homemade plant-based milks such as almond, cashew, coconut, soy, rice, and oat milk.

Figure 3.3: Internal view highlighting the 8-blade stainless steel system and high-power motor for efficient blending.
4. Setup
Before first use, please follow these steps:
- Unpack: Carefully remove all packaging materials and ensure all components listed in Section 3.1 are present.
- Initial Cleaning: Wash the interior of the pitcher and the lid (avoiding the electrical connection points) with warm, soapy water. Rinse thoroughly and dry. Use the provided cleaning brushes for hard-to-reach areas.
- Placement: Place the milk maker on a stable, flat, and dry surface, away from heat sources and direct sunlight. Ensure there is adequate ventilation around the unit.
- Power Connection: Plug the power cord into a standard electrical outlet. The LED screen will illuminate.
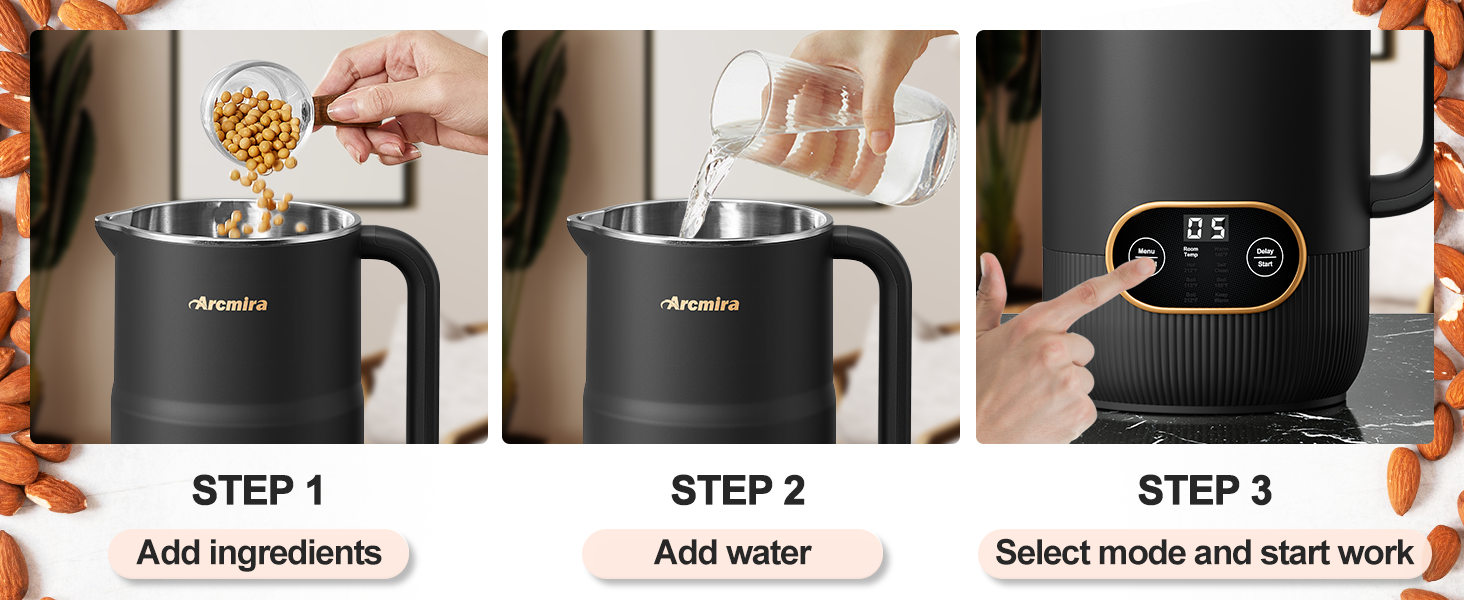
Figure 4.1: Basic preparation steps: Add ingredients, add water, then select your desired mode.
5. Operating Instructions
The Arcmira Nut Milk Maker offers various functions for different beverage types. Follow these general steps for operation:
- Add Ingredients: Place your desired nuts, grains, or beans into the pitcher. Refer to the included recipe book for recommended quantities. The machine's powerful blades allow you to skip the soaking step for most ingredients.
- Add Water: Pour water into the pitcher, ensuring it is between the MIN and MAX fill lines.
- Secure Lid: Place the lid onto the pitcher. Ensure the lid handle aligns with the pitcher's handle to lock it securely. If the lid is not properly secured, an "E2" error may be displayed, and the machine will not operate for safety.
- Power On: Plug in the machine. The LED display will show the default setting.
- Select Mode: Press the "Menu/Cancel" button repeatedly to cycle through the available functions until your desired mode is selected. The selected mode will be highlighted on the LED screen.
- Start Operation: Once the mode is selected, the machine will typically start automatically after a few seconds, or you may press the "Start" button if available for the specific mode.
- Completion: The machine will beep when the program is complete. Unplug the unit and carefully remove the lid.
5.1 Function Modes
- Room Temperature (5 min): Ideal for chilled nut milks like almond milk.
- Warm 140℉ (5 min): For warm beverages.
- Hot 212℉ (25 min): Suitable for making soy milk and rice milk, which require cooking.
- Boil Water (5 min / 9 min / 10 min): Various boil settings for different needs.
- Keep Warm (6 hours): Maintains the temperature of your beverage for an extended period.
- Delay Start (1-18 hours): Allows you to set a delayed start time for your program. Press "Delay Start" after selecting your mode, then use the buttons to adjust the delay time. The display will count down until the program begins.
- Self Clean (4 min): For easy cleaning of the interior.
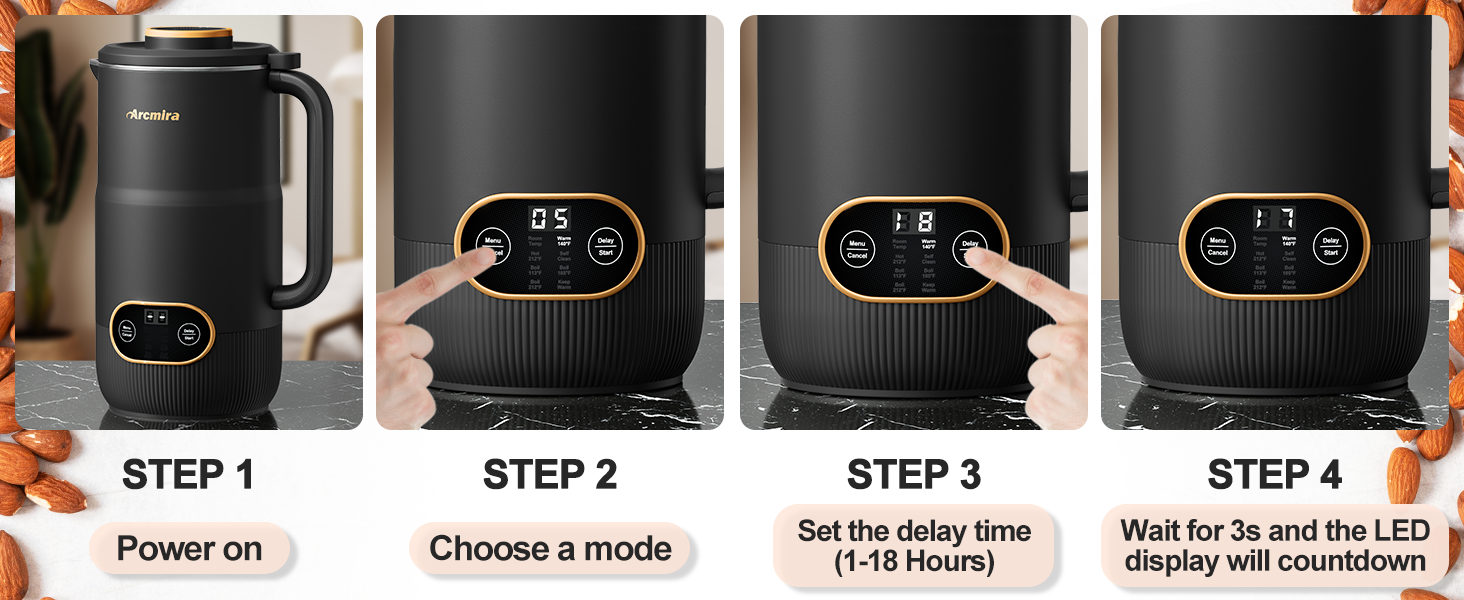
Figure 5.1: Operating sequence: Power on, choose a mode, optionally set delay time, and the machine will begin operation.

Figure 5.2: The Delay Start function allows you to prepare ingredients and set the machine to start up to 18 hours later, ensuring fresh milk is ready when you need it.

Figure 5.3: The powerful blending ensures smooth and creamy plant-based milk.
6. Maintenance and Cleaning
Proper cleaning and maintenance will extend the life of your Arcmira Nut Milk Maker.
6.1 Self-Cleaning Function
For quick and easy cleaning of the interior:
- After use, rinse the interior with a small amount of water.
- Add clean water up to the MIN line.
- Secure the lid.
- Select the "Self Clean" mode (4 min) on the control panel.
- Allow the cycle to complete.
- Empty the water and rinse thoroughly.

Figure 6.1: The built-in self-cleaning function simplifies post-use cleanup.
6.2 Manual Cleaning
For a more thorough cleaning:
- Always unplug the appliance before cleaning.
- Hand Wash Only: The pitcher and lid are not dishwasher safe.
- Use warm, soapy water and the provided cleaning brushes to clean the interior of the pitcher and around the blades. Be careful around the sharp blades.
- Wipe the exterior of the main unit with a damp cloth. Do not immerse the main unit or its electrical components in water.
- Ensure all parts are completely dry before storing.
7. Troubleshooting
If you encounter issues with your Arcmira Nut Milk Maker, refer to the table below:
| Problem | Possible Cause | Solution |
|---|---|---|
| Machine does not turn on / No display | Not plugged in; Power outage; Faulty outlet. | Ensure power cord is securely plugged into a working outlet. Check household circuit breaker. |
| E1 Error Code | Sensor disconnection alarm. | This indicates an internal sensor issue. Unplug the unit, wait a few minutes, and plug it back in. If the error persists, contact Arcmira customer support. |
| E2 Error Code | Lid not properly secured. | Ensure the lid is correctly placed and twisted to align its handle with the pitcher's handle, locking it into place. The machine will not operate if the lid is not secure. |
| Milk is not smooth/creamy | Insufficient blending time; Too many ingredients; Not enough water. | Ensure ingredients and water are within recommended levels. Run the cycle again if needed. For soy milk, soaking beans overnight can improve texture. |
| Machine is noisy during operation | Normal operation for blending; Hard ingredients. | Some noise is normal due to the powerful motor and blades. Ensure the machine is on a stable surface. |

Figure 7.1: Proper lid alignment is crucial to prevent the E2 error and ensure safe operation.
8. Specifications
| Feature | Detail |
|---|---|
| Brand | Arcmira |
| Model Name | HB-B102K |
| Color | Black |
| Material | Stainless Steel |
| Capacity | 1 Liters (35 oz) |
| Wattage | 1400W |
| Power Source | Corded Electric |
| Item Weight | 2.19 pounds (35 Ounces) |
| Package Dimensions | 13.03 x 7.91 x 7.8 inches |
| Special Features | Delay Start, Keep Warm, Self-Cleaning |
9. Warranty and Support
For warranty information, product support, or to inquire about replacement parts, please contact Arcmira customer service directly. Refer to the contact information provided with your product packaging or visit the official Arcmira website. Please retain your proof of purchase for warranty claims.