
ROMOSS RS1500
ROMOSS RS1500 Portable Power Station 1500W User Manual
1. Introduction
Thank you for choosing the ROMOSS RS1500 Portable Power Station. This device is a versatile 1500W solar-powered generator with a 1328Wh lithium-ion battery backup, designed to provide reliable power for various applications, including home emergency use, outdoor activities like camping, and car travel. It features multiple output ports, including AC, DC, USB, and a wireless charging pad, ensuring compatibility with a wide range of electronic devices. This manual provides essential information for safe operation, optimal performance, and proper maintenance of your power station.
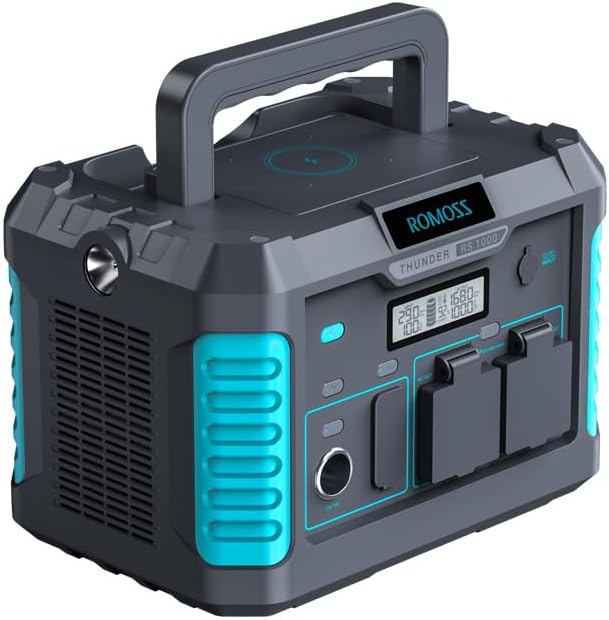
Figure 1: ROMOSS RS1500 Portable Power Station. This image displays the overall design of the power station, highlighting its compact form factor and integrated handle for portability.
2. Safety Instructions
To ensure safe operation and prolong the lifespan of your ROMOSS RS1500 Portable Power Station, please read and adhere to the following safety guidelines:
- Do not disassemble, repair, or modify the unit. Incorrect reassembly may cause fire or injury.
- Do not expose the unit to fire or high temperatures (above 60°C/140°F).
- Do not use or store the unit in bathrooms or areas exposed to water or rain.
- Do not use or store the unit near heat sources such as stoves or heaters.
- Use only the original charger and cables provided or approved by ROMOSS.
- Keep the unit away from children and pets.
- Avoid dropping, impacting, or subjecting the unit to strong vibrations.
- Ensure proper ventilation during use and charging to prevent overheating.
- If the unit emits smoke, odor, or unusual noise, discontinue use immediately and contact customer support.
- Dispose of the unit according to local regulations for lithium-ion batteries.
3. Package Contents
Verify that all items are present in your package:
- 1x ROMOSS Explorer 1500 Portable Power Station
- 1x AC Adapter
- 1x Car Adapter-DC Cable
- 1x User Manual (this document)
4. Product Overview
The ROMOSS RS1500 is equipped with various ports and features for versatile power delivery. Familiarize yourself with the layout of the power station:

Figure 2: Diverse Interfaces of the ROMOSS RS1500. This diagram illustrates the various input and output ports available on the power station, including USB-A, USB-C, AC outlets, and the DC car charger socket.
Component Identification:
- USB-A Ports (1-3): 18W Max each, for charging smartphones, tablets, and other USB-powered devices.
- USB-C Port (4): 60W Max, for fast charging compatible devices like laptops and modern smartphones.
- AC Output Alone Switch (5): Button to activate/deactivate the AC outlets.
- AC 2-Pole Sockets (6): Two AC outlets for standard electrical appliances.
- AC 3-Pole Sockets (7): Two AC outlets for standard electrical appliances.
- DC Output Alone Switch (8): Button to activate/deactivate the DC car charger socket.
- DC Car Charger Socket (9): 12V/10A, for powering car appliances or charging devices via a car charger.
- Wireless Charging Pad: Located on the top surface, for compatible wireless charging devices.
- LED Lights: One on the handle for reading, another on the side with multiple brightness/SOS modes for emergency lighting.
- Display Screen: Shows battery level, output wattage, input wattage, and other status indicators.
5. Setup
Initial Charging:
Before first use, fully charge your ROMOSS RS1500 Portable Power Station. This ensures the battery is conditioned for optimal performance.
- Connect the provided AC adapter to the power station's input port and then to a wall outlet.
- The display screen will indicate charging status.
- Charging typically takes approximately 5.5 hours via a wall outlet.
6. Operating Instructions
6.1 Charging the Power Station
The ROMOSS RS1500 can be recharged using three methods:

Figure 3: Recharging Options for the ROMOSS RS1500. This image illustrates the three primary methods to recharge the power station: via a standard wall outlet, compatible solar panels, or a car charger.
- Wall Outlet (AC Adapter): Connect the provided AC adapter to the input port and a standard wall outlet. Full charge in approximately 5.5 hours.
- Solar Panels (Sold Separately): Connect compatible solar panels (up to 120W Max) to the input port. Charging time varies based on sunlight intensity and panel wattage. Full charge in approximately 2.2 hours under optimal conditions.
- Car Adapter: Connect the provided Car Adapter-DC Cable to the input port and your vehicle's 12V cigarette lighter socket.
6.2 Using AC Outlets
The power station provides 1500W continuous AC output (3000W surge) via its three AC outlets.
- Press the AC Output Alone Switch (5) to activate the AC function. The display will show the AC icon.
- Plug your AC appliances into the AC 2-Pole Sockets (6) or AC 3-Pole Sockets (7).
- Ensure the total power consumption of your devices does not exceed 1500W.
- When finished, press the AC Output Alone Switch again to turn off the AC output and conserve battery.
6.3 Using USB Ports (USB-A & USB-C)
The power station features three 18W USB-A ports (1-3) and one 60W USB-C port (4).
- Connect your USB devices directly to the appropriate USB-A or USB-C ports.
- The USB ports are typically always active when the unit is on. Check the display for USB output indicators.
6.4 Using DC Car Charger Socket
The 12V/10A DC car charger socket (9) is suitable for powering car-specific devices.
- Press the DC Output Alone Switch (8) to activate the DC function. The display will show the DC icon.
- Plug your 12V DC device into the socket.
- When finished, press the DC Output Alone Switch again to turn off the DC output.
6.5 Wireless Charging
The top surface of the power station includes a wireless charging pad for compatible devices.

Figure 4: Wireless Charging Feature. This image shows a smartphone placed on the top surface of the power station, indicating the active wireless charging function.
- Place your Qi-compatible smartphone or device directly onto the wireless charging pad.
- Ensure the device is centered on the pad for optimal charging.
- The power station's display may indicate wireless charging activity.
6.6 LED Lights Operation
The power station is equipped with two LED lights for illumination.
- Handle Light: A small LED light on the handle, suitable for reading or focused illumination. Activate via its dedicated button.
- Side Light: A larger LED light on the side with multiple brightness settings and an SOS mode for emergencies. Activate via its dedicated button and cycle through modes with subsequent presses.
7. Maintenance
7.1 Storage
- Store the power station in a cool, dry place, away from direct sunlight and extreme temperatures.
- For long-term storage, charge the unit to approximately 50-80% every 3-6 months to maintain battery health.
- Avoid storing in areas with high humidity or corrosive substances.
7.2 Cleaning
- Use a soft, dry cloth to wipe the exterior of the power station.
- Do not use abrasive cleaners or solvents.
- Ensure all ports are free of dust and debris. Use compressed air if necessary.
8. Troubleshooting
If you encounter issues with your ROMOSS RS1500, refer to the following common problems and solutions:
| Problem | Possible Cause | Solution |
|---|---|---|
| Power station not turning on | Battery is completely depleted; Power button not pressed correctly. | Charge the unit using the AC adapter for at least 30 minutes. Press and hold the power button for 3-5 seconds. |
| AC outlets not providing power | AC output not activated; Device power exceeds 1500W; Overload protection triggered. | Press the AC Output Alone Switch. Reduce the load by unplugging high-power devices. Restart the unit. |
| USB ports not charging devices | Device cable faulty; Device not compatible; Power station battery low. | Try a different USB cable and device. Ensure the power station has sufficient charge. |
| Wireless charging not working | Device not Qi-compatible; Device not properly aligned; Phone case too thick. | Ensure your device supports Qi wireless charging. Realign the device on the pad. Remove thick phone cases. |
| Unit overheating | Poor ventilation; Excessive load. | Ensure the unit is in a well-ventilated area. Reduce the number or power of connected devices. |
If the problem persists after attempting these solutions, please contact ROMOSS customer support.
9. Specifications
Technical details of the ROMOSS RS1500 Portable Power Station:
| Feature | Detail |
|---|---|
| Model Name | RS1500 |
| Brand | ROMOSS |
| Battery Type | Lithium-ion |
| Capacity | 1328Wh |
| AC Output | 1500W (Rated), 3000W (Surge) |
| USB-A Output | 3 x 18W Max |
| USB-C Output | 1 x 60W Max (PD) |
| DC Car Port Output | 1 x 12V/10A (120W Max) |
| Wireless Charging | 10W Max |
| Recharge Time (AC Wall) | Approx. 5.5 hours |
| Recharge Time (Solar) | Approx. 2.2 hours (with 120W solar panel under optimal conditions) |
| Product Dimensions | 10.43"L x 9.45"W x 13.78"H |
| Weight | 30.6 lbs |
| Operating Temperature | 0°C to 40°C (32°F to 104°F) |

Figure 5: ROMOSS RS1500 Product Dimensions. This image provides a visual representation of the power station's length, width, and height measurements.
10. Warranty and Support
Warranty Information:
The ROMOSS RS1500 Portable Power Station comes with a 1-year limited warranty from the date of purchase. This warranty covers manufacturing defects and workmanship under normal use. It does not cover damage caused by misuse, accidents, unauthorized modifications, or natural disasters.
Customer Support:
For technical assistance, warranty claims, or any questions regarding your ROMOSS RS1500 Portable Power Station, please contact ROMOSS customer support. Refer to the contact information provided on the official ROMOSS website or your purchase documentation.
11. Official Product Videos
Based on the provided product data, no official seller videos are available for embedding in this manual.
Related documentsRS1500


Ask a question about this manual
Ask about setup, troubleshooting, compatibility, parts, safety, or missing instructions. Manuals+ will review the question and use this page’s manual context to help answer it.