
Introduction
Thank you for purchasing the HOTUT GU10 Indoor Wall Sconce. This manual provides important information regarding the safe installation, operation, and maintenance of your new wall lamp. Please read these instructions thoroughly before use and retain them for future reference.
Safety Instructions
- Professional Installation: It is recommended to have a qualified electrician install the lamp holder to prevent electrical shock accidents.
- Bulb Compatibility: Ensure to use GU10 bulbs that support linear dimming. Using incompatible bulbs may cause flickering when adjusted. In severe cases, the lamp holder may be damaged, or a short circuit accident could occur.
- Power Source: Connect the lamp only to a suitable power outlet as specified.
- Indoor Use Only: This product is designed for indoor use exclusively. Do not expose it to moisture or outdoor elements.
- Cleaning: Always disconnect the power before cleaning. Use a soft, dry cloth. Do not use abrasive cleaners or solvents.
- Bulb Type: The lamp is designed for GU10 bulbs with a maximum wattage of 20W. Halogen bulbs are not suitable.
Package Contents
Please check the package to ensure all components are present:
- 2 x HOTUT GU10 Indoor Wall Sconce
- 2 x Installation Accessories (Mounting Hardware)
Setup and Installation
Follow these steps to install your wall sconce. An GU10 bulb is not included and must be purchased separately.
- Remove the Lamp Cup: Rotate the lamp cup (shade) counter-clockwise and carefully remove it from the main body.
- Install the GU10 Bulb: Insert a compatible GU10 bulb (not included) into the GU10 socket. Then, reattach the lamp cup by rotating it clockwise until secure.
- Install the Fixed Bracket: Secure the fixed mounting bracket to your desired wall location using the provided installation accessories. Ensure the bracket is firmly attached to a stud or using appropriate wall anchors.
- Fix the Wall Light to the Bracket: Align the wall sconce body with the installed bracket and secure it using the provided screws.

Image: Visual guide showing the four installation steps: removing the lamp cup, installing the GU10 bulb, fixing the bracket, and attaching the light.
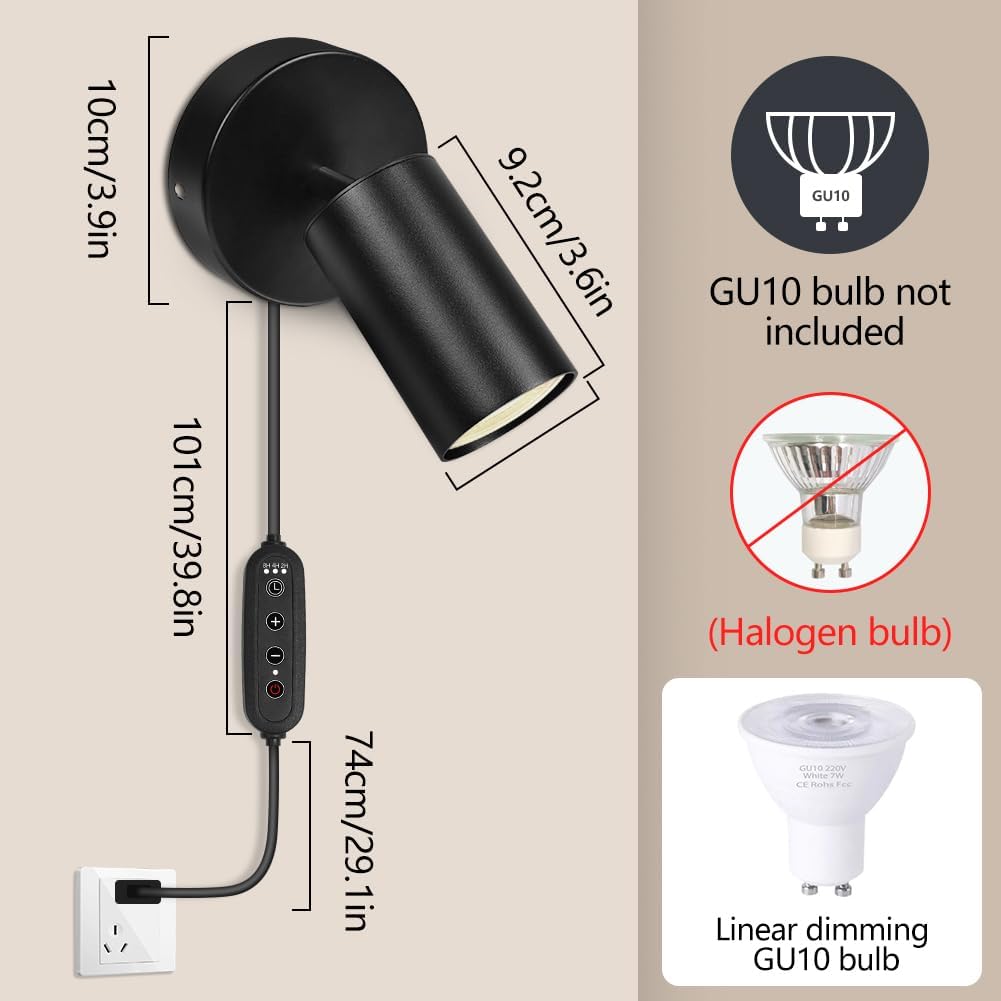
Image: Diagram illustrating the dimensions of the wall sconce and specifying that a GU10 bulb is not included, halogen bulbs are not compatible, and linear dimming GU10 LED bulbs are recommended.
Operating Instructions
The HOTUT wall sconce features an integrated control switch on its 1.75-meter power cable for convenient operation.
Power On/Off
- Plug the European standard plug into a suitable wall outlet.
- Press the ON/OFF button on the cable switch to turn the light on or off.
Brightness Adjustment
- While the light is on, use the + and - buttons on the cable switch to adjust the brightness level. There are 3 levels of brightness adjustment.
Timer Function
- Press the Timer button on the cable switch to set an automatic shut-off time. Available settings are 2 hours (2H), 4 hours (4H), and 8 hours (8H).

Image: Illustration of the timing functions (8H, 4H, 2H) and 3 levels of brightness adjustment available on the wall sconce.
Adjusting Light Direction
The lampshade offers flexible adjustment to direct light precisely where needed:
- Horizontal Rotation: The lampshade can be rotated up to 350° horizontally.
- Vertical Adjustment: The lampshade can be adjusted 90° up and down.

Image: Visual representation of the wall sconce's adjustable features, demonstrating 90° up and down tilt and 350° horizontal rotation.
Maintenance
Cleaning
- Before cleaning, ensure the lamp is unplugged from the power outlet.
- Wipe the lamp's surface with a soft, dry cloth. Do not use liquid cleaners or sprays, as they may damage the finish or electrical components.
Bulb Replacement
- Ensure the lamp is unplugged and the bulb has cooled down completely before attempting to replace it.
- Rotate the lamp cup counter-clockwise to remove it.
- Carefully remove the old GU10 bulb and insert a new, compatible GU10 LED bulb (max 20W, linear dimming).
- Reattach the lamp cup by rotating it clockwise until secure.
Troubleshooting
Light Flickers or Does Not Dim Properly
- Cause: The installed GU10 bulb may not support linear dimming.
- Solution: Replace the bulb with a GU10 LED bulb specifically designed for linear dimming. Using incompatible bulbs can lead to flickering, damage to the lamp holder, or even a short circuit.
Lamp Does Not Turn On
- Cause: The power plug is not fully inserted, or there is no power to the outlet.
- Solution: Check the power connection and ensure the outlet is functional.
- Cause: The GU10 bulb is faulty or not properly installed.
- Solution: Ensure the bulb is correctly seated in the socket. If the issue persists, try replacing the bulb with a new one.
Specifications
| Brand | HOTUT |
| Model Number | V7-240527EXZD2-FBA |
| Color | Black |
| Material | Metal |
| Style | Retro / Industrial |
| Product Dimensions (L x W x H) | 21.5L x 16.5W x 11.7H centimeters (8.5L x 6.5W x 4.6H inches) |
| Power Source | Corded Electric (1.75m cable with EU plug) |
| Bulb Base | GU10 |
| Max Wattage per Bulb | 20 Watts |
| Recommended Bulb Type | GU10 LED (linear dimming compatible) |
| Control Method | Push Button (on-cable switch) |
| Features | Dimmable, Energy Efficient, 350° Rotatable, 90° Up/Down Adjustable, Timer Function (2H/4H/8H) |
| Mounting Type | Wall Mount |
| Indoor/Outdoor Use | Indoor Use Only |
Warranty and Support
This product comes with a standard manufacturer's warranty. For specific warranty details, please refer to the documentation provided at the time of purchase or contact your retailer. If you encounter any issues or have questions regarding your HOTUT wall sconce, please contact the seller or manufacturer's customer support for assistance.
Please have your model number (V7-240527EXZD2-FBA) and purchase information ready when contacting support.