1. Product Overview
The Hearvo USB 3.0 HDMI KVM Switch allows you to control two computers using a single monitor, keyboard, and mouse. This device integrates both USB and HDMI switching functionalities, supporting various input devices and operating systems.

Image 1.1: Hearvo USB 3.0 HDMI KVM Switch main unit with connected peripherals and remote switch.
Key Features:
- Control Two Computers: Seamlessly switch between two computers using one HDMI monitor, keyboard, and mouse.
- USB 3.0 Ports: Three USB 3.0 ports offer ultra-fast data transfer speeds up to 5Gbps for sharing peripherals like printers, external drives, scanners, and flash drives.
- High Resolution: Supports 4K resolution at 60Hz, 4K@30Hz, 2K, 3D, and 1080P, ensuring clear and detailed visuals. HDCP 2.2 compliant for protected content.
- Dual Switching Methods: Switch between computers using the button on the KVM unit or the included wired remote switch.
- Adaptive EDID: Automatically optimizes display settings for stable and smooth image transmission, maintaining desktop icon and window positions.
- Plug and Play: No external power supply or driver software required for installation.
- Broad Compatibility: Compatible with Windows 7/8/10/11/Vista/XP, Linux, Mac, and various input devices such as PCs, Laptops, and PS4.
2. Package Contents
Before setup, please verify that all items are present in your package:

Image 2.1: Contents included in the Hearvo USB 3.0 HDMI KVM Switch package.
- 1x HDMI KVM Switch Unit
- 2x USB 3.0 Cables
- 1x Desktop Controller (Wired Remote Switch)
- 4x Anti-slip Rubber Pads
- 1x User Manual (This document)
- 1x Protection Plan Card
Note: HDMI cables are not included in the package and must be purchased separately.
3. Setup Instructions
Follow these steps to connect your Hearvo KVM Switch:
- Connect Monitor: Connect your HDMI monitor to the HD OUT port on the KVM switch using an HDMI cable.
- Connect Computers (HDMI): Connect the HDMI output of PC1 to the HD IN 1 port on the KVM switch. Repeat for PC2, connecting its HDMI output to the HD IN 2 port.
- Connect Computers (USB): Connect one end of a USB 3.0 cable to a USB port on PC1 and the other end to the USB port labeled PC 1 on the KVM switch. Repeat for PC2, connecting its USB port to the USB port labeled PC 2 on the KVM switch. For optimal performance, ensure both USB cables are connected.
- Connect Peripherals: Plug your keyboard, mouse, and other USB peripherals (e.g., printer, U-disk, gamepad) into the USB 3.0 ports on the front of the KVM switch.
- Connect Wired Remote (Optional): If desired, connect the wired remote switch to the CTRL port on the KVM unit.
- Power On: Power on your computers and monitor. The KVM switch is USB-powered and does not require an external power adapter.

Image 3.1: Detailed connection diagram for the KVM switch.
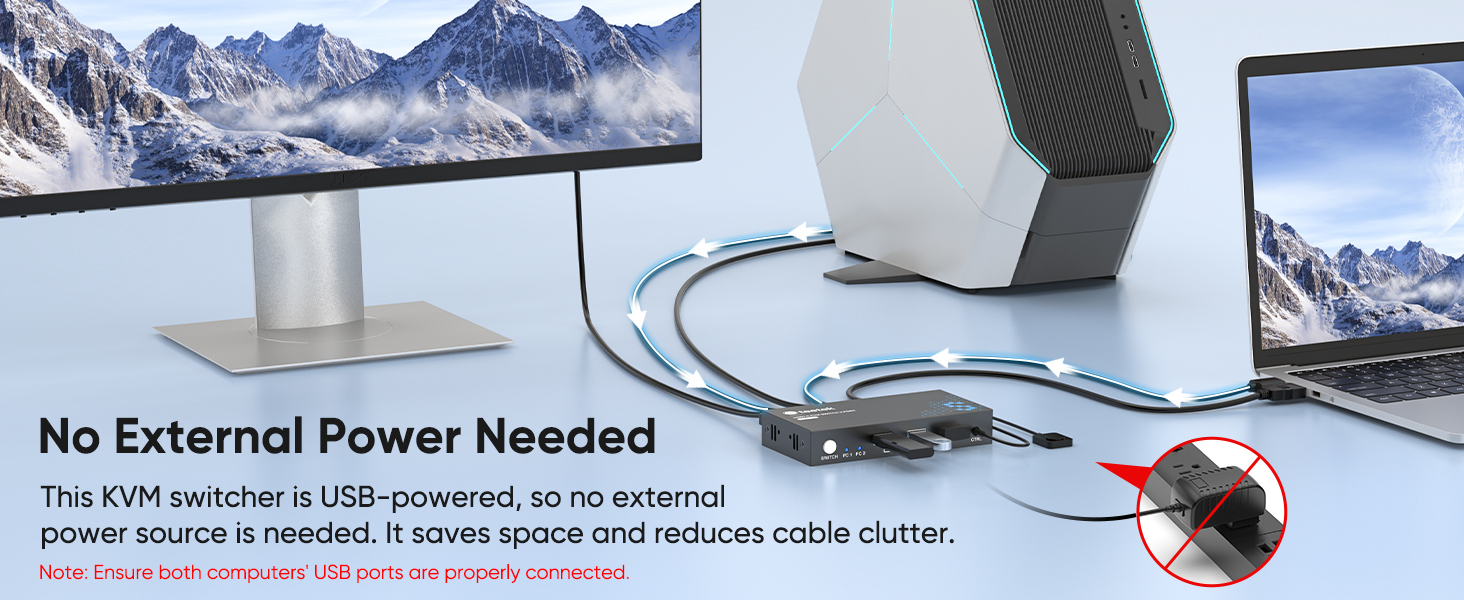
Image 3.2: The KVM switch is USB-powered, eliminating the need for an external power source.
4. Operating Instructions
Switching Between Computers:
The Hearvo KVM Switch offers two convenient methods for switching between connected computers:
- KVM Switch Button: Press the SWITCH button located on the front panel of the KVM unit. The LED indicators (PC 1, PC 2) will illuminate to show which computer is currently active.
- Wired Remote Switch: Press the button on the wired remote control. This allows for flexible placement of the KVM unit while keeping the switching control within easy reach.

Image 4.1: Two methods for switching between computers.
USB 3.0 Data Transfer:
The KVM switch features three USB 3.0 ports for connecting peripherals. These ports support data transfer speeds up to 5Gbps, which is significantly faster than USB 2.0.

Image 4.2: USB 3.0 offers 10X faster data transfer than USB 2.0.
Adaptive EDID Functionality:
The KVM switch incorporates Adaptive EDID technology. This feature ensures that your display settings are automatically optimized, providing stable and smooth image transmission. It also helps maintain the arrangement of your desktop icons and windows when switching between computers.

Image 4.3: Adaptive EDID ensures desktop icons and windows remain organized during switches.
Note: For Windows 11, ensure the "Remember window locations" option is enabled in display settings.
5. Maintenance
To ensure the longevity and optimal performance of your Hearvo KVM Switch, consider the following maintenance guidelines:
- Keep Clean: Regularly wipe the device with a soft, dry cloth to remove dust. Avoid using liquid cleaners or abrasive materials.
- Avoid Liquids: Do not expose the KVM switch to water or other liquids, as this can cause damage.
- Proper Ventilation: Ensure the device is placed in a well-ventilated area to prevent overheating.
- Cable Management: Organize cables neatly to prevent strain on ports and accidental disconnections.
- Storage: When not in use for extended periods, store the KVM switch in a cool, dry place away from direct sunlight.
6. Troubleshooting
If you encounter issues with your KVM switch, refer to the following common problems and solutions:
- No Display or Flickering Screen:
- Ensure all HDMI cables are securely connected to both the KVM switch and your computers/monitor.
- Verify that your monitor is set to the correct HDMI input.
- Check if the resolution and refresh rate of your computers are supported by the KVM switch and monitor (refer to Specifications section).
- A brief black screen (3-5 seconds) is normal during switching as HDMI signals are re-identified.
- Keyboard/Mouse Not Responding:
- Ensure both USB 3.0 cables from the KVM switch are securely connected to the USB ports on both computers.
- Try connecting the keyboard and mouse to different USB 3.0 ports on the KVM switch.
- Ensure your keyboard and mouse are functioning correctly by connecting them directly to a computer.
- Wired Remote Switch Not Working:
- Verify that the wired remote switch is firmly plugged into the CTRL port on the KVM unit.
- If the remote is still unresponsive, try using the button on the KVM unit directly.
- Peripherals Not Detected (e.g., Printer, USB Drive):
- Confirm that the peripheral is properly connected to one of the USB 3.0 ports on the KVM switch.
- Ensure the active computer has the necessary drivers for the peripheral installed.
- Audio Issues:
- Note that this KVM switch does not support audio output directly. Audio must be managed through your computer's sound card or monitor's audio output.
7. Specifications
Detailed technical specifications for the Hearvo USB 3.0 HDMI KVM Switch (Model STK-S7232H):
| Feature | Specification |
|---|---|
| Model Number | STK-S7232H |
| Brand | Hearvo |
| Manufacturer | Steetek |
| Video Input | 2 x HDMI (for PC1, PC2) |
| Video Output | 1 x HDMI (to Monitor) |
| USB Input | 2 x USB 3.0 Type-B (for PC1, PC2) |
| USB Output | 3 x USB 3.0 Type-A (for Peripherals) |
| Video Resolution | Up to 4K@60Hz, 4K@30Hz, 2K, 3D, 1080P |
| HDCP Compliance | HDCP 2.2 |
| USB Data Transfer Speed | Up to 5Gbps (USB 3.0) |
| Switching Methods | Button on KVM unit, Wired Remote Switch |
| Operating System Compatibility | Windows 7/8/10/11/Vista/XP, Linux, Mac |
| Power Supply | USB Powered (No external power adapter needed) |
| Product Dimensions | 6.4 x 5.9 x 0.8 inches |
| Item Weight | 9.59 ounces |
| Material | Aluminum |
Supported Resolutions and Refresh Rates:
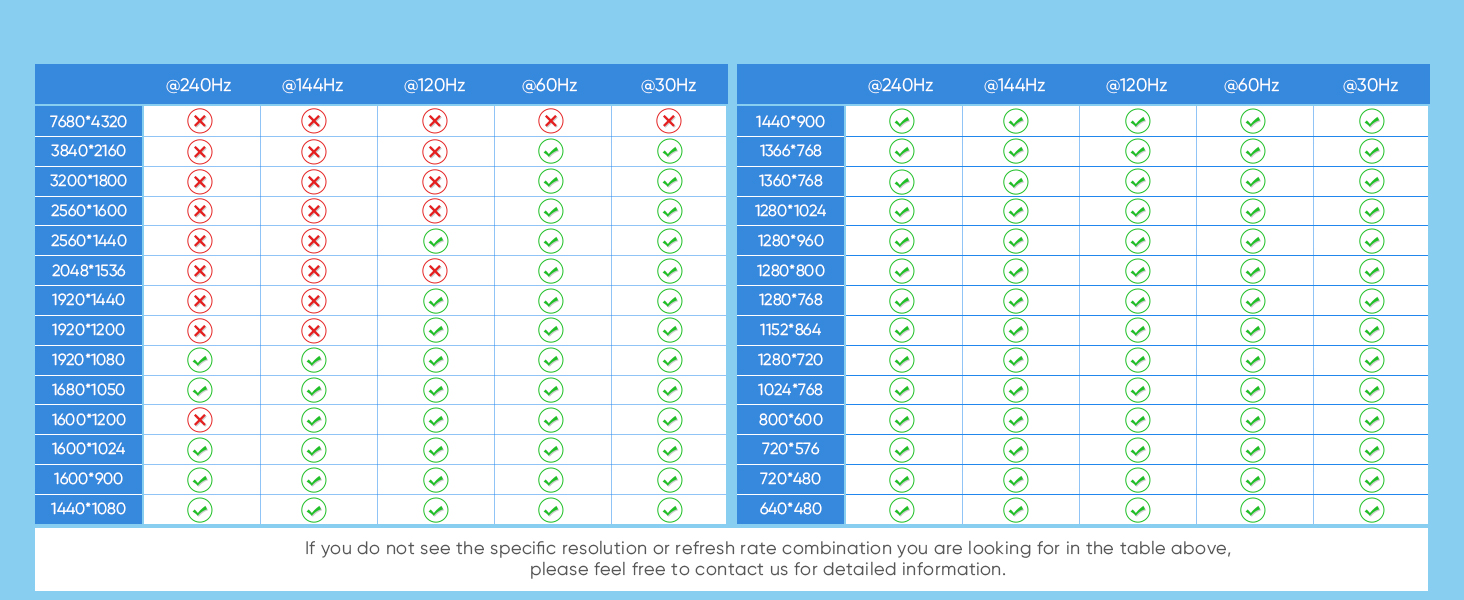
Image 7.1: Compatibility table for various resolutions and refresh rates.
If your specific resolution or refresh rate combination is not listed, please contact support for detailed information.
8. Warranty and Support
Hearvo products are designed for reliability and performance. We stand by the quality of our products with comprehensive warranty and support services.
Warranty Information:
- All Hearvo products come with a lifetime warranty.
- Additionally, your product is covered by a 12-month protection period, during which any defects can be replaced at no cost.
Customer Support:
For any issues, questions, or support needs, please contact us through Amazon's internal messaging system. Our support team aims to respond within 24 hours to assist you.