
1. Introduction
This manual provides detailed instructions for the setup, operation, and maintenance of your TKLBLS 16 Channel Live Sound Audio Mixer. Please read this manual thoroughly before using the device to ensure proper functionality and to prevent damage.
2. Key Features
- 48V Phantom Power: Independent switch for each microphone input, providing stable power for condenser microphones and filtering AC interference for clear sound.
- Dual DSP Reverb Effect: Equipped with dual DSP processors offering up to 24 reverb effects, allowing separate adjustment for microphone and music, and the ability to layer effects.
- 4-Way Group Output: Flexible control for outputting groups separately or sending group signals to the main channel.
- Real-Time Monitoring & 100mm High Travel Faders: Features real-time level display, mute function, and 100mm faders for precise volume adjustment and smooth transitions.
- PAD Attenuation Function: Reduces input signal volume by up to -26dB to prevent overload and distortion, includes a high-pass filter for noise reduction.
- Mid-Range Frequency Selection: Each input channel has a mid-range frequency adjustment for precise audio tuning.
- 3-Way AUX Auxiliary Output: Connects to monitoring equipment, external effects, or amplifiers for enhanced audio processing flexibility.
- USB Interface & Bluetooth Connectivity: Supports MP3 lossless playback via USB or wireless audio transmission via Bluetooth.
- Built-in Sound Card: Integrated high-performance sound card for direct connection to a computer or smartphone for recording and live streaming.
3. Product Overview
Familiarize yourself with the layout and connections of your TKLBLS 16 Channel Live Sound Audio Mixer.

Figure 3.1: Front Panel Controls and Indicators. This image highlights the various knobs, faders, buttons, and display screen on the mixer's top panel, including signal lights, phantom power switch, gain, EQ, AUX sends, effect controls, and the MP3/USB/Bluetooth module.

Figure 3.2: Rear Panel Connections. This image shows the rear panel of the mixer, detailing the power interface, mono inputs, microphone inputs, stereo input, group outputs, and auxiliary outputs.
4. Setup
Follow these steps to set up your audio mixer for initial use.
- Power Connection: Connect the mixer to a suitable power source using the provided power cable. Ensure the power switch is in the OFF position before connecting.
- Input Connections: Connect your microphones, instruments, or other audio sources to the appropriate XLR or Line inputs.
- Output Connections: Connect the main outputs (MAIN OUT) to your amplifier or powered speakers. Use group outputs (G1-G2, G3-G4) or AUX outputs as needed for monitors or external effects.
- USB/Bluetooth Setup: For digital audio, connect a USB drive or pair a Bluetooth device as described in the Operating Instructions.
- Power On: Once all connections are secure, switch the power button to ON.

Figure 4.1: Typical Connection Diagram. This diagram illustrates various connection possibilities for the TKLBLS mixer, including microphones, computers, mobile phones, headphones, power supply, amplifiers, and effect units.
Video 4.1: TKLBLS LA DJ Mixer Overview. This video provides a general overview of the TKLBLS LA DJ Mixer, demonstrating its physical features and basic functionality, which is applicable to the 16 Channel model.
5. Operating Instructions
5.1. 48V Phantom Power
The 48V Phantom Power is essential for condenser microphones. Each microphone input channel has an independent 48V phantom power switch. Activate it only when using condenser microphones that require phantom power. This ensures a stable power supply and helps filter out AC interference for clearer audio.

Figure 5.1: 48V Phantom Power Switches. This image shows the individual 48V phantom power switches located above each microphone input channel, allowing for selective power activation.
5.2. Dual DSP Reverb Effects
The mixer features dual DSP processors with 24 reverb effects. Use the PROGRAM (PUSH) knob to select an effect and adjust its parameters. The dual effect capability allows for separate application to microphone and music, or for layering effects to create richer sound environments.

Figure 5.2: DSP Effect List. This image displays the list of 24 available DSP effects, ranging from various room and hall reverbs to delays, chorus, flanger, and pitch effects.
5.3. 4-Way Group Output
The 4-way group output allows for flexible routing of audio signals. You can output edited channels to specific groups (G1-G2, G3-G4) and then either use these groups as separate main outputs or send their signals to the main stereo output for further mixing. This provides enhanced control over sub-mixes.

Figure 5.3: Group Volume Control and Grouped XLR Interface. This image illustrates the group volume controls on the mixer's front panel and the corresponding grouped XLR output interfaces on the rear panel, demonstrating how to manage and route audio groups.
5.4. Real-Time Monitoring and Faders
Each channel is equipped with a 100mm high-travel fader for precise volume control and smooth transitions. The real-time level display and mute functions allow you to monitor and manage audio signals effectively, ensuring clear and stable sound quality throughout your mix.
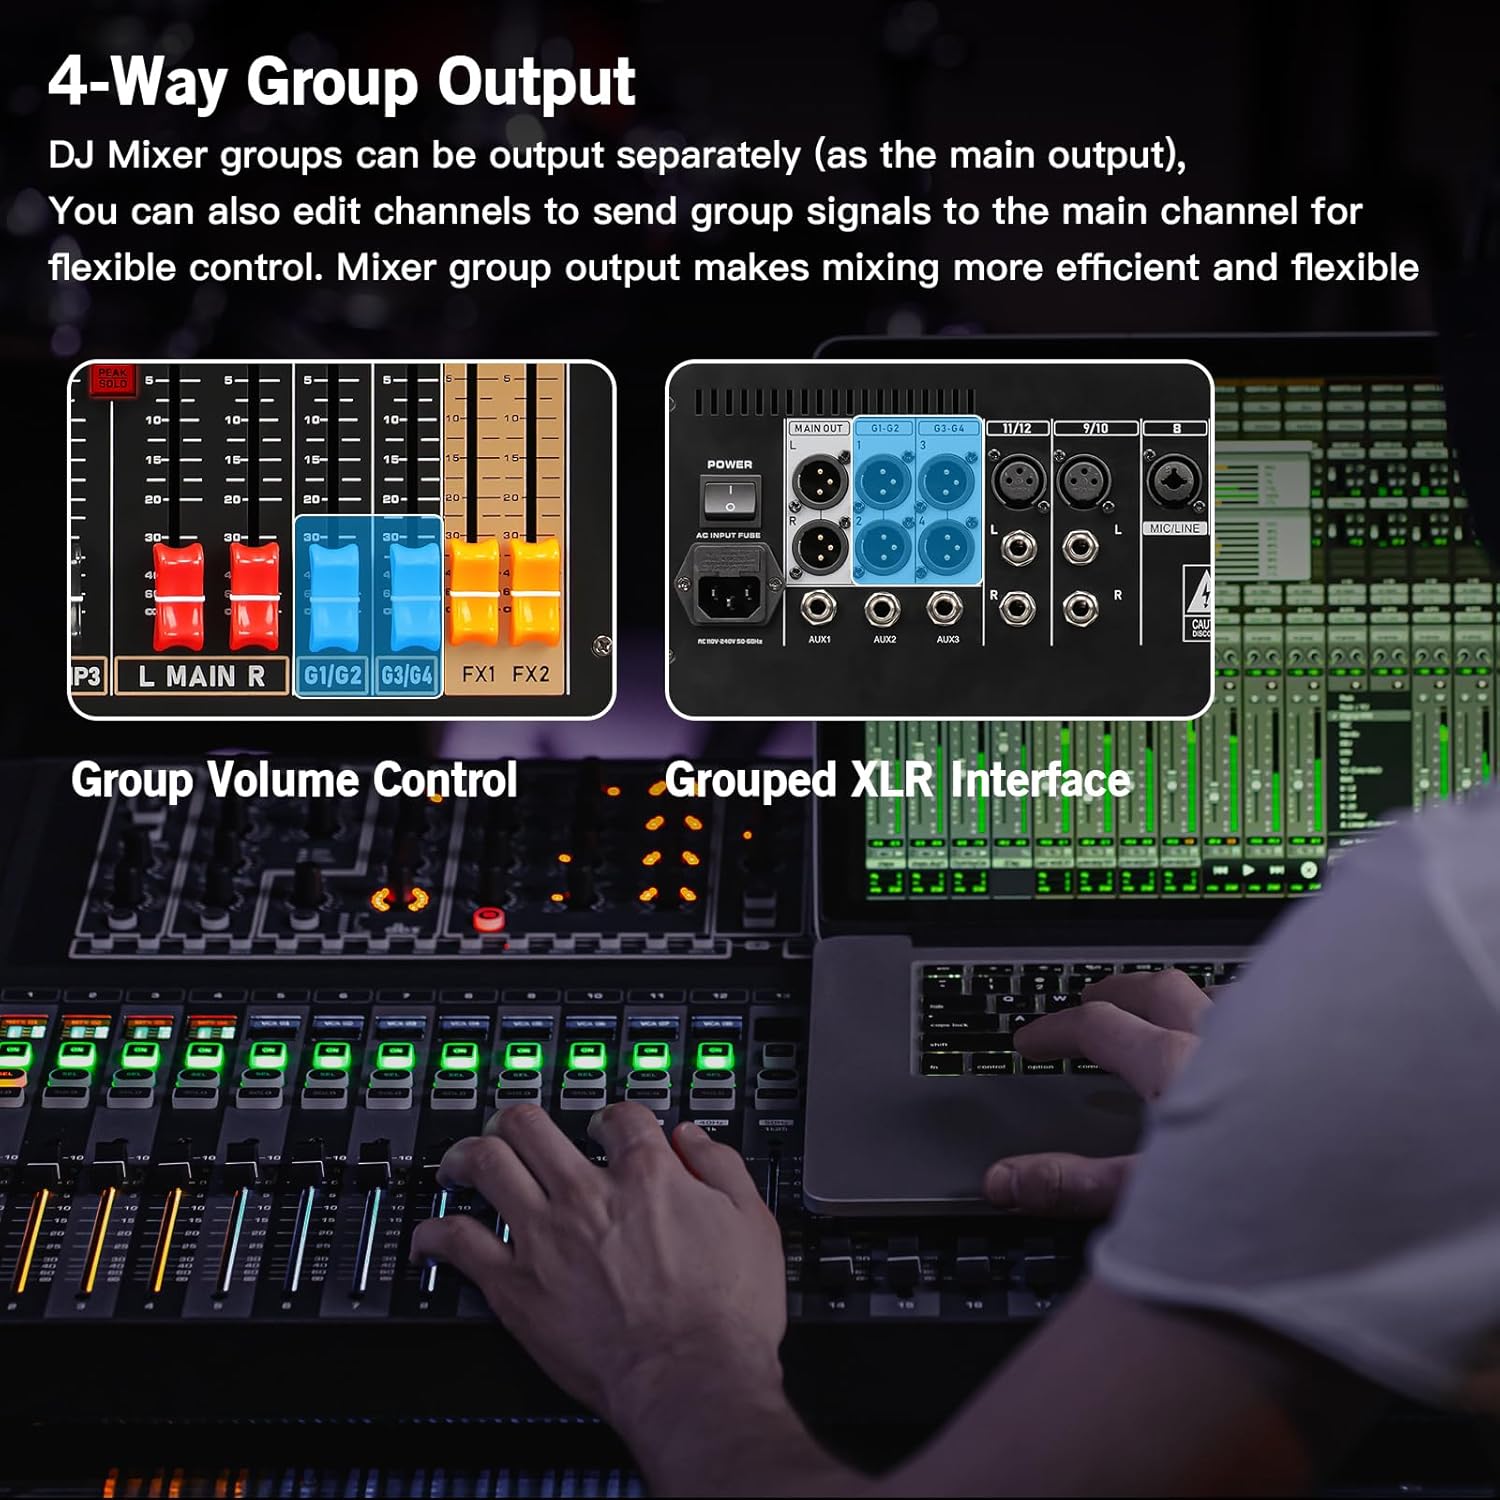
Figure 5.4: Instant Monitoring with 100mm High Travel Faders. This image highlights the long faders on the mixer, indicating their length and emphasizing their role in providing precise and smooth volume adjustments for each channel.
5.5. PAD Attenuation Function
The PAD function allows you to attenuate the input signal by up to -26dB. This is crucial when dealing with high-level input sources to prevent signal overload and distortion. Additionally, the built-in high-pass filter helps eliminate unwanted noise and low-frequency rumble, resulting in a cleaner audio signal.

Figure 5.5: PAD Attenuation Function and Fixed Value Attenuation. This image shows the PAD buttons on each channel, explaining their function in attenuating input signals to prevent overload, and also mentions the high-pass filter.
5.6. MP3 Lossless Playback & Bluetooth
The mixer supports high-quality MP3 audio playback via a USB drive or wireless audio transmission through Bluetooth. This allows for easy integration of backing tracks or music from external devices for various applications like home entertainment, DJing, or live performances.

Figure 5.6: MP3 Playback and Bluetooth Connection. This image illustrates the USB port for U disk playback and the Bluetooth connectivity feature, showing how to connect a mobile phone for wireless audio streaming.
5.7. Recording Function
The mixer includes a built-in sound card for direct recording to a USB drive or a connected computer/smartphone. Follow the steps below to utilize the recording function.
Video 5.7: How to Use the LA Mixer Recording Function. This video demonstrates the step-by-step process of using the recording function on the TKLBLS mixer, including connecting a USB drive, setting up channels, initiating recording, saving, and playing back recorded audio.
6. Maintenance
To ensure the longevity and optimal performance of your TKLBLS Audio Mixer, follow these maintenance guidelines:
- Cleaning: Regularly wipe the surface of the mixer with a soft, dry cloth. Avoid using abrasive cleaners or solvents that could damage the finish or internal components.
- Ventilation: Ensure proper ventilation around the mixer to prevent overheating. Do not block any ventilation openings.
- Storage: When not in use for extended periods, store the mixer in a cool, dry place, away from direct sunlight and extreme temperatures. Cover it to protect against dust.
- Cable Management: Keep cables organized and free from kinks or excessive tension to prevent damage to connectors and ports.
7. Troubleshooting
If you encounter any issues with your TKLBLS Audio Mixer, refer to the following common troubleshooting tips:
- No Power: Check if the power cable is securely connected to both the mixer and the power outlet. Ensure the power switch is in the ON position.
- No Sound Output: Verify all input and output cables are correctly connected. Check fader levels and gain settings for all channels and the main output. Ensure mute buttons are not engaged.
- Distorted Sound: Reduce input gain levels (TRIM/GAIN) to prevent clipping. Check if the PAD function is appropriately engaged for high-level signals. Ensure speakers/amplifiers are not overdriven.
- Microphone Not Working: For condenser microphones, ensure 48V phantom power is activated. Check microphone cable connections. Test with a different microphone if possible.
- USB/Bluetooth Playback Issues: Ensure the USB drive is properly inserted and contains compatible audio files. For Bluetooth, ensure the device is correctly paired and within range.
If the issue persists, please contact customer support.
8. Specifications
| Feature | Specification |
|---|---|
| Brand | TKLBLS |
| Number of Channels | 16 |
| Item Weight | 12.09 Kilograms |
| Connectivity Technology | Bluetooth |
| Power Source | Corded Electric |
| Output Connector Type | Auxiliary |
| Audio Input | XLR |
| Noise Level | 26 Decibels |
9. Warranty & Support
This TKLBLS Audio Mixer comes with a 1-year warranty from the date of purchase. For warranty claims or technical support, please contact the TKLBLS Store directly.
You can visit the official TKLBLS Store on Amazon for more information and support: TKLBLS Store