
jelkuz T309S-B+64G
User Manual for jelkuz 10.26'' Wireless CarPlay Screen with Dash Cam
Model: T309S-B+64G
1. Introduction
This manual provides detailed instructions for the installation, operation, and maintenance of your jelkuz 10.26'' Wireless CarPlay Screen with 2.5K Dash Cam and Backup Camera. Please read this manual thoroughly before using the device to ensure proper functionality and safety.
1.1 Product Overview
The jelkuz portable car stereo integrates a 10.26-inch display with wireless Apple CarPlay and Android Auto capabilities, a 2.5K front dash camera, and a 1080P backup camera. It offers features such as GPS navigation, Bluetooth connectivity, AirPlay, AUX/FM audio output, and Siri/Google Assistant voice control. The front camera can rotate 180° for versatile recording, and the system supports simultaneous front and rear recording with a 64GB memory card included.

Figure 1: jelkuz 10.26 inch Wireless CarPlay Screen with Dash Cam and Backup Camera, showing the main unit, front camera, rear camera, and included accessories like the 64GB memory card and 33ft cable.
1.2 What's in the Box
- 1 x 10.26-inch Wireless CarPlay Screen Unit
- 1 x Rear Camera (1080P, waterproof)
- 1 x 64GB Memory Card
- 1 x Suction Cup Bracket
- 1 x Sticker Bracket
- 1 x Car Charger
- 1 x AUX Cable
- 1 x 33ft Rear Camera Cable
- 1 x User Manual

Figure 2: Diagram illustrating the contents of the product package and various vehicle types compatible with the device.
2. Safety Information
- Do not operate the device or adjust settings while driving. Always pull over safely before making any adjustments.
- Ensure all cables are securely connected and do not obstruct the driver's view or vehicle controls.
- The device is compatible with vehicles from 7-36V. Using it with incompatible voltage may cause damage.
- Keep the device away from extreme temperatures, direct sunlight for prolonged periods, and moisture.
- Do not attempt to disassemble or repair the device yourself. Refer to qualified service personnel.
- The rear camera is waterproof, but ensure all connections are sealed to prevent water ingress.
3. Setup and Installation
3.1 Mounting the Display Unit
The display unit can be mounted using either the self-adhesive bracket or the suction mount. Choose a location on your dashboard or windshield that does not obstruct your view or interfere with airbags.
- Clean the mounting surface thoroughly.
- Attach the chosen bracket to the display unit.
- Secure the bracket to the desired location. For the suction mount, press firmly and engage the lever. For the adhesive bracket, peel off the protective film and press firmly for 30 seconds.
- Adjust the angle of the display for optimal viewing. The brackets allow for 360° rotation.

Figure 3: Illustration of the suction cup and sticker brackets, showing their 360° adjustability and examples of various mounting positions in a car. Also depicts the wide range of compatible vehicles.
3.2 Connecting the Power
Connect the provided car charger to the display unit's power input and then plug the charger into your vehicle's cigarette lighter socket.
3.3 Installing the Cameras
- Front Camera: The front camera is integrated into the display unit and can be rotated 180° to record the front, side, or inside of the car. Adjust its angle as needed.
- Rear Camera:
- Mount the 1080P waterproof rear camera at the back of your vehicle, typically above the license plate or near the rear window.
- Route the 33ft rear camera cable from the rear camera to the main display unit, ensuring it does not interfere with vehicle components or passenger movement.
- Connect the rear camera cable to the designated input on the display unit.
- (Optional) For automatic reverse guidelines, connect the rear camera's red wire to your vehicle's reverse light power supply.

Figure 4: Demonstrates the 180° rotation capability of the front camera, allowing it to record the front view, side view, or inside the car, useful for monitoring children in the back seat.

Figure 5: Illustrates the dual recording capability (2.5K front, 1080P rear) and the adjustable reverse guideline feature for parking assistance.
4. Operating Instructions
4.1 Initial Power On and Setup
Once powered, the device will boot up. Follow any on-screen prompts for initial language and time settings.
4.2 Wireless Apple CarPlay / Android Auto Connection
The device supports wireless connection to Apple CarPlay and Android Auto for seamless smartphone integration.
- On the display unit, select the "CarPlay" or "Android Auto" icon.
- On your smartphone, enable Bluetooth and Wi-Fi.
- Search for the device's Bluetooth name (e.g., "TF781BT_xxxxxx") in your phone's Bluetooth settings and pair.
- Confirm the pairing code on both devices.
- Once paired via Bluetooth, the device will automatically prompt you to use CarPlay or Android Auto via Wi-Fi. Confirm the connection.
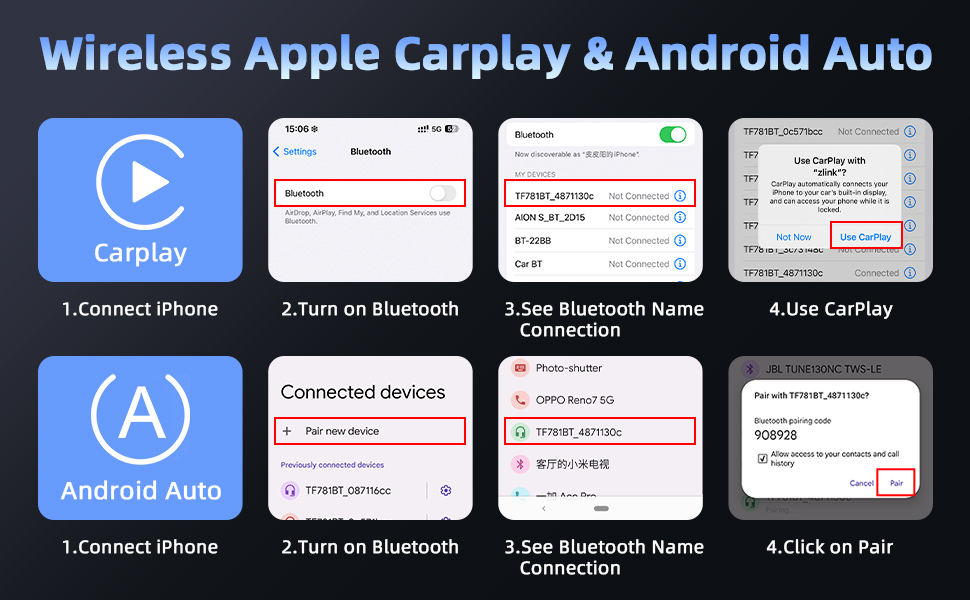
Figure 6: Step-by-step guide showing how to connect an iPhone to the device for Wireless Apple CarPlay and Android Auto via Bluetooth pairing.

Figure 7: Overview of the wireless connectivity options including Apple CarPlay, Android Auto, and Mirror Link, with examples of their interfaces on the display.
4.3 Dash Cam Recording Functions
The device supports simultaneous 2.5K front and 1080P rear camera recording.
- Loop Recording: Footage is recorded in continuous loops. When the memory card is full, the oldest files are overwritten automatically.
- G-Sensor: In case of a sudden impact or collision, the G-sensor will automatically lock the current video file to prevent it from being overwritten.
- Night Vision: Enhanced low-light recording capabilities ensure clear footage even in dark conditions.
- Video Playback: Access recorded videos directly on the display unit or by removing the 64GB memory card and viewing on a computer.
- Mobile App Connection: Use the dedicated mobile app (via 5G WiFi) to preview, play, and download recorded files in real-time on your smartphone.
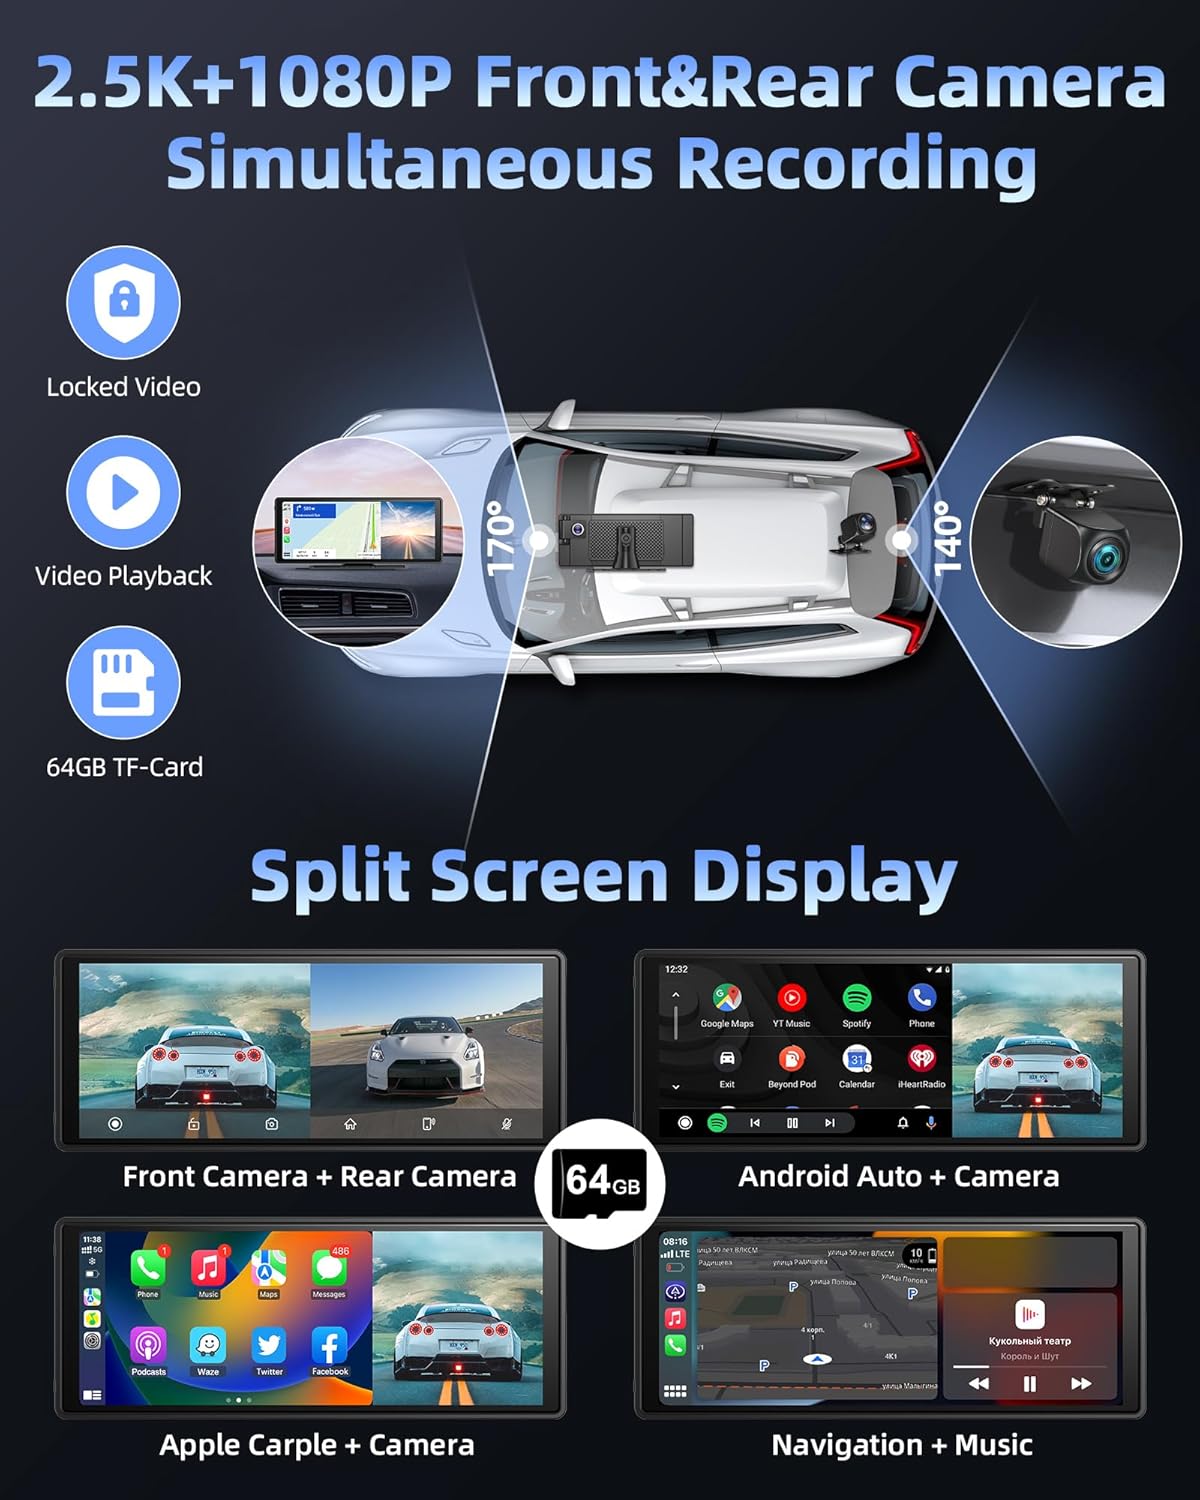
Figure 8: Shows the dual recording feature with 2.5K front and 1080P rear cameras, along with examples of split-screen display modes for viewing camera feeds and applications simultaneously.
4.4 Split Screen Display
The device supports various split-screen modes, allowing you to view camera feeds and applications simultaneously.
- Front Camera + Rear Camera
- Android Auto + Camera
- Apple CarPlay + Camera
- Navigation + Music
- Phone + Front/Rear Camera

Figure 9: Various split-screen configurations, including front camera with rear camera, Android Auto with camera, Apple CarPlay with camera, and navigation with music.
4.5 Audio Output Options
The device offers multiple ways to output audio to your car's sound system.
- Bluetooth: Connect the device to your car's original Bluetooth system for audio playback and hands-free calling. The dual Bluetooth 5.0 design enhances stability.
- FM Transmitter: Transmit audio wirelessly to your car's FM radio by setting both the device and your car radio to the same FM frequency.
- AUX Output: Connect the provided AUX cable from the device's AUX output to your car's AUX input for a wired audio connection.
- Built-in Speaker: The device has a built-in speaker for direct audio output.

Figure 10: Visual representation of the four audio output methods: Bluetooth, FM transmission, built-in speaker, and AUX connection.
4.6 Voice Control (Siri/Google Assistant)
Utilize voice commands for hands-free operation through Siri (for Apple CarPlay) or Google Assistant (for Android Auto).
- Activate voice control by saying "Hey Siri" or "Hey Google" (if configured on your phone) or by tapping the voice assistant icon on the screen.
- Examples of commands: "Navigate to [address]", "Call [contact name]", "Play [song/artist]", "What's the weather today?".

Figure 11: Depicts the voice control functionality with examples of commands and the mobile app connection for real-time video preview and download.
4.7 Auto Dimming Function
The display features an auto-dimming function to adjust screen brightness based on ambient light, reducing glare during night driving.
- Access the display settings to configure auto-dimming preferences, including brightness levels and scheduled dimming times.

Figure 12: Highlights advanced features such as auto-dimming, intelligent voice control, customizable reverse guidelines, and the ability to flip camera views (up/down/left/right).
5. Maintenance
- Cleaning: Use a soft, dry cloth to clean the display screen and device body. Do not use abrasive cleaners or solvents.
- Memory Card: Periodically format the 64GB memory card (at least once a month) to ensure optimal recording performance and prevent data corruption. Back up any important footage before formatting.
- Protective Film: The product surface may have a removable protective film. If scratches or dirt appear, this film can be peeled off.
- Firmware Updates: Check the manufacturer's website or contact support for any available firmware updates to improve performance and add new features.
6. Troubleshooting
| Problem | Possible Cause | Solution |
|---|---|---|
| Device does not power on. | No power from cigarette lighter; loose connection; faulty charger. | Check cigarette lighter fuse; ensure charger is fully inserted; try another power source if available. |
| CarPlay/Android Auto not connecting wirelessly. | Bluetooth/Wi-Fi off on phone; incorrect pairing; interference. | Ensure Bluetooth and Wi-Fi are enabled on your phone; forget device in phone's Bluetooth settings and re-pair; restart both devices. |
| No video from rear camera. | Loose cable connection; faulty camera. | Check the rear camera cable connection at both ends; ensure the camera is properly powered (if applicable). |
| Poor audio quality via FM. | FM frequency interference; weak signal. | Try a different, clear FM frequency on both the device and your car radio. |
| Memory card error / Recording issues. | Corrupted card; full card; incompatible card. | Format the memory card (backup data first); ensure it's a high-speed card (Class 10 or higher); replace if necessary. |
7. Specifications
| Feature | Detail |
|---|---|
| Model Name | T309S-B+64G |
| Display Size | 10.26 inches |
| Front Camera Resolution | 2.5K |
| Rear Camera Resolution | 1080P |
| Field of View | Front: 170°, Rear: 140° |
| Connectivity | Wireless CarPlay, Wireless Android Auto, Mirror Link, Bluetooth 5.0 (Dual), 5G WiFi, AUX, FM Transmitter |
| Power Supply | 7-36V (Cigarette Lighter) |
| Included Memory Card | 64GB |
| Item Weight | 2.57 pounds |
| Package Dimensions | 10.87 x 5.59 x 4.09 inches |
| Mounting Type | Suction Mount, Sticker Bracket |
8. Warranty and Support
Jelkuz offers a 1-year after-sale service for this product. If you encounter any questions during installation or use, or require technical support, please refer to the contact information provided on the instruction manual included in your product package.
For customized boot icon service, please contact the after-sale address specified in the instruction manual.
Ask a question about this manual
Ask about setup, troubleshooting, compatibility, parts, safety, or missing instructions. Manuals+ will review the question and use this page’s manual context to help answer it.