
1. Introduction
This manual provides detailed instructions for the installation, operation, and maintenance of your GLEDOPTO ESP32 WLED LED Strip Controller with Microphone. This device is designed to provide versatile and dynamic lighting control for addressable LED strips, featuring an integrated microphone for music synchronization and extensive customization options via the WLED application.
2. Product Overview
2.1 What's in the Box
- 1pc* ESP32 WLED Strip Controller with Mic
- 1pc* User Manual
- 1pc* 3cm Stricker
2.2 Key Features
- Based on ESP32 Chip: Utilizes a high-performance ESP32 chip for robust processing and stable network connectivity.
- Integrated Microphone Function: Allows LED lights to react to ambient sounds and music rhythms, creating dynamic audio-visual effects.
- Low Power Consumption: Features an on-board switching regulator for the ESP32 and a built-in MOSFET relay for efficient idle operation.
- Simple Wiring and Expandability: Designed with user-friendly wiring ports and an additional IO33 port for DIY customization.
- Rich Dynamic Modes and Compatibility: Offers over 100 dynamic lighting modes and is compatible with various addressable LED strips (e.g., WS2811, WS2812, WS2813, SK6812).
2.3 Product Specifications
| Model No. | GL-C-015WL-M | Input Voltage | DC 5-24V |
| IC Quantity | 800 Max | Output Current/Channel | 10A Max |
| Total Output Current | 15A Max | Material | Fireproof PC |
| Microphone | Yes | UART Download | No |
| Net Weight | 56.4g | Gross Weight | 67.6g |
| Operating Temperature | -20~45°C | Dimensions | 45x18x108mm |
| Connectivity Technology | Wi-Fi | Max Supported Devices | 1 |

Image: Detailed product parameters and specifications.
3. Installation and Wiring
Proper wiring is crucial for the safe and effective operation of your LED strip controller. Please follow these instructions carefully.
3.1 Wiring Diagram
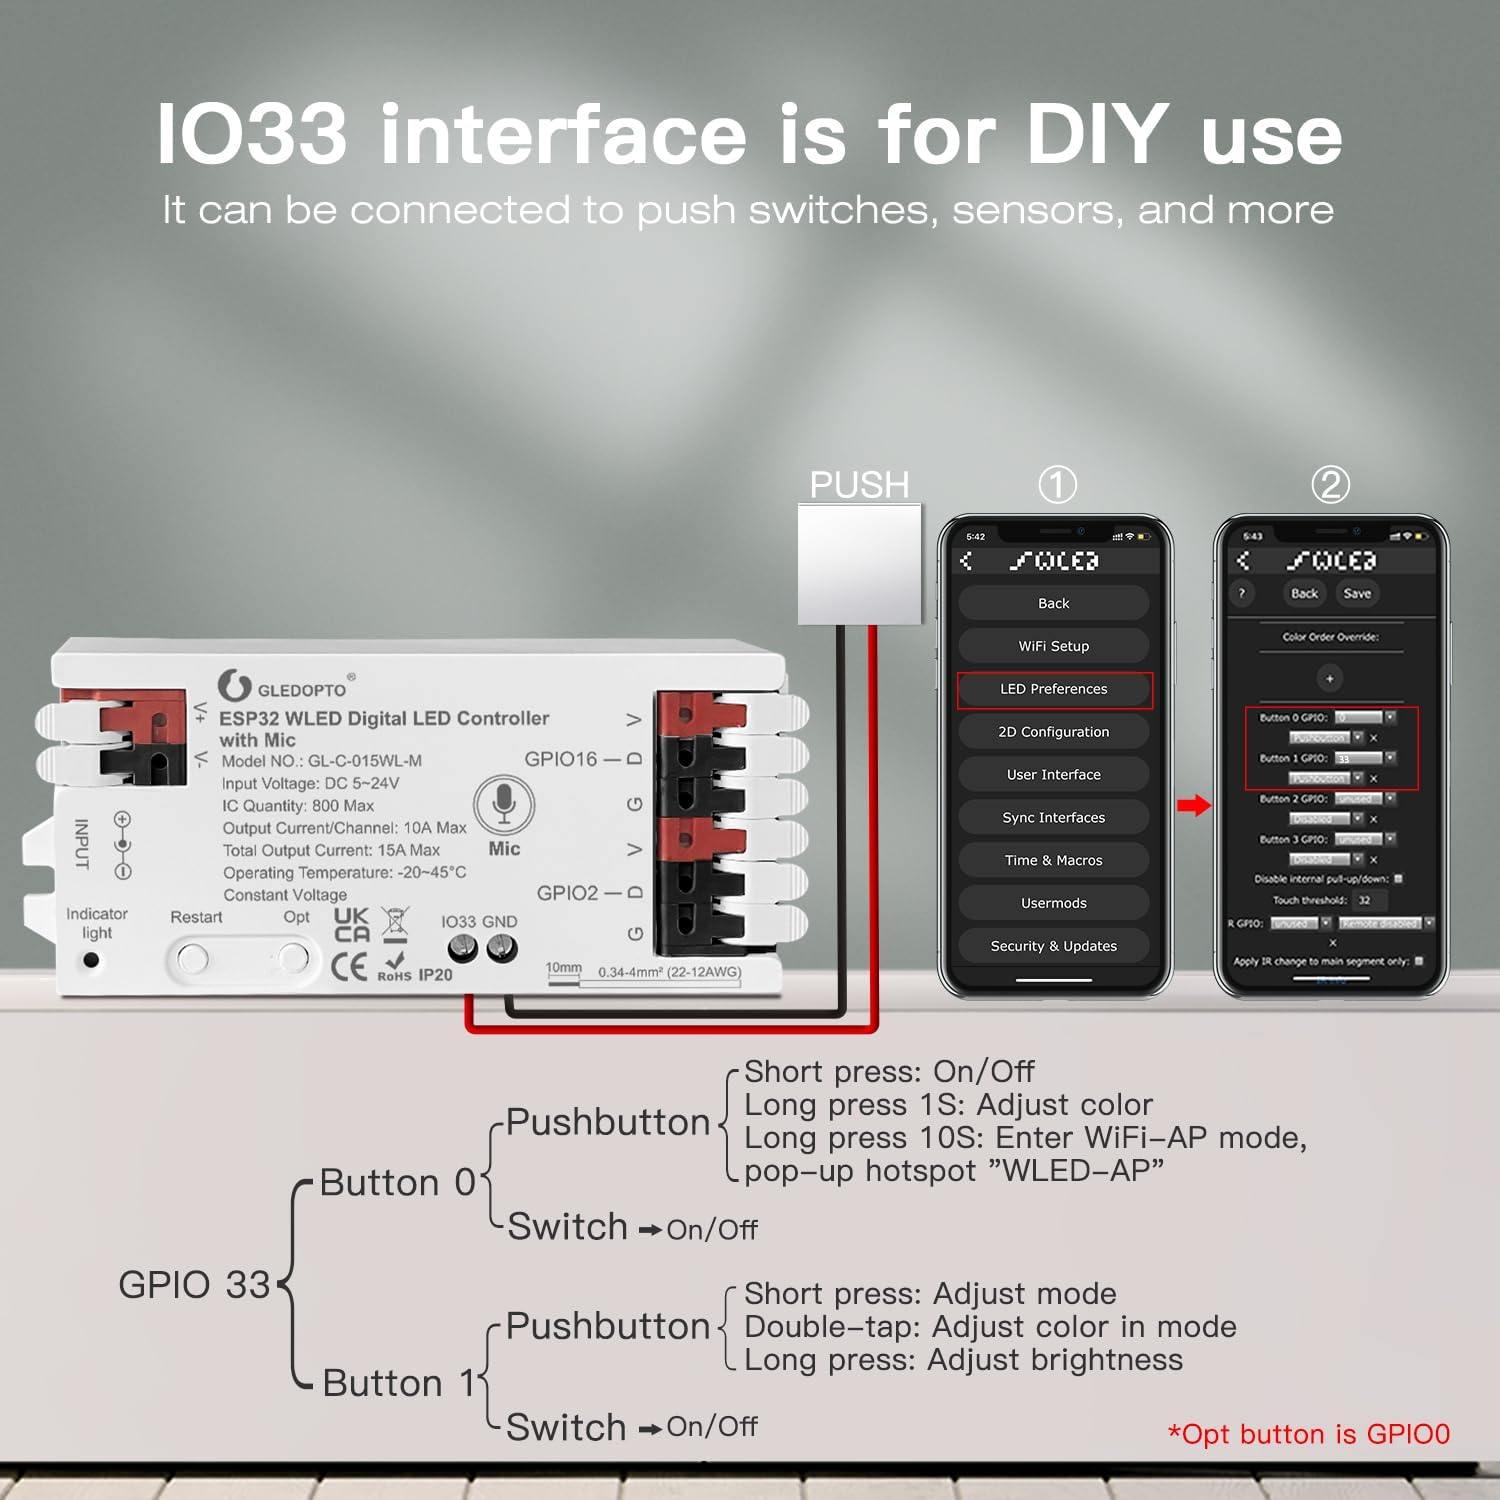
Image: Wiring instructions for the GLEDOPTO controller. V=VCC (Power), D=DATA, G=GND (Ground). The default output group is GPIO16-D. GPIO2-D can be configured via the app.
3.2 Quick Connect Port Usage
The controller features quick-connect ports for simplified wiring. Follow these steps:
- Step 1: Open the connector upwards. Gently lift the lever on the connector to open the wire jaw.
- Step 2: Press down after inserting the wire. Insert the stripped end of the wire into the open slot. Ensure the wire is fully seated.
- Step 3: Wiring is complete, and the product is ready for use. Release the lever to secure the wire. Gently tug on the wire to ensure it is firmly connected.
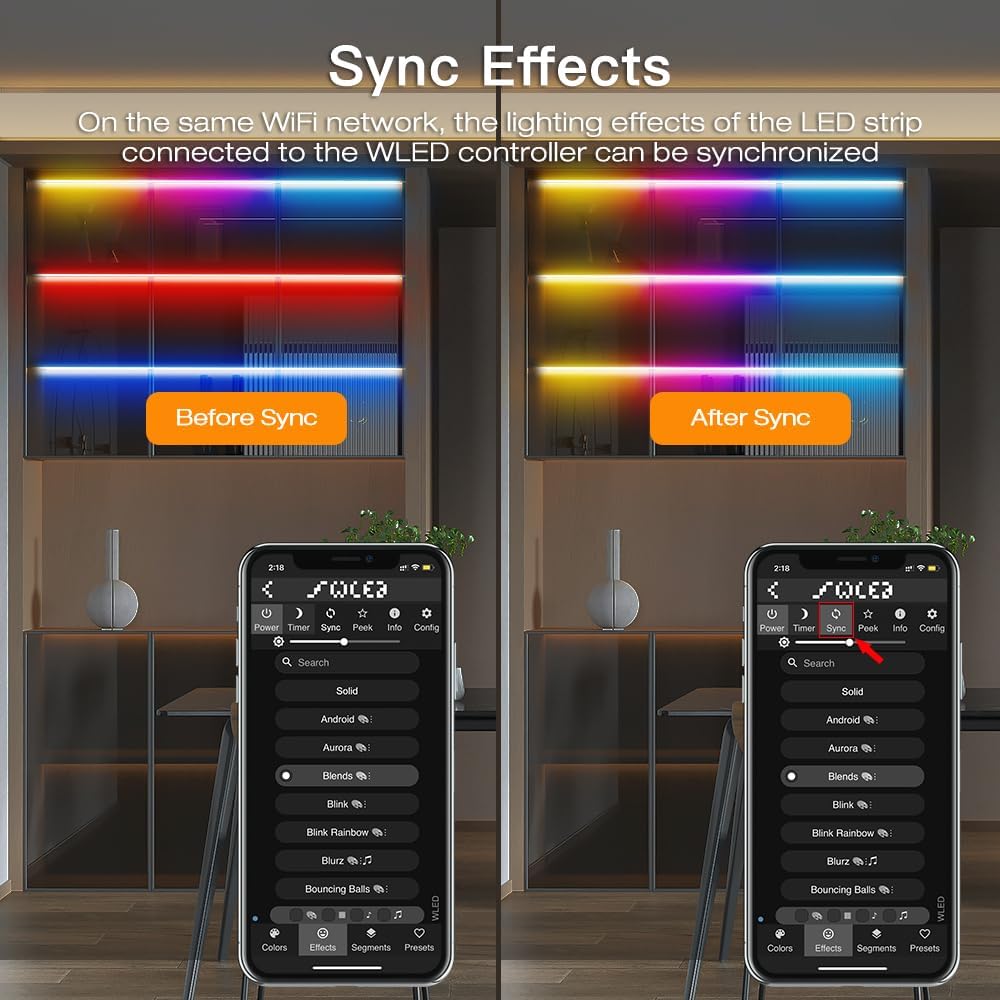
Image: Illustration of opening the quick connect port by lifting the lever upwards.
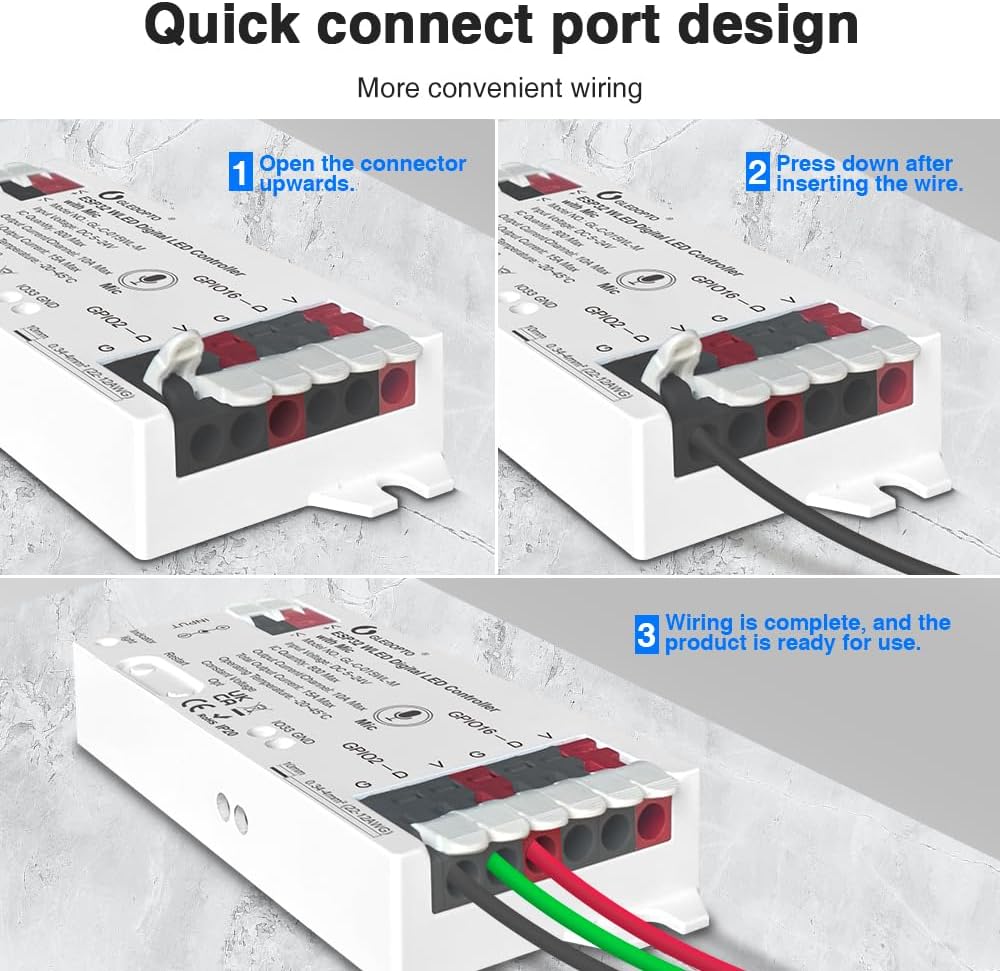
Image: Illustration of pressing down the lever after inserting the wire into the quick connect port.
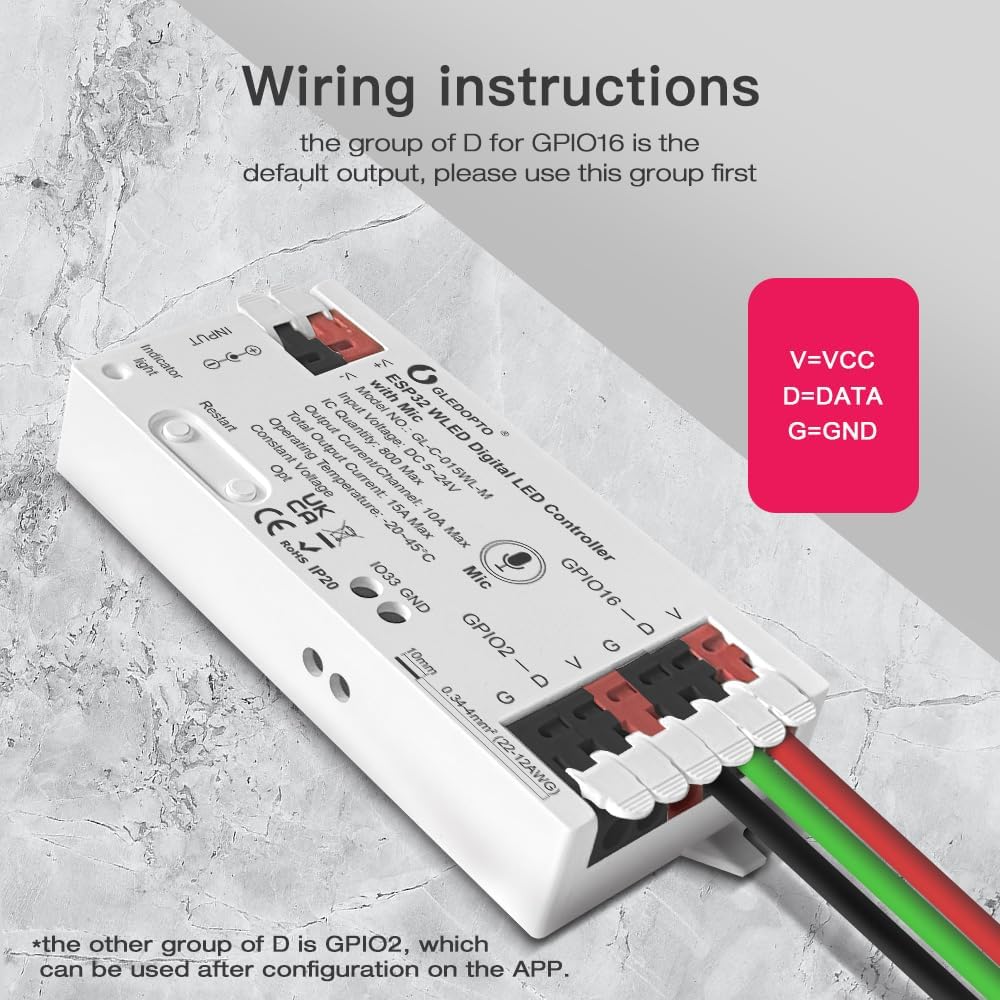
Image: Illustration of the quick connect port with wires securely connected, indicating completion of wiring.
4. Initial Setup
4.1 Connecting to WLED App
The GLEDOPTO controller is designed for easy control via the WLED application, requiring no additional gateway.

Image: A smartphone displaying the WLED application interface, showing color selection and device list, demonstrating easy control without a gateway.
4.2 WiFi Configuration
To connect your controller to your home WiFi network:
- Power on the controller.
- On your smartphone or computer, search for available WiFi networks.
- Connect to the network named "WLED-AP" (or similar).
- Once connected, a configuration portal should automatically open in your browser. If not, navigate to
192.168.4.1. - Enter your home WiFi network's SSID and password in the portal.
- Save the settings. The controller will restart and connect to your home network.
- Open the WLED app. Your controller should now appear in the device list.
5. Operation
5.1 WLED App Control
The WLED app provides comprehensive control over your LED strips. You can adjust colors, brightness, and select various effects.
5.2 Dynamic Lighting Modes
The controller offers over 100 dynamic lighting modes, allowing for extensive personalization of your lighting effects.
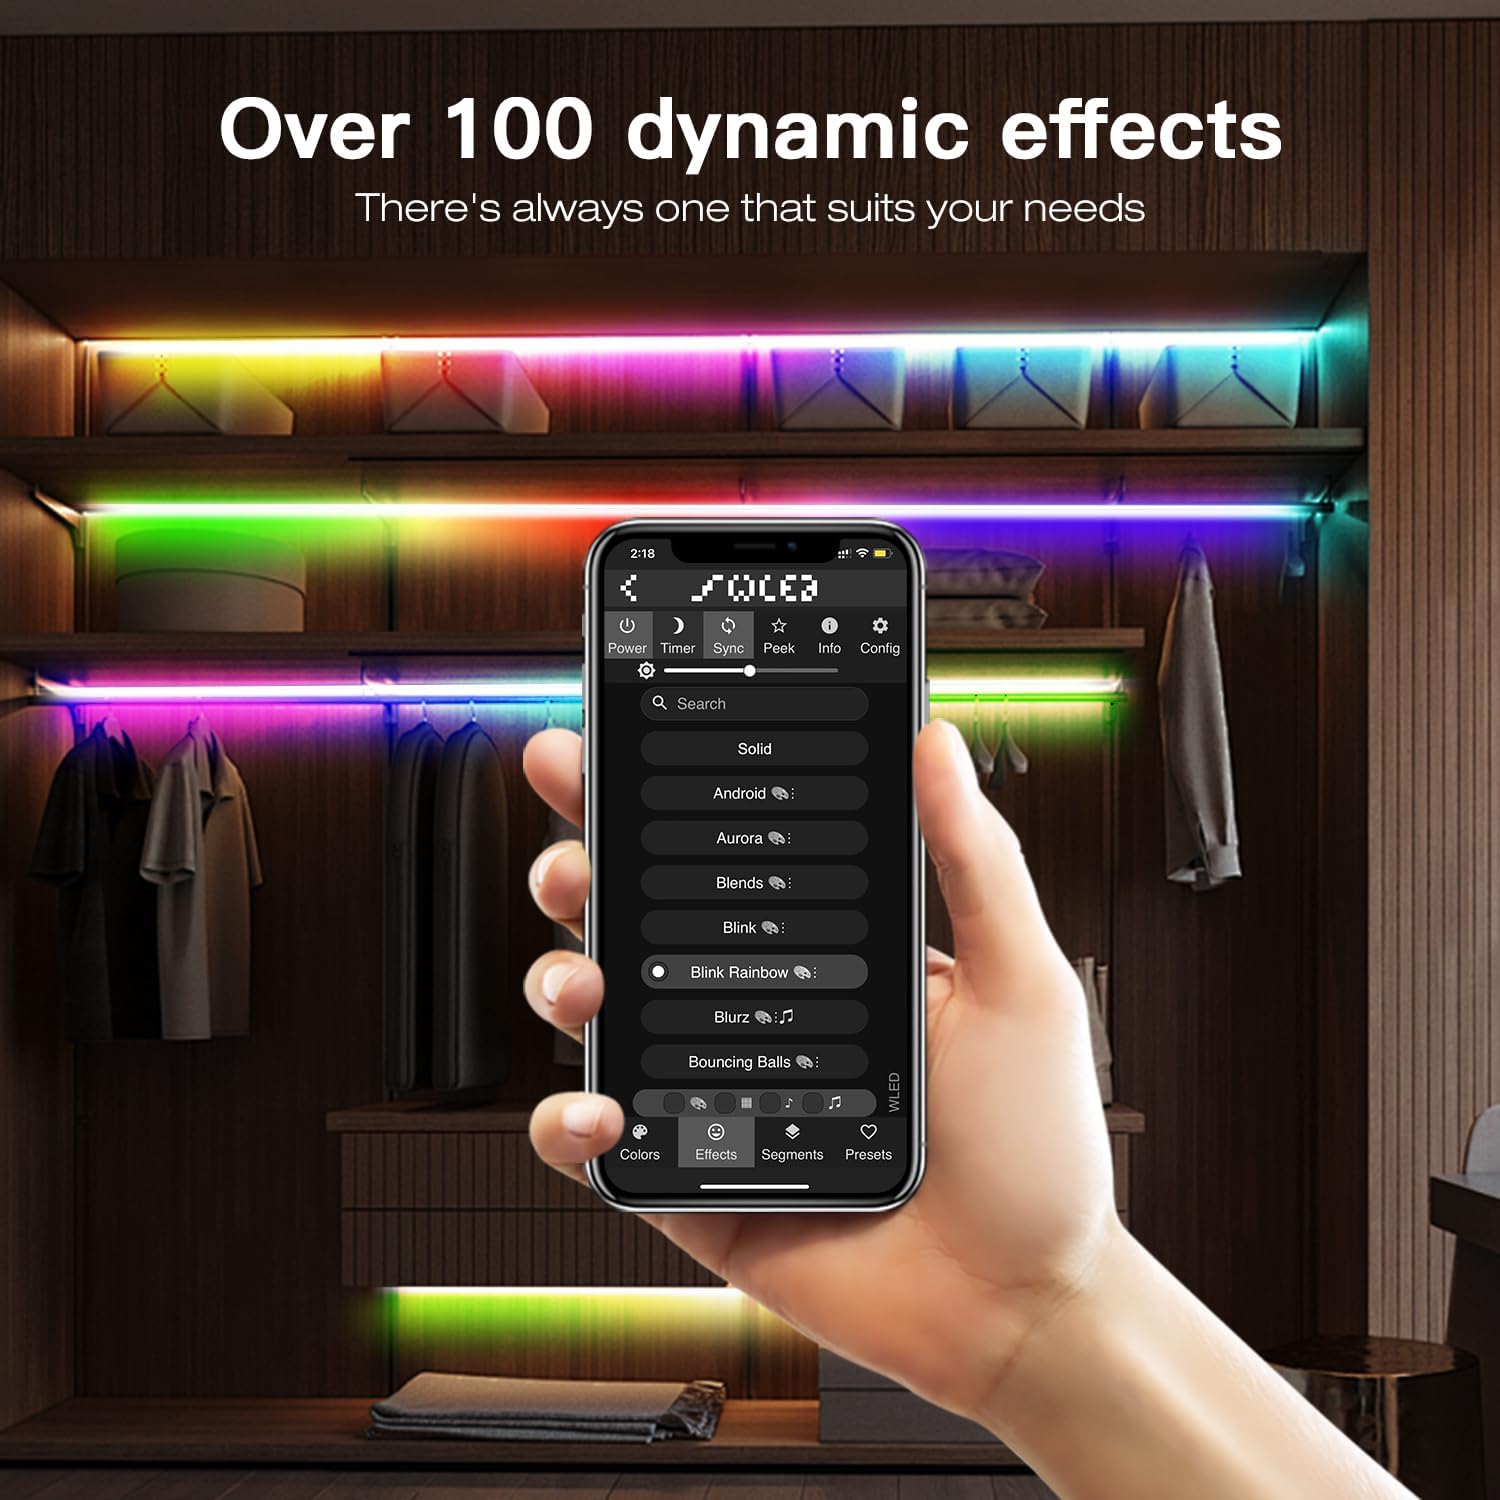
Image: A smartphone displaying the WLED application's effects menu, showcasing a wide variety of dynamic lighting modes available for selection.
5.3 Music Synchronization (Microphone Function)
The built-in microphone enables the LED lights to respond to surrounding sounds and music, creating immersive dynamic effects.

Image: A scene depicting LED strip lights dynamically changing colors and patterns in response to music, illustrating the microphone function.
5.4 Segmented Color Control
Personalize every segment of your LED strip to display different colors, allowing for intricate and custom lighting designs.

Image: An LED strip displaying multiple distinct colors across its length, demonstrating the segmented color control feature.
5.5 Syncing Multiple Controllers
On the same WiFi network, the lighting effects of multiple WLED controllers can be synchronized for a cohesive lighting experience across different areas.

Image: A comparison showing LED strips with unsynchronized effects (Before Sync) and synchronized effects (After Sync) across multiple installations, controlled via the WLED app.
5.6 Physical Button Functions
The controller includes physical buttons for basic control and configuration:
- Restart Button: Pressing this button will power off the controller module and then power it back on. This is useful for restarting the controller after configuring the microphone or other settings.
- Opt Button (GPIO0):
- Short press: Power On/Off.
- Long press for 1 second: Switch colors.
- Long press for 10 seconds: Reset the WLED controller and activate the WLED-AP hotspot for initial setup or re-configuration.

Image: Diagram illustrating the functions of the physical 'Restart' and 'Opt' buttons on the GLEDOPTO controller.
5.7 IO33 Interface for Customization
The IO33 interface is provided for advanced users and DIY enthusiasts. It can be connected to external push switches, sensors, and other components to expand functionality.

Image: Diagram showing the IO33 interface on the controller and its connection to external pushbuttons for custom control, along with corresponding WLED app settings.
6. Compatibility
The GLEDOPTO ESP32 WLED LED Strip Controller is compatible with a wide range of addressable LED strip types, including but not limited to:
- WS2811
- WS2812 / WS2812B
- SK6812
- TM1814
- WS2813
- WS2815
- SM16703P
- GS8208

Image: Visual representation of various compatible addressable LED strip types, such as WS2812B, SK6812, and WS2811, highlighting the controller's broad compatibility.
7. Maintenance
To ensure the longevity and optimal performance of your GLEDOPTO LED Strip Controller, follow these general maintenance guidelines:
- Keep Clean: Regularly wipe the controller with a dry, soft cloth to remove dust and debris. Avoid using liquid cleaners.
- Avoid Moisture: Ensure the controller is installed in a dry environment, away from water or high humidity, as it is not waterproof.
- Proper Ventilation: Ensure adequate airflow around the controller to prevent overheating, especially during extended use.
- Secure Connections: Periodically check all wiring connections to ensure they remain secure and free from corrosion.
- Firmware Updates: Check the WLED community or official GLEDOPTO channels for any available firmware updates to improve performance and add new features.
8. Troubleshooting
If you encounter issues with your GLEDOPTO LED Strip Controller, refer to the following common troubleshooting steps:
| Problem | Possible Cause | Solution |
|---|---|---|
| Controller not powering on | No power supply; incorrect voltage; faulty power adapter. | Verify power supply connection. Ensure input voltage is DC 5-24V. Test with a different power adapter if available. |
| LEDs not lighting up or flickering | Incorrect wiring (Data, GND, VCC); loose connections; incompatible LED strip; insufficient power for LED strip. | Double-check wiring according to the diagram (V, D, G). Ensure all quick-connects are secure. Confirm LED strip type is compatible. Use an adequate power supply for the length and type of LED strip. |
| Cannot connect to WLED-AP WiFi | Controller not in AP mode; WiFi interference. | Long press the 'Opt' button for 10 seconds to reset and activate WLED-AP hotspot. Try connecting from a different device or location to rule out interference. |
| Controller not appearing in WLED app after WiFi setup | Incorrect WiFi credentials; controller failed to connect to home network; network firewall. | Ensure correct SSID and password were entered during setup. Restart the controller. Check router settings for any client isolation or firewall rules blocking communication. Ensure your phone is on the same WiFi network as the controller. |
| Microphone function not working | Microphone not configured; ambient noise too low. | Ensure microphone settings are correctly configured within the WLED app (e.g., input type, gain). Increase ambient sound or music volume. |
9. Support
For further assistance, technical support, or warranty inquiries, please contact the seller or manufacturer directly. Refer to your purchase documentation for specific contact details.
Manufacturer: Sogledwow
Seller: GLEDOPTO SMART STORE