1. Introduction
The Blackmagic Design ATEM 1 M/E Constellation 4K is a powerful 1 M/E Ultra HD live production switcher designed for professional broadcast and live event environments. This manual provides essential information for the setup, operation, and maintenance of your ATEM 1 M/E Constellation 4K switcher.
Key features include 10 standards-converted 12G-SDI inputs, 6 12G-SDI auxiliary outputs, a Digital Video Effects (DVE) processor, 4 ATEM Advanced Keyers, a 16-way multiview, integrated media players, and a USB webcam output. It also incorporates built-in talkback functionality and a professional 28-channel Fairlight audio mixer with EQ and dynamics processing.
2. Product Overview
2.1 Front Panel Controls and Indicators
The ATEM 1 M/E Constellation 4K features a compact rack-mount design with an integrated control panel, allowing for direct operation, especially useful during setup or in emergency situations. The front panel provides access to essential switching functions, audio controls, and system settings.

Figure 2.1: Front Panel of the ATEM 1 M/E Constellation 4K Switcher.
This image displays the front panel, highlighting the input selection buttons (1-10), program/preview buttons, DSK, KEY, MP, FTB controls, CUT/AUTO transition buttons, a talkback connection, and an LCD display for monitoring and menu navigation.

Figure 2.2: Angled Front View of the ATEM 1 M/E Constellation 4K Switcher.
This angled view provides a better perspective of the unit's compact form factor and the layout of the front panel controls, including the talkback XLR connector on the left and the menu navigation section on the right.
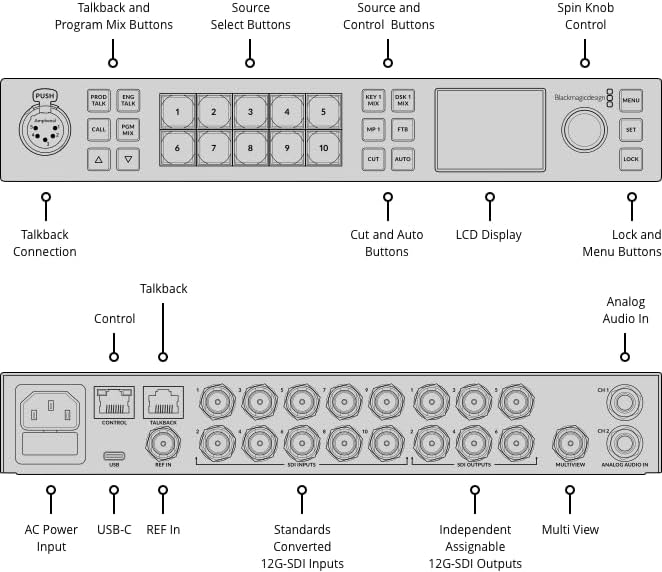
Figure 2.3: Front Panel Control Diagram.
This diagram illustrates the specific functions of each button and control on the front panel, including the Talkback Connection, Program/Mix buttons, Source Select buttons (1-10), DSK/KEY/MP/FTB controls, Cut/Auto transition buttons, LCD Display, Spin Knob, and Menu/Lock buttons.
2.2 Rear Panel Connections
The rear panel houses all the necessary input and output connections for video, audio, and control, facilitating integration into a live production workflow.

Figure 2.4: Rear Panel of the ATEM 1 M/E Constellation 4K Switcher.
This image details the rear connections, including the AC power input, USB-C port, REF IN, Control and Talkback Ethernet ports, 10 standards-converted 12G-SDI inputs, 6 independent assignable 12G-SDI outputs, a Multiview SDI output, and analog audio inputs (CH1, CH2).
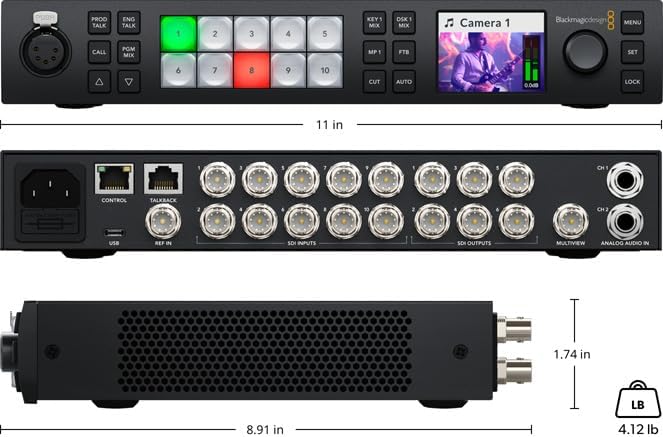
Figure 2.5: Rear Panel Connection Diagram.
This diagram provides a clear labeled overview of all rear panel connections, including power, data, video inputs and outputs, and audio inputs.
3. Setup
3.1 Power Connection
- Connect the provided 6ft power cord to the AC power input on the rear panel of the ATEM 1 M/E Constellation 4K.
- Plug the other end of the power cord into a grounded electrical outlet.
- Ensure the power source meets the voltage requirements specified for the device.
3.2 Video Input Connections
The switcher features 10 standards-converted 12G-SDI inputs. These inputs automatically detect and convert various video formats, simplifying multi-source setups.
- Connect your SDI video sources (e.g., cameras, playback devices) to the "SDI INPUTS" BNC connectors on the rear panel.
- Ensure that the SDI cables are of appropriate quality and length for 12G-SDI signals to maintain signal integrity.
- For reference synchronization, connect a black burst or tri-sync signal to the "REF IN" BNC connector.
3.3 Video Output Connections
The ATEM 1 M/E Constellation 4K provides 6 independent assignable 12G-SDI outputs and a dedicated Multiview SDI output.
- Connect your program output, auxiliary feeds, or other desired video signals to the "SDI OUTPUTS" BNC connectors.
- Connect a monitor to the "MULTIVIEW" SDI output to view all inputs, program, and preview feeds simultaneously.
- For webcam functionality, connect a USB-C cable from the "USB Type-C" port to a computer.
3.4 Audio Connections
The switcher includes balanced analog audio inputs and talkback capabilities.
- Connect balanced audio sources to the "ANALOG AUDIO IN" 1/4" TRS inputs (CH1, CH2) on the rear panel.
- For talkback communication, connect a 5-pin XLR headset to the "Talkback Connection" on the front panel.
3.5 Network Connection
Connect an Ethernet cable from your network switch or computer to the "CONTROL" RJ-45 port on the rear panel for remote control via ATEM Software Control.
4. Operation
4.1 Basic Switching
The front panel allows for direct program and preview switching.
- Program/Preview Buttons: The top row of numbered buttons (1-10) typically selects the source for the program output, while the bottom row selects the source for the preview output.
- CUT Button: Performs an instant, hard cut transition between the preview and program sources.
- AUTO Button: Executes a smooth, timed transition (e.g., dissolve, wipe) between the preview and program sources, based on the selected transition type and duration.
4.2 Using the LCD Display and Rotary Knob
The integrated LCD display provides visual feedback and access to various switcher settings.
- MENU Button: Press to access the switcher's menu system on the LCD.
- Rotary Knob: Turn to navigate through menu options and adjust parameters.
- SET Button: Press to confirm selections or enter sub-menus.
- LOCK Button: Engages or disengages the control panel lock to prevent accidental changes.
4.3 Advanced Features (Overview)
The ATEM 1 M/E Constellation 4K offers advanced features for complex productions:
- ATEM Advanced Keyers: Utilize the 4 advanced keyers for chroma, luma, pattern, and DVE keying effects.
- DVE: The Digital Video Effects processor allows for picture-in-picture effects, resizing, and positioning of video sources.
- Media Players: Access built-in media players for graphics, logos, and stills.
- Fairlight Audio Mixer: The 28-channel audio mixer provides comprehensive control over audio levels, EQ, and dynamics for all inputs.
- Multiview: Monitor up to 16 different views on a single display, including inputs, program, preview, and media players.
5. Maintenance
5.1 General Care
- Keep the switcher in a clean, dry environment, away from direct sunlight and extreme temperatures.
- Ensure proper ventilation around the unit to prevent overheating. Do not block ventilation openings.
- Avoid exposing the device to liquids or excessive dust.
5.2 Cleaning
- Disconnect the power before cleaning.
- Use a soft, dry, lint-free cloth to wipe the exterior surfaces.
- For stubborn marks, lightly dampen the cloth with water; avoid harsh chemicals or abrasive cleaners.
6. Troubleshooting
6.1 No Power
- Verify the power cord is securely connected to both the switcher and the electrical outlet.
- Check if the electrical outlet is functional by plugging in another device.
- Ensure the correct fuse is installed and not blown (refer to the fuse compartment on the rear panel).
6.2 No Video Output
- Confirm that video sources are properly connected to the SDI inputs and are active.
- Check that the correct input is selected on the program bus.
- Verify that output monitors are correctly connected to the SDI outputs and are powered on.
- Ensure that the output format of the switcher matches the capabilities of your display devices.
6.3 Network Connection Issues
- Ensure the Ethernet cable is securely connected to the "CONTROL" port and your network.
- Check network settings on your computer and the switcher to ensure they are on the same subnet.
- Restart the ATEM Software Control application and the switcher.
7. Specifications
| Model Number | SWATEMSCN2/2ME1/4K |
| Video Inputs | 10 x Standards Converted 12G/6G/3G/HD/SD-SDI |
| Reference Input | 1 x Reference SDI |
| Video Outputs | 6 x 12G-SDI (Assignable), 1 x 16-Way Multiview SDI |
| Audio Inputs | 2 x Balanced 1/4" TRS input |
| Talkback | 1 x 5 pin XLR (Front Panel), 1 x RJ-45 (Rear Panel) |
| Control Interface | 2 x RJ-45 (Ethernet Control and Talkback), 1 x USB Type-C (Webcam Output) |
| Dimensions (L x W x H) | 8.91 x 11 x 1.74 inches |
| Weight | 4.12 pounds |
| Manufacturer | Blackmagic Design |
| Compatible Devices | Camera, Television |
8. Support and Warranty
8.1 Technical Support
For technical assistance, software updates, and additional resources, please visit the official Blackmagic Design support website:
www.blackmagicdesign.com/support
8.2 Warranty Information
This product is covered by a limited manufacturer's warranty. Please refer to the warranty documentation included with your purchase or visit the Blackmagic Design website for detailed terms and conditions. Keep your proof of purchase for warranty claims.


