1. Introduction
This manual provides detailed instructions for the safe and effective use of your HOLEWOR Biometric Pistol Safe. Please read this manual thoroughly before operating the device and retain it for future reference.
2. Important Safety Information
WARNING: Firearm safety is paramount. Always store firearms securely and out of reach of children. This safe is designed to deter unauthorized access but is not a substitute for responsible firearm handling and storage practices.

Image: A child looking over a table, with a gun visible. Below, the HOLEWOR safe is shown securely stored inside a drawer, out of reach. This illustrates the importance of secure storage.

Image: A visual emphasizing child safety, showing a child observing the safe, with a clear indication that the safe helps keep firearms out of children's reach.
Ensure the safe is properly secured to a fixed object using the provided security cable to prevent unauthorized removal.
3. Product Overview
The HOLEWOR Biometric Pistol Safe offers multiple access methods and a robust design for securing your handgun and valuables.

Image: The HOLEWOR Biometric Pistol Safe in its closed state, highlighting its sleek black design and the control panel with numbered buttons and fingerprint scanner.
Key Features:
- 3 Ways to Access: Biometric fingerprint, 6-digit passcode, and backup keys.
- Compact and Portable: Dimensions of 11.4"D x 7.1"W x 2.5"H, weighing 4.65 lbs, designed for easy transport.
- Temporary Power: Emergency USB-C power supply for access if batteries are depleted.
- Solid & Security: Constructed from Alloy Steel, includes a 40.16" steel security cable for tethering.
- Internal Protection: Inside foaming protects contents.
- LED Light: Internal blue LED light illuminates when opened for visibility in low light.

Image: The compact size of the safe is demonstrated as it is easily placed into a backpack, emphasizing its portability for travel.

Image: A close-up view of the safe's interior, highlighting the soft foam padding designed to protect stored items from scratches and impacts.

Image: The interior of the open safe is illuminated by a blue LED light, demonstrating its utility for accessing contents in dark environments.
4. Setup Instructions
4.1. Battery Installation
- Locate the battery compartment, typically found on the underside or inside the safe.
- Use the provided screwdriver to unscrew the battery compartment cover.
- Insert the required batteries (Alkaline, included) into the compartment, ensuring correct polarity.
- Replace the cover and secure it with the screw.
4.2. Registering Fingerprints
The safe supports up to 50 fingerprints.
- With the safe open, locate the function button (often labeled 'SET' or similar) inside the safe.
- Press the function button once. The fingerprint scanner light will turn blue.
- Press the number '3' button on the keypad.
- Place your finger firmly on the fingerprint scanner. Lift and repeat three times until you hear a long beep, indicating successful registration.
- For improved reliability, register the same finger multiple times from different angles.

Image: A finger is shown on the biometric scanner, illustrating the 'One Touch Unlock' feature for quick access.
4.3. Setting a Passcode
The safe supports up to 8 passcodes, each 6 digits long.
- With the safe open, locate the function button inside the safe.
- Press the function button once.
- Press the number '1' button on the keypad.
- Enter your desired 6-digit passcode using the numbered buttons (1, 2, 3, 4).
- Confirm the passcode by re-entering it. You will hear a confirmation beep upon successful setup.

Image: A hand interacting with the keypad to enter a passcode, demonstrating the 'Passcode Unlock' method.
5. Operating Instructions
5.1. Opening the Safe
- Using Fingerprint: Place a registered finger on the biometric scanner. The safe will open automatically.
- Using Passcode: Enter your 6-digit passcode on the keypad. The safe will open automatically.
- Using Keys: Insert one of the two backup keys into the keyhole and turn to unlock. The safe will open manually.
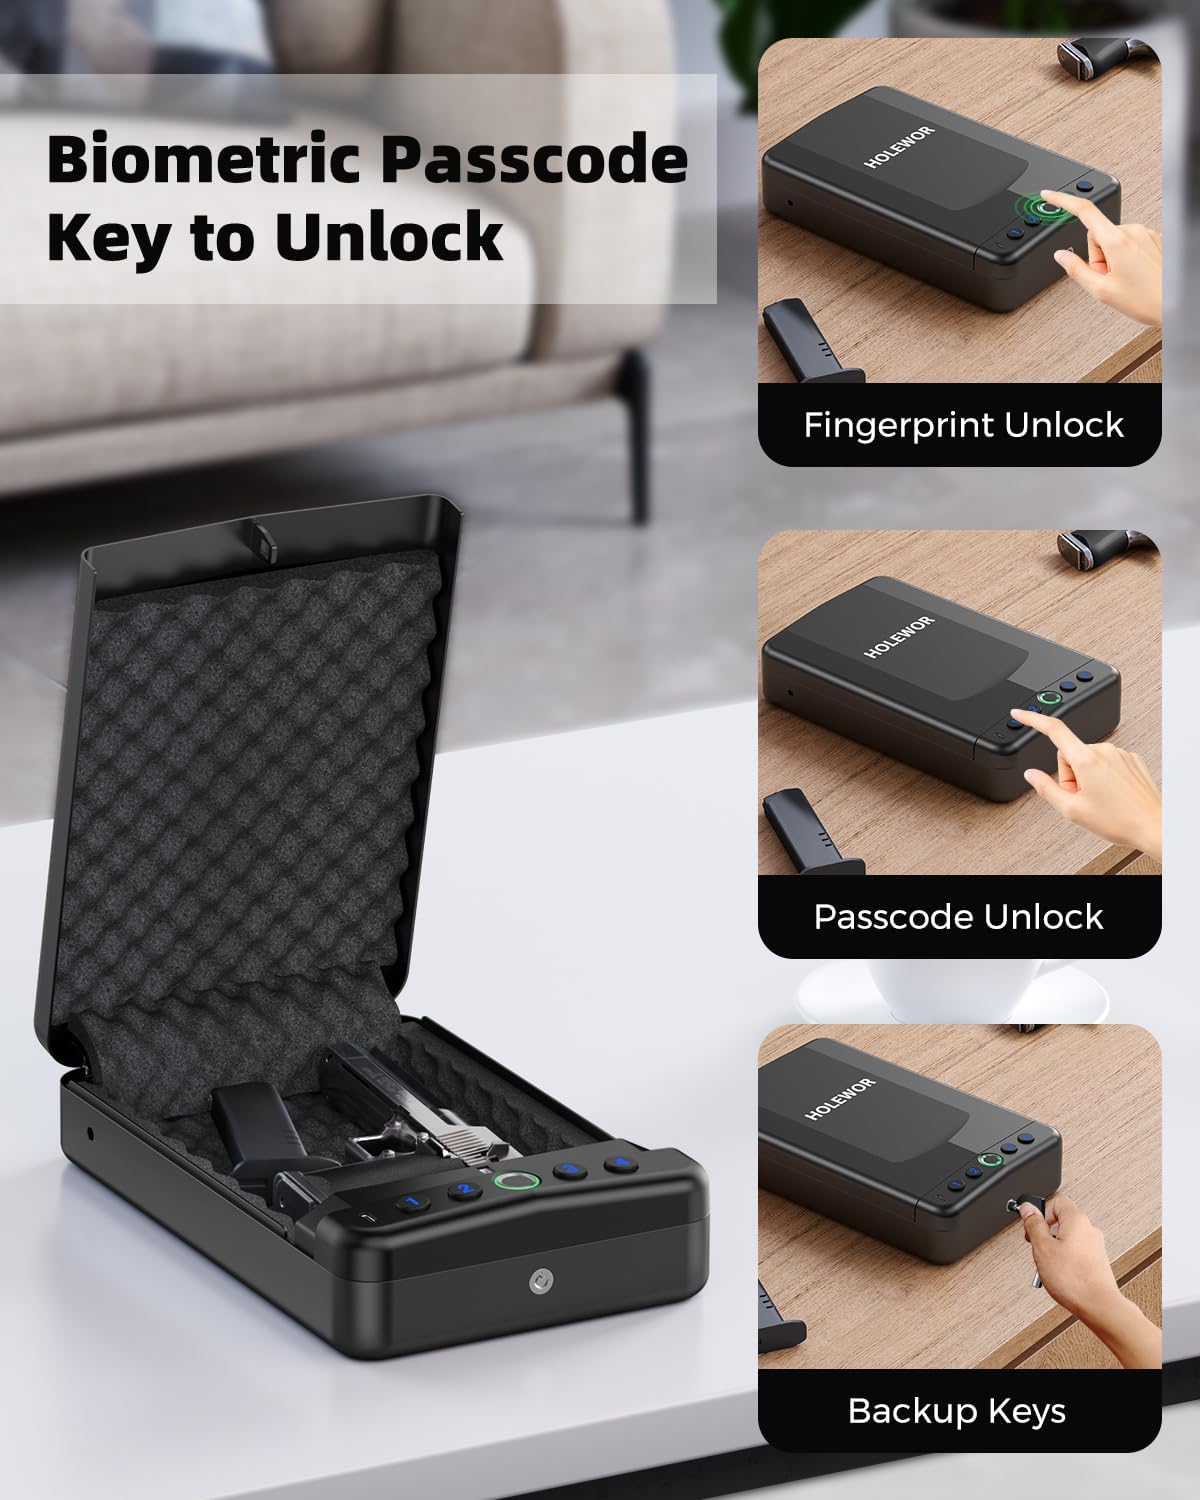
Image: A composite image illustrating the three primary methods of accessing the safe: fingerprint recognition, passcode entry, and manual key override.

Image: A hand inserting and turning a mechanical key in the safe's lock, demonstrating the manual key unlock method.
5.2. Securing the Safe with Cable
The 40.16" steel security cable can be used to tether the safe to a fixed object, enhancing security and preventing easy removal.
- Locate the cable attachment point on the safe.
- Thread the steel security cable through the attachment point and around a secure, immovable object (e.g., car seat frame, desk leg).
- Secure the cable ends as instructed in the cable's specific locking mechanism.

Image: The safe is shown secured under a car seat using the included steel security cable, illustrating a common use case for enhanced security.
6. Maintenance
6.1. Cleaning
Wipe the exterior of the safe with a soft, dry cloth. For the biometric scanner, use the provided cleaning cloth or a lint-free cloth to ensure optimal performance. Avoid abrasive cleaners or solvents.
6.2. Battery Replacement
When the batteries are low, the safe may indicate this with a specific light or sound. Replace all batteries with new Alkaline batteries following the installation steps in Section 4.1.
7. Troubleshooting
| Problem | Possible Cause | Solution |
|---|---|---|
| Safe does not open with fingerprint. | Finger not registered or improperly scanned. | Ensure finger is clean and dry. Re-register fingerprint, trying different angles. Try another registered finger. |
| Safe does not open with passcode. | Incorrect passcode entered. | Verify the passcode. Ensure all 6 digits are entered correctly. |
| Safe is unresponsive (no lights/sounds). | Batteries are depleted. | Connect a USB-C cable to the emergency power port for temporary power access. Replace batteries as soon as possible. Use backup keys if available. |
| Safe cannot be opened with keys. | Key is damaged or incorrect. | Ensure you are using the correct backup key. If key is damaged, contact customer support. |
8. Specifications
| Feature | Detail |
|---|---|
| Brand | HOLEWOR |
| Product Dimensions | 11.4"D x 7.1"W x 2.5"H |
| Lock Type | Biometric, Electronic Combination Lock, Mechanical Key Lock |
| Color | Black |
| Capacity | 4.65 Pounds (weight of safe) |
| Material | Alloy Steel |
| Special Features | Biometric Fingerprint, Combination Lock, Portable, Small |
| Mounting Type | Under the Seat, Nightstand |
| Control Type | Biometric Control, Passcode Control, Key Control |
| Included Components | Accessories, Portable Gun Safe |
| Alarm | Anti-theft |
| Water Resistance Level | Not Water Resistant |
| Chamber Depth | 2.5 Inches |
| Item Weight | 5.46 pounds |
| Item Model Number | Pistol Safe |
| Batteries Included? | Yes |
| Batteries Required? | Yes |
| Battery Cell Type | Alkaline |
9. Warranty and Support
HOLEWOR is committed to providing reliable quality and purposeful design. For any product inquiries, technical support, or warranty claims, please contact HOLEWOR customer service through the retailer's platform or the official HOLEWOR brand store.
Keep your purchase receipt as proof of purchase for warranty purposes.


