1. Product Overview
Thank you for choosing the GRIFEMA 2PCS 20W LED Outdoor Floodlights. This manual provides essential information for the safe and efficient installation, operation, and maintenance of your new floodlights. These units are designed for outdoor use, offering bright, energy-efficient illumination with a robust, weather-resistant design.
Package Contents:
- 2 x GRIFEMA 20W LED Outdoor Floodlights
- Instruction Manual

Image 1.1: Two GRIFEMA 20W LED Outdoor Floodlights. These are compact, black-framed lights with a white LED panel, designed for outdoor illumination.
2. Safety Information
Please read all safety instructions carefully before installation and use. Failure to follow these instructions may result in electric shock, fire, or other hazards.
- Electrical Safety: This product does not come with a plug and requires direct wiring. Installation should be performed by a qualified electrician to ensure compliance with local electrical codes and safety standards.
- Power Disconnection: Always disconnect power at the circuit breaker before installing, servicing, or cleaning the floodlights.
- Voltage: Ensure the power supply voltage matches the requirements of the floodlight (typically 220-240V for European markets).
- Grounding: Proper grounding is essential to prevent electric shock. Connect the yellow/green wire to the ground terminal.
- Operating Temperature: Do not operate the floodlight in environments outside its specified temperature range.
- Waterproof Rating: The floodlight is IP66 rated, meaning it is protected against powerful water jets and dust. However, it should not be submerged in water.
- Light Source: Do not stare directly into the LED light source when illuminated, as it may cause eye strain or damage.
- Handling: Handle the floodlights with care during installation to avoid damage, as some components may be delicate.
3. Installation
The GRIFEMA LED floodlights are designed for flexible installation on various outdoor surfaces. Always ensure the mounting surface is sturdy enough to support the weight of the fixture.
3.1 Mounting Options
Each floodlight features a 180° adjustable bracket, allowing for versatile positioning. Common mounting methods include:
- Wall Mounted: Securely attach the bracket to a vertical wall surface.
- Ground Mounted: Install the bracket onto a horizontal ground surface.
- Under Eave Mounting: Mount the bracket to the underside of an eave or overhang.

Image 3.1: Adjustable positioning of the floodlight. The bracket allows for 180-degree rotation, enabling installation on walls, ground, or under eaves.
3.2 Wiring Instructions
As these floodlights do not include a plug, professional electrical installation is highly recommended.
- Disconnect Power: Turn off the main power supply at the circuit breaker before beginning any wiring.
- Identify Wires: The floodlight cable contains three wires:
- Brown wire: Live (L)
- Blue wire: Neutral (N)
- Yellow/Green wire: Ground (E)
- Connect Wires: Connect the floodlight wires to your mains power supply wires according to their respective functions (Live to Live, Neutral to Neutral, Ground to Ground). Use appropriate waterproof connectors and junction boxes for outdoor installations.
- Secure Connections: Ensure all connections are secure and properly insulated to prevent short circuits and water ingress.
- Restore Power: Once installation is complete and all connections are checked, restore power at the circuit breaker.

Image 3.2: Product dimensions and wiring detail. This image illustrates the compact size of the floodlight and the three-wire cable (brown, blue, yellow/green) for direct electrical connection.
4. Operation
Once properly installed and connected to a power source, the GRIFEMA LED floodlights will operate when power is supplied. There are no complex controls on the unit itself.
- Light Activation: The floodlights will illuminate when power is switched on at the connected circuit or switch.
- Light Output: Each 20W floodlight provides 2200 lumens of 6500K cool white light with a 100° lighting angle, suitable for illuminating various outdoor areas.

Image 4.1: Energy saving and lighting angle. This graphic demonstrates the energy efficiency of the 20W LED compared to a 150W incandescent lamp and highlights the 100-degree lighting angle for broad coverage.

Image 4.2: Application scenarios. The floodlights are shown illuminating a house entrance, a garage, a sports court, and a patio, demonstrating their versatility for different outdoor spaces.
5. Maintenance
The GRIFEMA LED floodlights are designed for durability and require minimal maintenance.
- Cleaning: Periodically clean the surface of the floodlight with a soft, damp cloth. Do not use abrasive cleaners or solvents, as these can damage the finish or optical components. Ensure power is disconnected before cleaning.
- Inspection: Regularly inspect the wiring and mounting bracket for any signs of wear, damage, or loosening. Address any issues promptly to maintain safety and performance.
- Weather Resistance: The IP66 rating ensures protection against dust and water jets. No special weather-proofing maintenance is required beyond ensuring the housing remains intact.
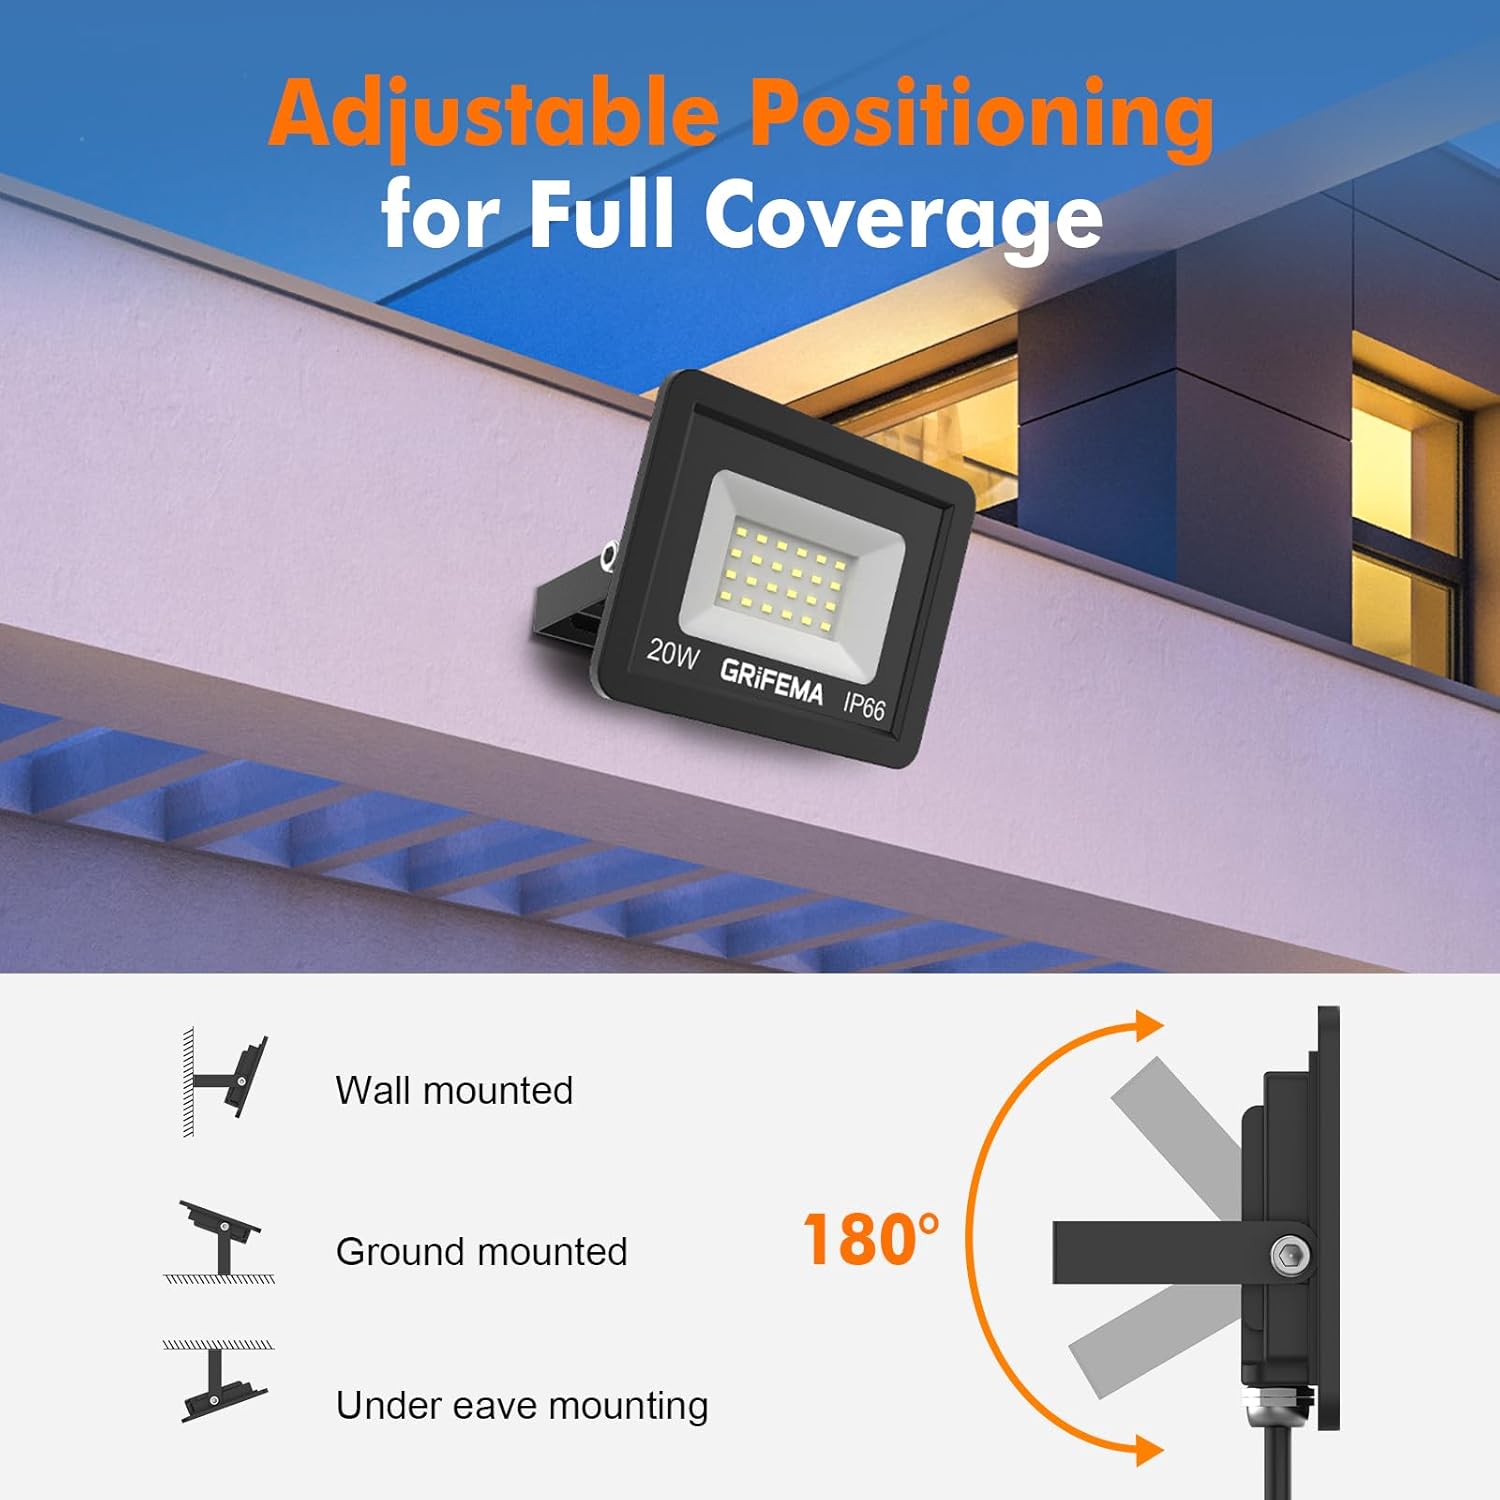
Image 5.1: IP66 waterproof and weather resistance. This image highlights the floodlight's ability to withstand rain, cold, heat, and wind, ensuring reliable performance in various weather conditions.

Image 5.2: Construction features. This image details the thickened PC material for durability, the slim design for efficient heat dissipation, and the waterproof cable, all contributing to the product's longevity.
6. Troubleshooting
If you encounter issues with your GRIFEMA LED floodlights, refer to the following common troubleshooting steps:
- Light Not Turning On:
- Check the power supply at the circuit breaker to ensure it is on.
- Verify all electrical connections are secure and correctly wired.
- Ensure the floodlight is receiving the correct voltage.
- Light is Dim or Flickering:
- Check for loose wiring connections.
- Ensure the power supply is stable and providing adequate voltage.
- Water Inside the Fixture:
- Although IP66 rated, improper installation or damage can compromise the seal. Disconnect power immediately and inspect for cracks or improperly sealed connections.
- Physical Damage: If the floodlight appears physically damaged, disconnect power and contact customer support or a qualified electrician for assessment.
If these steps do not resolve the issue, please contact GRIFEMA customer support for further assistance.
7. Specifications
| Feature | Specification |
|---|---|
| Model Number | GD401-2 |
| Power | 20W per unit |
| Luminous Flux | 2200LM per unit |
| Color Temperature | 6500K (Cool White) |
| Waterproof Rating | IP66 |
| Dimensions (L x W x H) | 12 x 2.2 x 9.3 cm |
| Weight | 400 grams |
| Material | Metal |
| Finish | Black matte |
| Lighting Angle | 100° |
| Energy Efficiency Class | E |
| EPREL Database Link | https://eprel.ec.europa.eu/qr/2025061 |

Image 7.1: Energy efficiency label. This label indicates the product's energy efficiency class is E, with a consumption of 20 kWh/1000h.
8. Warranty and Support
For warranty information, technical support, or any inquiries regarding your GRIFEMA LED floodlights, please refer to the purchase documentation or contact the seller directly. Specific warranty terms and conditions may vary by region and retailer.


