1. Safety Information
Read and understand all safety warnings and instructions before operating this pressure washer. Failure to follow these instructions may result in serious injury or property damage. Keep this manual for future reference.
General Safety Warnings:
- Flammable Fuels: Gasoline is highly flammable. Store fuel in an approved container in a well-ventilated area. Refuel in a well-ventilated outdoor area, away from sparks, open flames, or pilot lights. Do not smoke while refueling.
- High Pressure Spray: The pressure washer produces a high-pressure spray that can cause serious injury. Never direct the spray at people, pets, electrical devices, or the unit itself. Always wear appropriate eye protection (safety glasses) and protective clothing.
- Exhaust Fumes: Engine exhaust contains carbon monoxide, a colorless, odorless, poisonous gas. Operate the pressure washer only in well-ventilated outdoor areas. Never operate indoors or in enclosed spaces.
- Moving Parts: Keep hands, feet, and clothing away from moving parts such as the engine fan and belt.
- Hot Surfaces: The engine and pump can become very hot during operation. Avoid contact with hot surfaces to prevent burns.
- Electrical Safety: Ensure all electrical connections are dry and free from damage. Do not operate the pressure washer in standing water.
- Stability: Operate the pressure washer on a stable, level surface to prevent tipping.
- Children and Pets: Keep children and pets away from the operating area.
2. Product Overview
The Aceup Energy AWPG3400 is a gas-powered pressure washer designed for various cleaning tasks. Familiarize yourself with its components before assembly and operation.

Figure 2.1: Main components of the Aceup Energy AWPG3400 Gas Pressure Washer, including the engine, pump, frame, wheels, spray gun, high-pressure hose, various nozzles, foam cannon, and engine oil.
Included Accessories:

Figure 2.2: The box contains the pressure washer unit, spray gun, high-pressure hose, detergent hose, engine oil, foam cannon (1 L), and various tools for assembly and maintenance.
- Pressure Washer Unit: Main assembly with engine and pump.
- Spray Gun: Handheld device for directing the high-pressure spray.
- High-Pressure Hose: Connects the pump to the spray gun.
- Detergent Hose: For drawing cleaning solutions from a container.
- Nozzles: Various spray patterns for different cleaning tasks (0°, 15°, 25°, 40°, Soap).
- Foam Cannon (1 L): For applying detergent as a thick foam.
- Engine Oil: Initial supply for the engine.
- Tools: Wrenches and a nozzle cleaning tool.
3. Setup and Assembly
Follow these steps to assemble and prepare your pressure washer for first use.
3.1. Initial Assembly

Figure 3.1: Visual guide for connecting the spray gun, high-pressure hose, and foam cannon.
- Attach the Spray Wand: Connect the spray wand to the spray gun handle. Ensure it is securely tightened.
- Connect High-Pressure Hose: Attach one end of the high-pressure hose to the pump outlet on the pressure washer and the other end to the spray gun. Tighten all connections firmly to prevent leaks.
- Connect Water Supply: Attach a garden hose (not included) to the water inlet on the pump. Ensure the garden hose is free of kinks and has a minimum diameter of 5/8 inch. Turn on the water supply completely before starting the engine.
- Install Detergent Hose: If using detergent, connect the small detergent hose to the designated inlet on the pump. Place the other end into a container of pressure washer safe detergent.

Figure 3.2: Illustration of the detergent hose, high-pressure hose, and water supply connections to the pump.
3.2. Add Engine Oil
The engine is shipped without oil. You must add the provided engine oil before starting the unit. Refer to the engine manual for specific oil type and capacity if not using the included oil.
- Place the pressure washer on a level surface.
- Remove the oil fill cap/dipstick.
- Carefully pour the engine oil into the oil fill opening until it reaches the upper mark on the dipstick. Do not overfill.
- Replace the oil fill cap/dipstick securely.
3.3. Add Fuel
Use fresh, unleaded gasoline with an octane rating of 87 or higher. Do not use E85 or mixed fuels.
- Ensure the engine is off and cool.
- Remove the fuel cap.
- Fill the fuel tank slowly, leaving about 1 inch (2.5 cm) of space from the top to allow for fuel expansion.
- Replace the fuel cap securely. Wipe up any spilled fuel immediately.
4. Operating Instructions
Follow these steps for safe and effective operation of your pressure washer.
4.1. Starting the Engine

Figure 4.1: Step-by-step visual guide for starting the pressure washer engine.
- Check Oil Level: Ensure the engine oil level is correct.
- Check Fuel Level: Ensure there is sufficient fuel in the tank.
- Connect Water: Connect the garden hose to the water inlet and turn on the water supply completely. Squeeze the spray gun trigger to purge air from the pump and hose until a steady stream of water emerges.
- Set Choke: Move the choke lever to the "CHOKE" or "START" position (if the engine is cold).
- Set Fuel Valve: Turn the fuel valve to the "ON" position.
- Set Engine Switch: Turn the engine switch to the "ON" position.
- Pull Starter Cord: Grasp the starter handle and pull slowly until resistance is felt, then pull quickly and firmly. Repeat until the engine starts.
- Adjust Choke: Once the engine starts, gradually move the choke lever to the "RUN" or "OPEN" position.
- Allow to Warm Up: Let the engine run for a few moments to warm up before beginning cleaning.
4.2. Using Nozzles
Different nozzles provide various spray patterns for specific cleaning tasks. Always select the appropriate nozzle for the job.
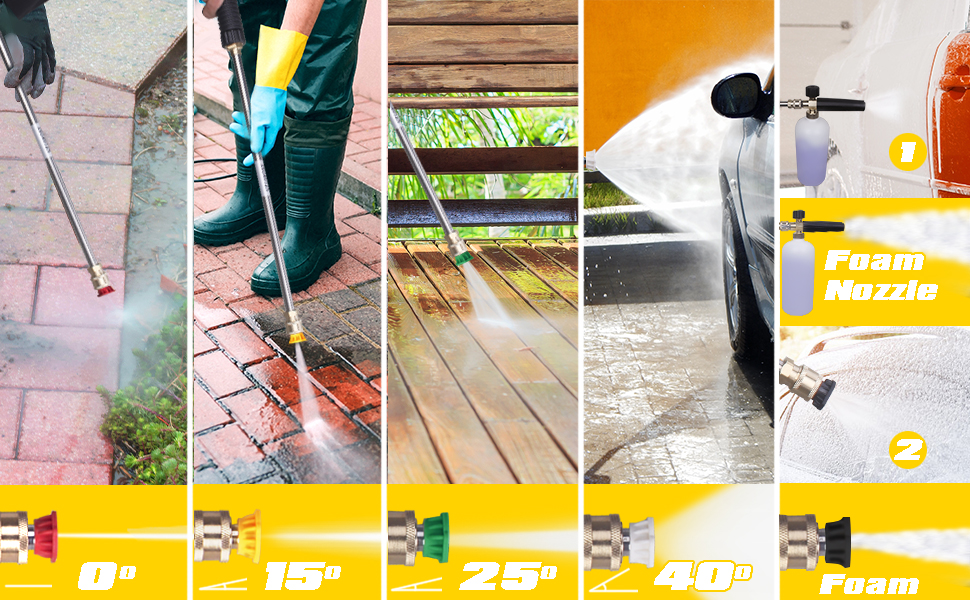
Figure 4.2: Visual representation of 0°, 15°, 25°, 40° spray patterns and foam application.
- Red (0°): Pin-point jet for intense cleaning of small, stubborn spots. Use with extreme caution.
- Yellow (15°): Narrow, high-pressure spray for aggressive cleaning of tough stains on hard surfaces.
- Green (25°): Medium-angle spray for general cleaning of most surfaces.
- White (40°): Wide-angle spray for gentle cleaning of delicate surfaces or large areas.
- Black (Soap/Detergent): Low-pressure spray for applying detergents.
To change nozzles, pull back the collar on the quick-connect fitting, insert the desired nozzle, and release the collar. Tug on the nozzle to ensure it is securely seated.
4.3. Using the Foam Cannon
The foam cannon allows for effective application of cleaning detergents as a thick foam.
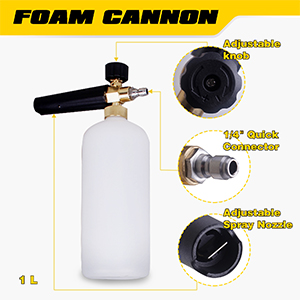
Figure 4.3: The foam cannon features an adjustable knob for foam thickness, a 1/4" quick connector, and an adjustable spray nozzle.
- Fill the foam cannon bottle with appropriate pressure washer detergent and water according to the detergent manufacturer's instructions.
- Attach the foam cannon to the quick-connect fitting on the spray wand.
- Adjust the top knob to control the foam thickness and the front nozzle for spray pattern.
- Squeeze the spray gun trigger to apply foam.
- After applying detergent, remove the foam cannon and replace it with a rinsing nozzle (e.g., 25° or 40°) to rinse the surface.
4.4. Shutting Down the Engine
- If using detergent, remove the detergent hose from the detergent container and place it in a bucket of clean water. Run the pressure washer for a few minutes to flush out any remaining detergent from the system.
- Turn the engine switch to the "OFF" position.
- Turn the fuel valve to the "OFF" position.
- Turn off the water supply.
- Squeeze the spray gun trigger to release any remaining pressure in the system.
- Disconnect the garden hose and high-pressure hose.
5. Maintenance
Regular maintenance ensures optimal performance and extends the life of your pressure washer. Always perform maintenance with the engine off and cool.
5.1. Engine Maintenance
- Oil Change: Change the engine oil after the first 5 hours of operation, then every 25-50 hours or annually, whichever comes first. Refer to the engine manual for detailed instructions.
- Air Filter: Check and clean the air filter every 25 hours or more frequently in dusty conditions. Replace if damaged.
- Spark Plug: Inspect the spark plug annually or every 100 hours. Clean or replace as needed.
5.2. Pump Maintenance
- Nozzle Cleaning: Use the provided nozzle cleaning tool to clear any blockages from the spray nozzles.
- Inlet Screen: Periodically check and clean the water inlet screen to prevent debris from entering the pump.
- Winterization: If storing the pressure washer in freezing temperatures, drain all water from the pump and hoses. Consider using a pump protector/antifreeze solution.
6. Troubleshooting
This section addresses common issues you might encounter. For problems not listed here, contact customer support.
| Problem | Possible Cause | Solution |
|---|---|---|
| Engine will not start | No fuel; Low oil level; Engine switch OFF; Choke incorrect; Spark plug issue. | Add fresh fuel; Fill oil to correct level; Turn engine switch ON; Adjust choke; Inspect/replace spark plug. |
| Low or no pressure | Water supply off or restricted; Clogged nozzle; Air in pump; Kinked hose. | Turn on water, check hose for kinks; Clean nozzle; Purge air by squeezing trigger; Straighten hose. |
| Engine runs rough | Stale fuel; Clogged air filter; Dirty spark plug. | Drain and refill with fresh fuel; Clean/replace air filter; Clean/replace spark plug. |
| Water leaks | Loose connections; Damaged O-rings. | Tighten all hose connections; Inspect and replace O-rings if damaged. |
7. Specifications
| Feature | Detail |
|---|---|
| Brand | Aceup Energy |
| Model Number | AWPG3400 |
| Maximum Pressure | 3400 PSI |
| Flow Rate | 2.6 GPM |
| Power Source | Gas Powered |
| Item Weight | 24.2 Kilograms |
| Hose Length | 7.3 Meters |
| Product Dimensions | 50.04 x 50.04 x 98.04 cm |
8. Warranty and Support
For warranty information and customer support, please refer to the documentation included with your purchase or visit the official Aceup Energy website. Keep your proof of purchase for warranty claims.
If you encounter any issues or have questions regarding the operation or maintenance of your Aceup Energy AWPG3400 Gas Pressure Washer, please contact Aceup Energy customer service for assistance.