1. Introduction
This manual provides detailed instructions for the assembly, installation, operation, and maintenance of your AWOL VISION 180-inch Fixed Frame Projector Screen (Model MW-180). This screen is designed to enhance your viewing experience with its high-quality matte white material, optimized for 4K/8K Ultra HD and Active 3D projection.
Key features include:
- 1.3 dB Peak Gain: Significantly improves picture quality, especially when paired with projectors like the LTV-2500.
- High-Tier PVC Matte White Material: Ensures optimal color reproduction and image clarity.
- 4K/8K and Active 3D Ready: Fully optimized for high-resolution and immersive 3D content.
- 170° Viewing Angle: Provides a wide viewing area for multiple viewers.
- Black Baked Design: Enhances contrast and minimizes light reflection.
- Ultra-Thin Frame: Maximizes the viewing area with a 0.4-inch narrow edge.
2. Safety Information
Please read all instructions carefully before assembly and installation. Keep this manual for future reference.
- Always wear the provided gloves during assembly to prevent fingerprints and damage to the screen surface.
- Ensure the installation area is clean and free from dust.
- Handle the screen material with care to avoid creases or wrinkles.
- Two people are recommended for safe and efficient installation, especially when mounting the frame onto the wall.
- Verify that wall brackets are securely fastened to a sturdy surface capable of supporting the screen's weight.
3. Package Contents
Before beginning assembly, please verify that all components are present and in good condition. Refer to the image below for a visual guide.

Image: Components of the AWOL VISION Projector Screen. Includes exterior frame, inner frame, screen, support rod, additional cloth, and fiberglass strips.
Main Components:
- Exterior Frame sections
- Inner Frame sections
- Screen with Box
- Support Rod
- Additional Cloth
- Fiberglass Strips
Accessories:
- M4 Screws
- Additional Screws
- Screwdriver
- Draw Springs
- Hooks
- Wall Brackets
- Mounting Pack
- Corner Protectors
- Gloves
- User Manual
- Adhesive Tapes
4. Setup & Installation
Follow these steps carefully for proper assembly and installation. Wearing the provided gloves is recommended throughout the process.
Video: Official installation guide for the AWOL VISION Matte White Projector Screen, demonstrating step-by-step assembly of the frame, screen, and wall mounting process.
4.1 Assemble Inner Frame
- Check Inner Frame Components: Verify all 6 inner frame sections and their labels. Ensure all labels are adhesive to prevent loss.
- Connect Long Frames: Use the provided connectors inside the 1-A metal rods to assemble the long frames. Tighten the screws.
- Connect Short Frames: Connect the short sides (1-C metal rods) with the long sides using corner connectors. Tighten screws, but leave some tightness for adjustment.
- Install Support Rod: Align the screw holes of the support rod with those in the middle of the long sides. Save some tightness while tightening M4 screws for the support rod. Adjust the support rod for accurate installation, then fully tighten all screws.
4.2 Confirm Mounting Area
- Mark Upper Brackets: Confirm and mark the highest reflection point corresponding to your projector's line. This point will be used for the Upper Wall Brackets, representing the highest hooking border of the inner frame.
- Drill Holes & Install Upper Brackets: Drill holes at the marked positions and install the Upper Wall Brackets.
- Test Upper Brackets: Mount the inner frame onto the installed Upper Wall Brackets to test fit.
- Calibrate Horizontal Level: Use a gradienter (level tool) to ensure the inner frame is perfectly horizontal.
- Mark Lower Brackets: Mark the positions for the Lower Wall Brackets, representing the lowest hooking border of the inner frame.
- Drill Holes & Install Lower Brackets: Drill holes and install the Lower Wall Brackets.
- Test Full Inner Frame Mounting: Test mounting the entire inner frame onto both Upper and Lower Wall Brackets. Insert the inner frame into the Lower Wall Brackets and pull up to ensure proper insertion for the Upper Wall Brackets.
4.3 Assemble Screen
- Prepare Screen: Put on gloves. Carefully unroll the screen onto a flat, clean floor, ensuring the black part faces up. Be cautious to avoid any creases on the fragile screen material.
- Position Inner Frame: Place the completed inner frame precisely on the center of the screen.
- Insert Fiberglass Strips: Insert the 4 short fiberglass strips into the 4 holes at each end inside the 2 long sides of the screen.
- Hook Tension Springs: Simultaneously hook tension springs for 2 vertices on the same long side, then proceed to the other long side. This prevents wrinkles caused by significant differences in protruded length. Do not cover the corresponding nuts for attaching the outer frame in the next step. Re-check whether tension springs are loose or lose elasticity, which may eventually cause wrinkles.
4.4 Assemble Outer Frames
- Check Outer Frame Strips: Verify the condition of the outer frame strips. If they are not in good condition, contact the after-sale service team.
- Align Frame Strips: Align the corresponding frame strips to the proper borders of the completed inner frame.
- Attach Short Sides: Align 10-C metal rods to the short sides. Save some tightness while tightening screws for the short sides.
- Attach Long Sides: Align 10-A & B metal rods to the long sides. Repeat the tightening process for the long sides.
- Install Corner Protectors: Complete the outer frame by attaching the 4 corner protectors.
4.5 Mount Screen onto Wall
- Insert Bottom Frame: Carefully insert the bottom inner frame of the screen into the Lower Wall Brackets.
- Hook Top Frame: Hook the top inner frame of the screen into the Upper Wall Brackets, holding steady to release.
- Caution: Please hold the screen steady to prevent harm to people during mounting.
5. Operating Instructions
Your AWOL VISION projector screen is designed for optimal performance with various projectors, including standard, short throw, and ultra-short throw models. Its 170° wide viewing angle ensures that everyone in the room can enjoy a clear and vivid view from any position.

Image: The screen's 170-degree wide viewing angle allows for immersive viewing from various positions.
For best results, ensure your projector is correctly aligned with the screen. The matte white surface and black baked design work together to deliver a high-contrast, immersive viewing experience for 4K/8K content and Active 3D.
6. Maintenance & Care
Maintaining your AWOL VISION projector screen is simple and ensures its longevity and optimal performance.
- Cleaning: The screen material is easy to clean. Gently wipe it with a lightly moistened soft cloth. No additional detergent is needed. Avoid harsh chemicals or abrasive materials that could damage the screen surface.
- Dust Removal: Use a soft, dry microfiber cloth to gently wipe away dust from the screen surface and frame.
- Storage: If the screen needs to be temporarily removed, ensure it is stored in a clean, dry place, protected from direct sunlight and extreme temperatures.
7. Troubleshooting
If you encounter any issues with your projector screen, please refer to the following common solutions:
- Wrinkles on Screen: If wrinkles appear after initial setup, release and re-install the tension springs. Ensure the inner frame is perfectly centered on the screen before hooking the springs. Verify that all tension springs are properly hooked and have adequate elasticity.
- Uneven Image: Check the horizontal level of the installed screen using a gradienter. Adjust the wall brackets if necessary to ensure the screen is perfectly level.
- Loose Frame: Ensure all screws on the inner and outer frames, especially the corner connectors and support rod screws, are fully tightened.
- Difficulty Mounting: Re-check the measurements and alignment of the wall brackets. Ensure the lower frame is inserted correctly before attempting to hook the upper frame.
If problems persist, please contact AWOL VISION customer support for assistance.
8. Specifications
| Feature | Specification |
|---|---|
| Model Number | MW-180 |
| Display Dimensions | 180 inches (diagonal) |
| Material | Polyvinyl Chloride (PVC) |
| Screen Surface Description | Matte White |
| Mounting Type | Wall Mount |
| Item Weight | 57.9 pounds |
| Manufacturer | AWOL VISION |
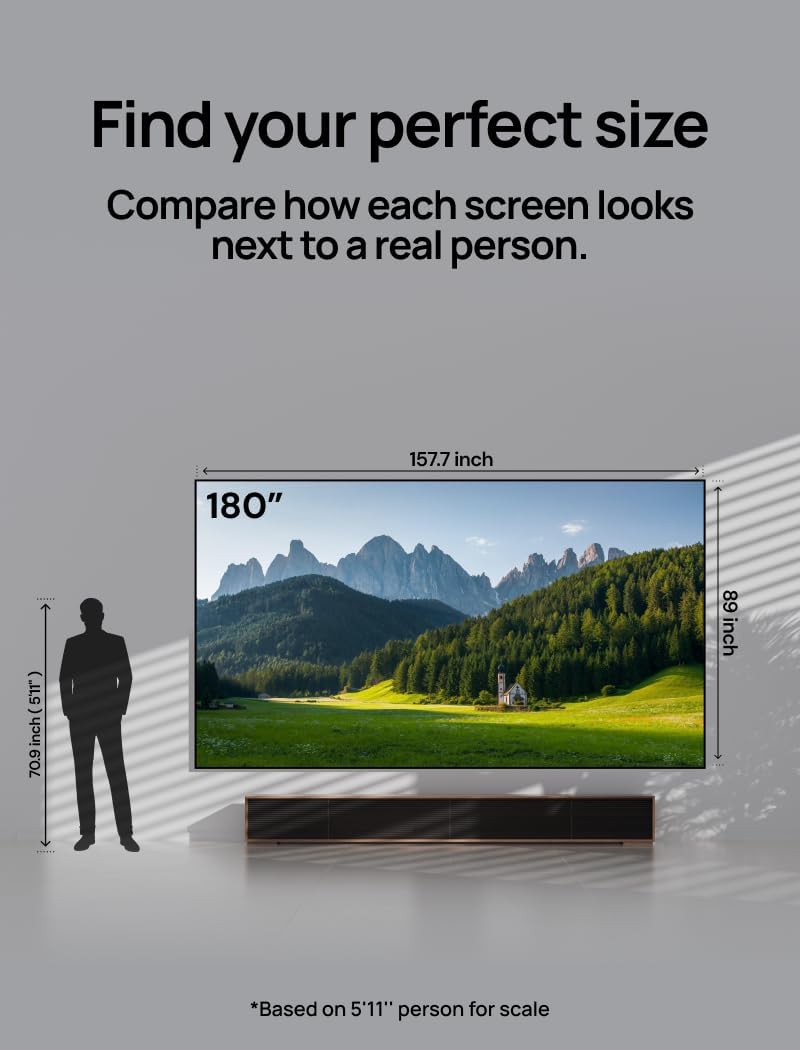
Image: Dimensions of the 180-inch projector screen.
9. Warranty & Support
AWOL VISION is committed to providing excellent customer service and product reliability.
- 30-Day Price Protection: Ensures you get the best value for your purchase.
- 2 Years Product Support: Comprehensive support for two years from the date of purchase.
Contact Information:
- Phone / WhatsApp: +1 (888) 891-6866
- Email: support@awolvision.com
For additional information or to explore other AWOL VISION products, please visit the AWOL VISION Store.


