1. Introduction
This manual provides detailed instructions for the installation, operation, and maintenance of your MAIMEIMI Universal Motorcycle Digital Speedometer. Please read this manual thoroughly before use to ensure proper functionality and safety.
2. Product Overview
The MAIMEIMI Universal Motorcycle Digital Speedometer is a multi-functional gauge cluster designed for motorcycles. It integrates several essential functions into a single, compact unit, providing clear digital readouts for various parameters.
Key Features:
- Integrated Display: Combines speedometer, tachometer, and gear indicator.
- Comprehensive Data: Displays oil level, steering indicators, and mileage (ODO/TRIP).
- Universal Compatibility: Adjustable for various tire sizes (8-22 inch wheels) and compatible with 2-stroke and 4-stroke motorcycles (1, 2, and 4 cylinders).
- Waterproof Design: Constructed from high-quality, rugged ABS material for durability in various weather conditions.
- Clear LCD Screen: Provides excellent visibility for data reading day or night.
Package Contents:
- 1 x Digital Speedometer Unit
- 1 x Speed Sensor Cable
- 2 x Magnets

Image 2.1: The MAIMEIMI Universal Motorcycle Digital Speedometer unit with its speed sensor cable and magnets.

Image 2.2: Labeled interface display showing speed, unit, mileage, gear, voltage/fuel, engine fault light, and indicators.
3. Specifications
| Product Dimensions | 6.33 x 1.4 x 1.81 inches |
| Item Weight | 0.42 Pounds (6.72 ounces) |
| Material | Metal, Plastic (ABS) |
| Operating Voltage | 9-16V |
| Wheel Size Compatibility | 8-22 inches (adjustable) |
| Engine Type Compatibility | 2-stroke and 4-stroke (1, 2, 4 cylinders) |
| RPM Functionality | Works with carburetor motors; does not work with Electric Fuel Injection (EFI) engines. |
4. Setup and Installation
Careful installation is crucial for the correct operation of the speedometer. It is recommended that installation be performed by a qualified technician if you are unfamiliar with motorcycle electrical systems.
4.1 Wiring Diagram
Refer to the following diagram for proper wiring connections. Ensure all connections are secure and insulated.

Image 4.1: Wiring connections for the speedometer unit and speed sensor.
4.2 Speed Sensor Installation
- Mount the speed sensor cable securely near the wheel.
- Attach the two provided magnets to the brake disc, ensuring they are positioned 180 degrees apart. This spacing is critical for accurate speed readings.
- Ensure the sensor is aligned with the magnets and has a consistent, small gap for reliable detection.
4.3 Initial Power-Up and Wheel Size Adjustment
After wiring, turn on the ignition. The speedometer is adjustable for various wheel sizes (8-22 inches). Refer to the 'Parameter Settings' section for instructions on how to configure the tire circumference.

Image 4.2: Product dimensions for installation planning.
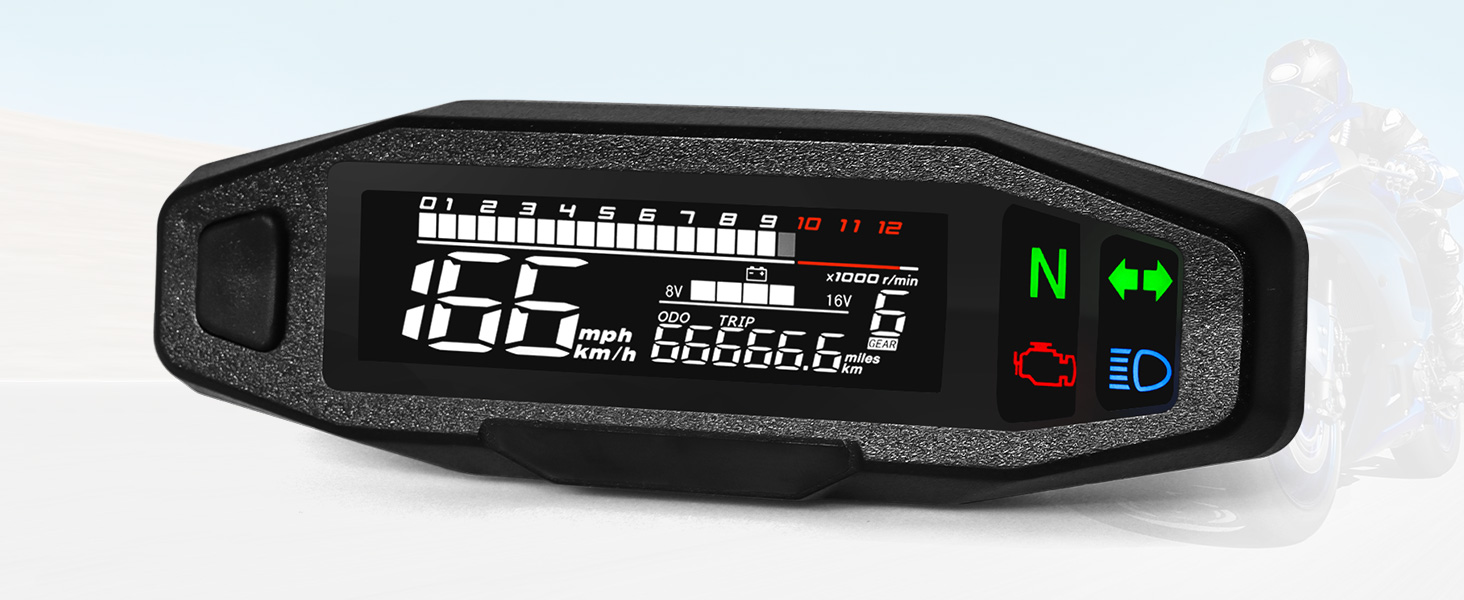
Image 4.3: Examples of compatible motorcycle types.
5. Operating Instructions
The speedometer features a single button for most operations and settings.
5.1 Operating Interface
- Short Press: Switch between ODO (total mileage) and TRIP (trip mileage).
- Long Press in ODO Mode: Switch between metric (km/h) and imperial (mph) units for speed.
- Long Press in TRIP Mode: Reset the trip mileage.
5.2 Background Parameter Settings
To access advanced settings:
- Press and hold the button while turning on the ignition switch. Keep it pressed for 5 seconds.
- The screen will display "SETUP". Release the button.
- Short Press: Enter the background parameter settings.
- Speed Sensor Magnet Number Setting: The interface "E - 2" will flash (factory setting is 2 magnets). Short press to increase the number by 1 (1 to 9). Long press to save and switch to the next parameter.
- Tire Circumference Setting: The interface will jump to "C - 1902" and flash (factory set tire circumference is 1902 mm). Short press to increase the value. Long press to move the cursor. After setting the fourth digit, long press to switch to the next parameter.
- Engine Stroke Setting: The interface "IP" will flash (factory setting is 1). Short press to switch between 1 - 4.
- After completing all parameter settings, long press the button to exit the parameter setting interface.
If there is no operation on the parameter setting interface for 20 seconds, it will automatically exit and return to the operating interface.
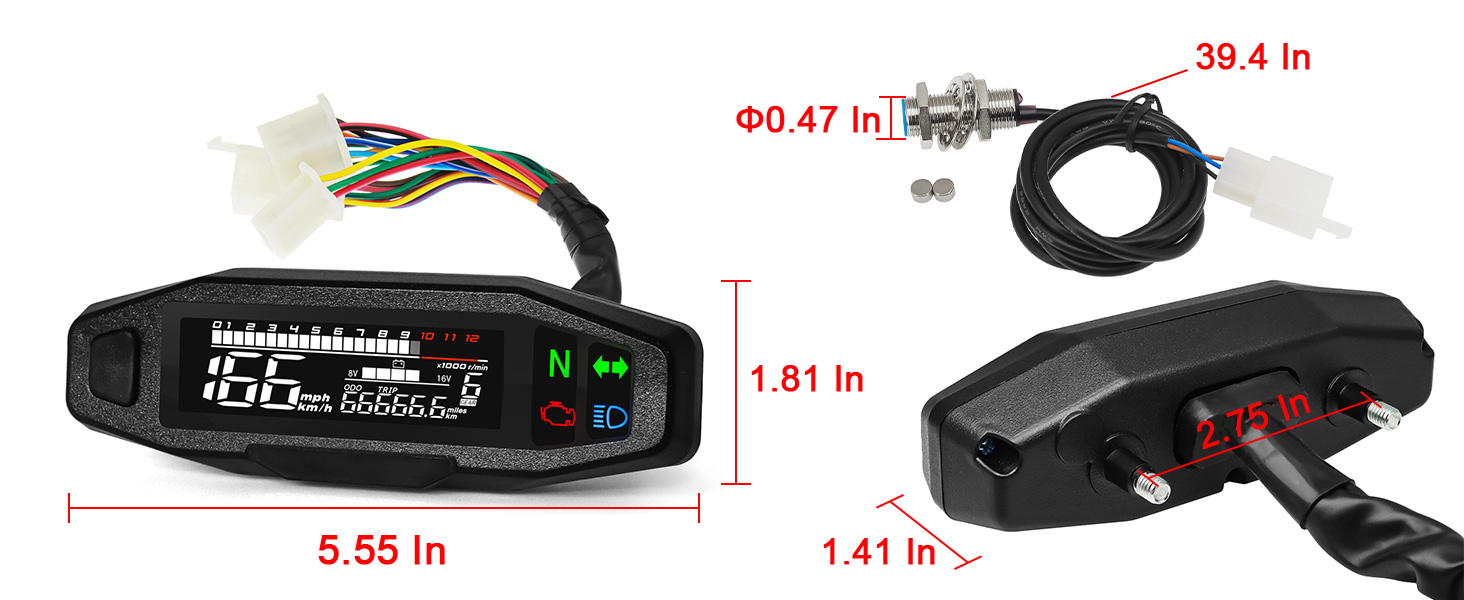
Image 5.1: Detailed instructions for parameter settings.
6. Maintenance
The MAIMEIMI Digital Speedometer is designed for durability and minimal maintenance.
6.1 Waterproof Design
The unit features a waterproof design, allowing normal operation in rainy conditions. However, avoid prolonged submersion or high-pressure water jets directly on the unit.

Image 6.1: The speedometer's waterproof capability.
6.2 General Care
- Clean the screen and housing with a soft, damp cloth. Avoid abrasive cleaners.
- Regularly check wiring connections for security and signs of wear.

Image 6.2: Display visibility in varying light conditions.
7. Troubleshooting
7.1 Common Issues
- RPM not working: The RPM function is designed for carburetor motors and is not compatible with Electric Fuel Injection (EFI) engines. Verify your engine type.
- Inaccurate Speed Reading: Check the speed sensor and magnet placement. Ensure magnets are 180 degrees apart and the sensor gap is consistent. Verify the tire circumference setting in the parameter menu.
- No Display/Intermittent Power: Check all wiring connections according to the diagram in Section 4.1. Ensure the operating voltage is within the 9-16V range.
7.2 Reset Procedure
The unit includes a reset function for mileage. Note that once a reset is initiated, it cannot be undone.
- Press and hold the button while turning on the ignition switch and keep it pressed for 5 seconds.
- The screen will display "SETUP". Release the button.
- Long Press: Enter the reset procedure.
- Short Press: This will reduce the total mileage by 200 kilometers. The number of resets will increase by 1.
- Long Press: Exit the reset procedure.
There are a total of three reset opportunities. If the total mileage is less than 200 kilometers, it will be directly reset. If it exceeds 200 kilometers, each press will reduce it by 200 kilometers.
If there is no action on the setting parameter buttons for 20 seconds, the system will automatically exit.
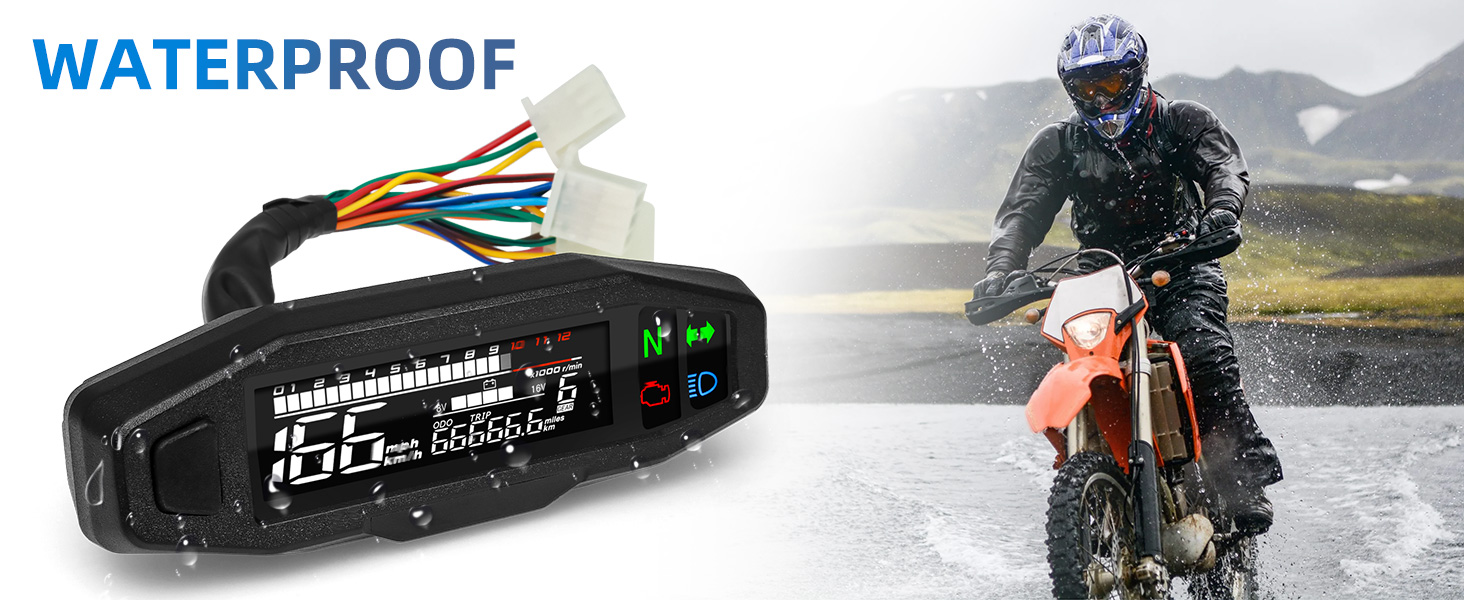
Image 7.1: Detailed instructions for the reset procedure.
8. Warranty and Support
For warranty information and technical support, please contact the seller or manufacturer directly. Keep your purchase receipt as proof of purchase.


